
There is a particular kind of paranoia I think every cloud engineer should have: “Okay, I locked everything down. But how do I know nobody is going to come along and change the rules?”
Because securing a network is only half the job.
You can spend an afternoon tightening security groups, restricting network ACLs, hiding workloads in private subnets, and feeling very proud of yourself, then someone changes a firewall rule.
AWS records the change.
And you have absolutely no idea it happened unless you go looking for it.
That was the problem I wanted to explore in this project.
That took me from basic VPC networking into Security Groups, Network ACLs, CloudTrail, CloudWatch, SNS, and eventually a little bit of threat detection.
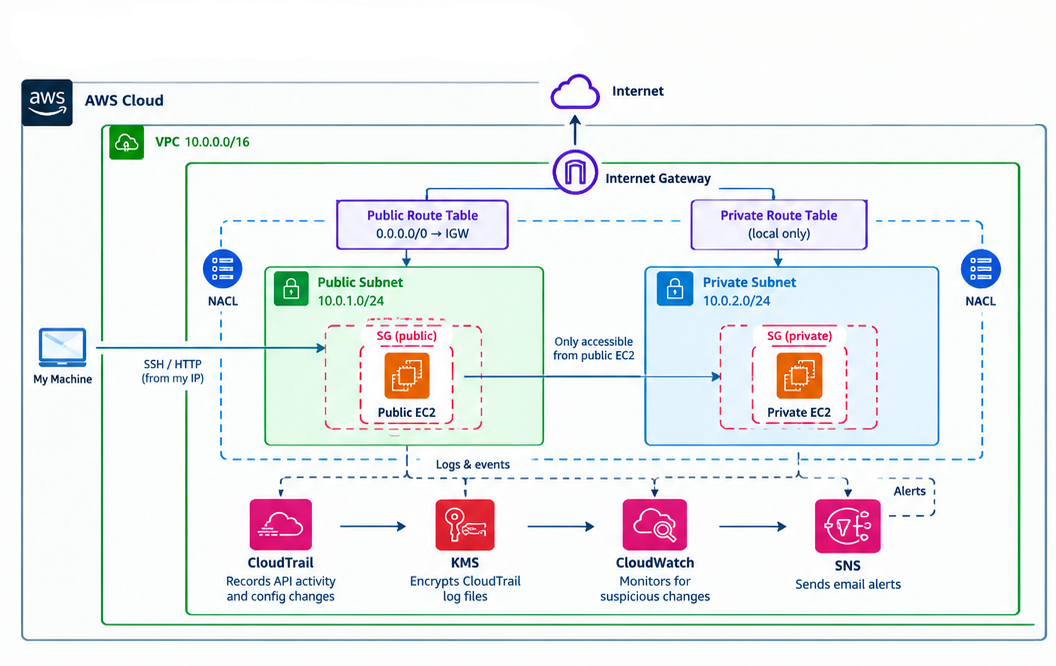
By the end, I had built a VPC where:
- A public EC2 instance could be reached over SSH and HTTP from my IP.
- A private EC2 instance could only be reached through the public instance.
- Security Groups controlled instance-level traffic.
- Network ACLs added another layer of subnet-level restrictions.
- CloudTrail recorded changes to my network controls.
- CloudWatch detected those changes.
- KMS encrypted the CloudTrail log files using an AWS KMS key.
- SNS sent me an email when something suspicious happened.
Basically: lock the doors, add a security camera, then make the camera text me when someone touches the locks.
1. Starting With My Two-Tier AWS Network
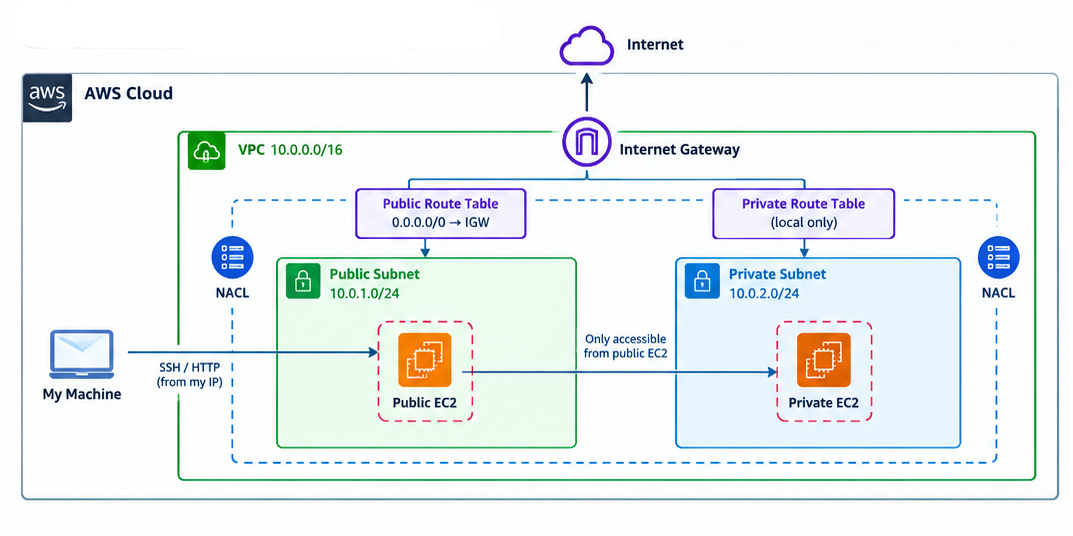
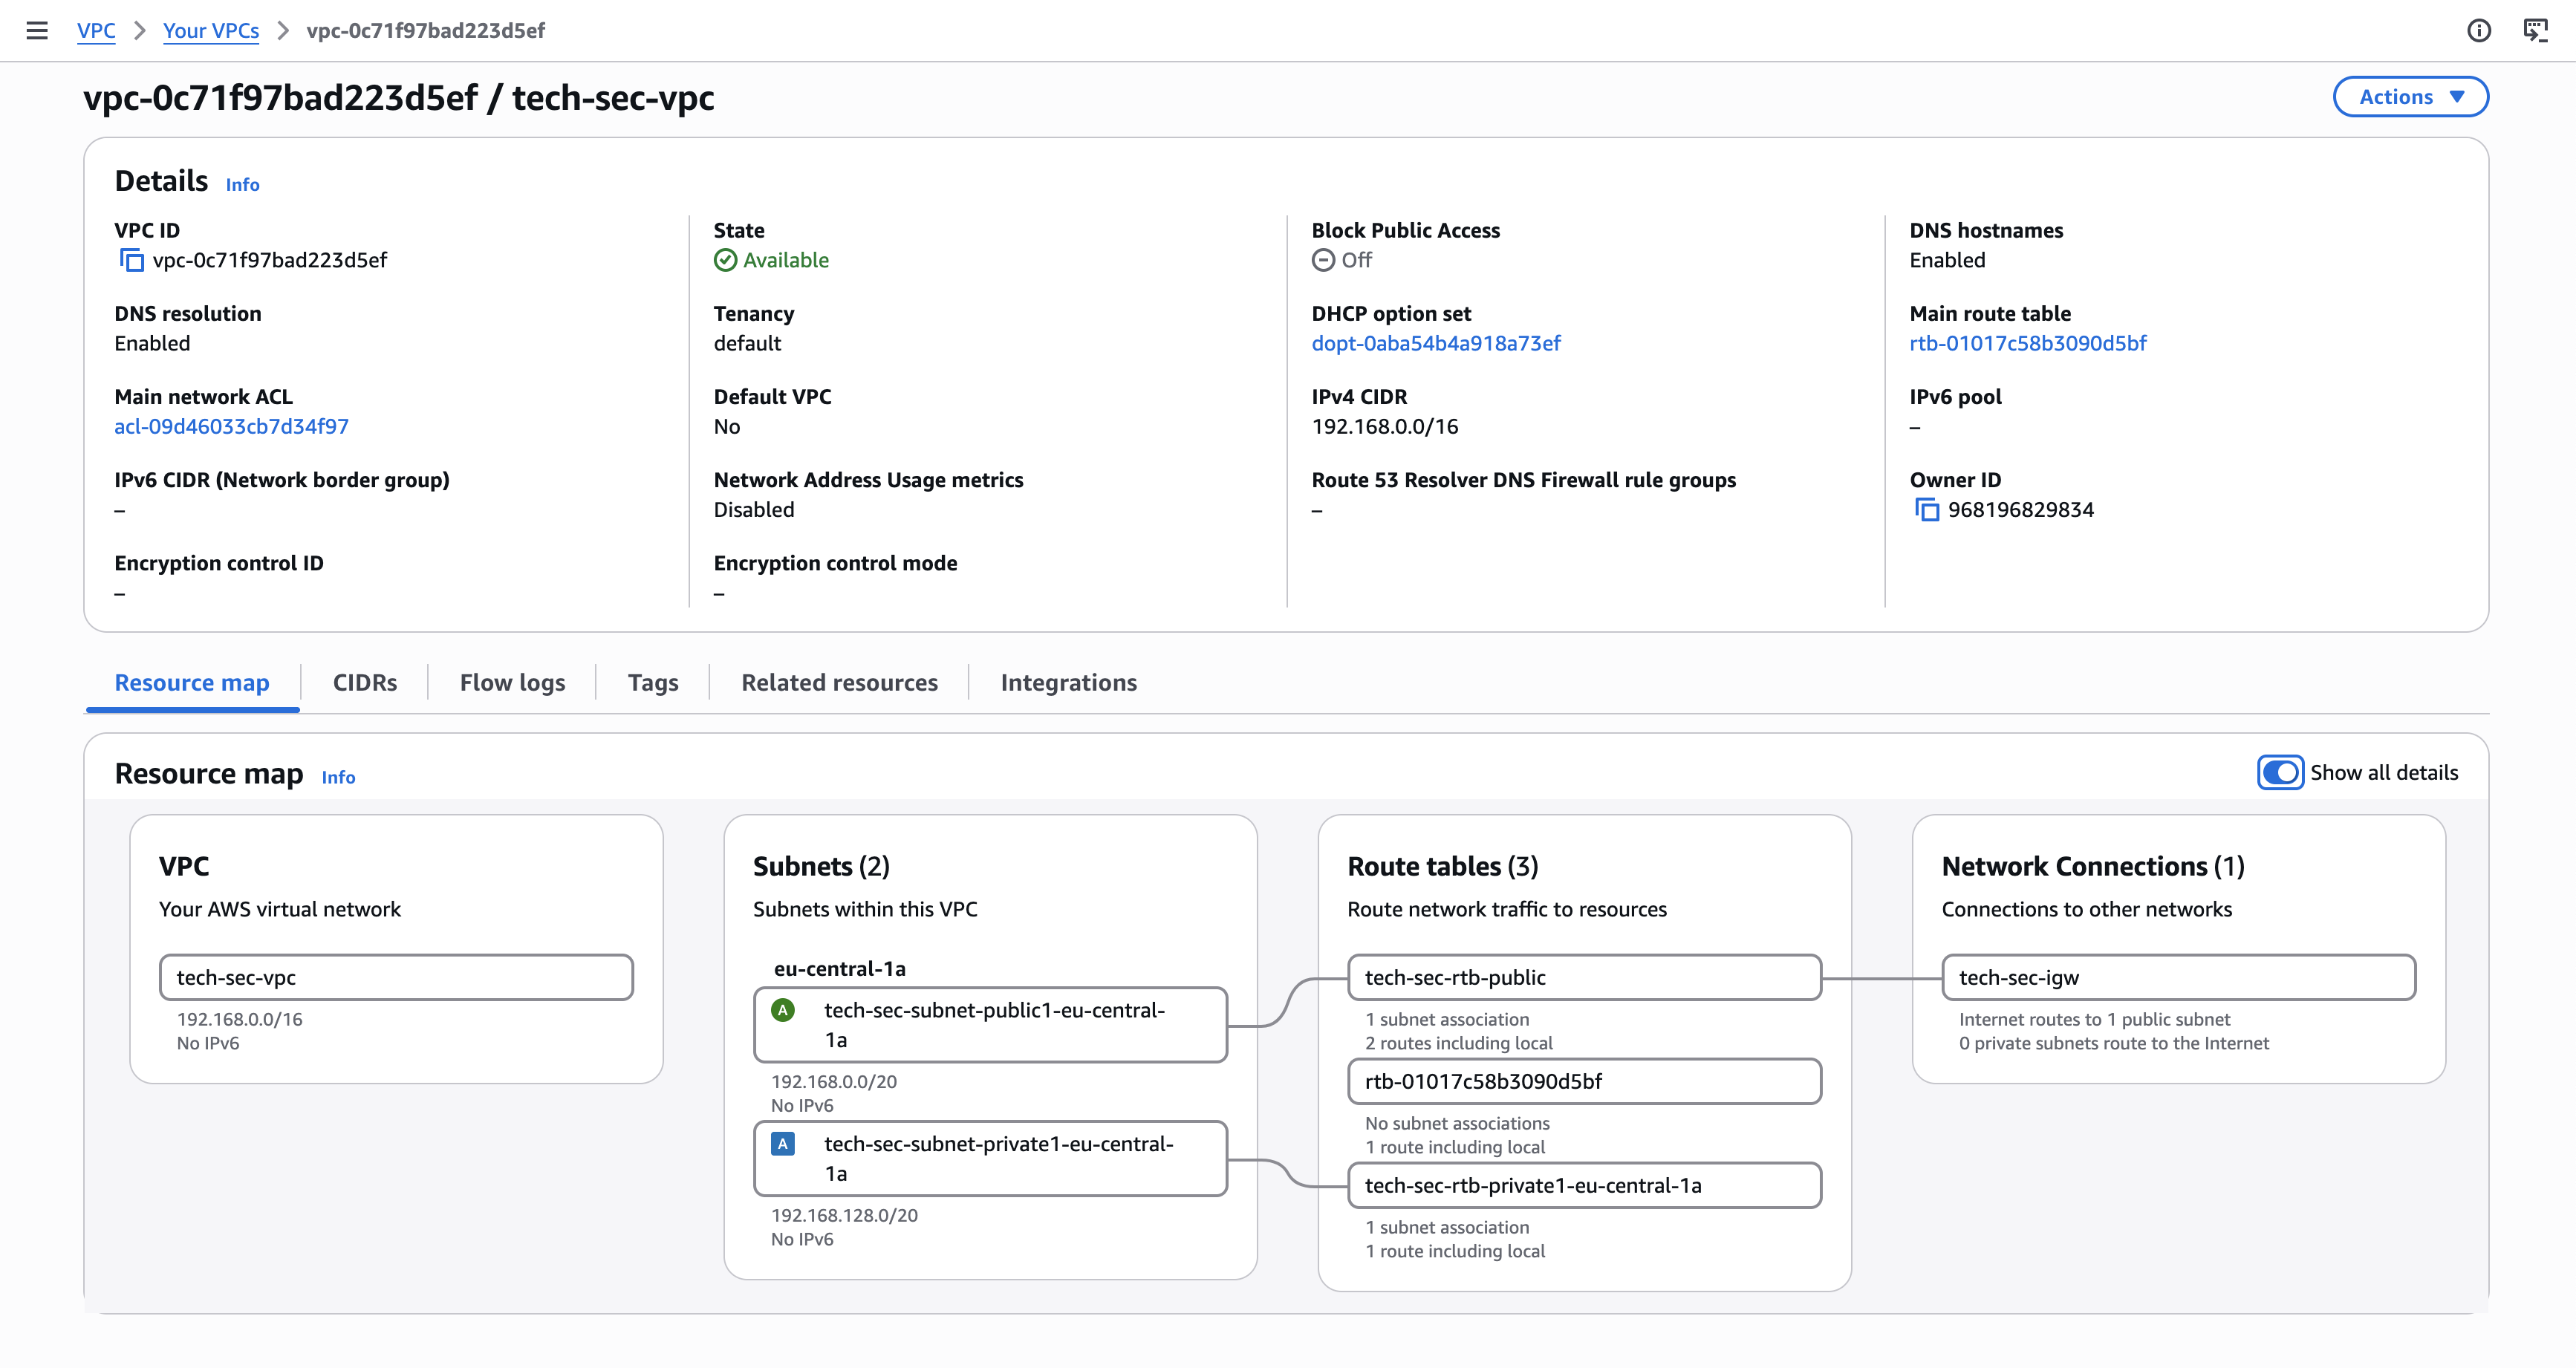
I started with a simple VPC containing:
- 1 VPC
- 1 public subnet
- 1 private subnet
- 1 route table for each subnet
- 1 Internet Gateway
- Custom Network ACLs
- Custom Security Groups
The idea was to create two different network zones.
The public subnet would contain an EC2 instance that could receive traffic from my machine.
The private subnet would contain another EC2 instance that shouldn’t be directly reachable from the internet.
The distinction between the two comes down to routing.
A subnet is considered public when its associated route table contains a route to an Internet Gateway. A private subnet does not have a route directly to an Internet Gateway.
In my setup, that meant the public subnet had a route to the Internet Gateway, while the private subnet only had its local VPC route.
So the architecture looked roughly like this:
No direct internet access to the private instance.
No random traffic wandering into my network because I forgot to remove a default rule.
At least, that was the plan.
2. Security Groups: First Layer of Defense
a) EC2 instance setup
I launched two EC2 instances. One lived in the public subnet and the other lived in the private subnet.
I used Nginx on the instances so I could have something tangible to test connectivity against. For the public instance, I configured Nginx to return the instance’s public IP:
#!/bin/bash

dnf update -y
dnf install -y nginx

PUBLIC_IP=$(curl -s http://checkip.amazonaws.com)

cat > /usr/share/nginx/html/index.html <<EOF
<!DOCTYPE html>
<html>
<head>
    <title>EC2 Instance</title>
</head>
<body>
    <h1>Hello from the ${PUBLIC_IP} address</h1>
</body>
</html>
EOF

systemctl start nginx
systemctl enable nginx
That gave me a very simple way to confirm that HTTP traffic was actually reaching the intended EC2 instance.
b) Security Group Lockdown
Security groups are my first layer of traffic control.
Unlike NACLs, security groups are stateful. If an allowed connection is established, the return traffic is automatically allowed.
I started by removing unnecessary access and defining only the traffic paths I actually needed.
i. Public EC2
The public EC2 security group allows:
- SSH from my IP address
- HTTP from my IP address
That means I can access the web server and SSH into the machine from my own machine, but I am not opening those ports to the entire internet.
This is one of those security rules that sounds incredibly obvious until you see how many tutorials casually use 0.0.0.0/0 for everything.
Please do not give the entire internet SSH access to your EC2 instance just because the AWS console makes it very easy.
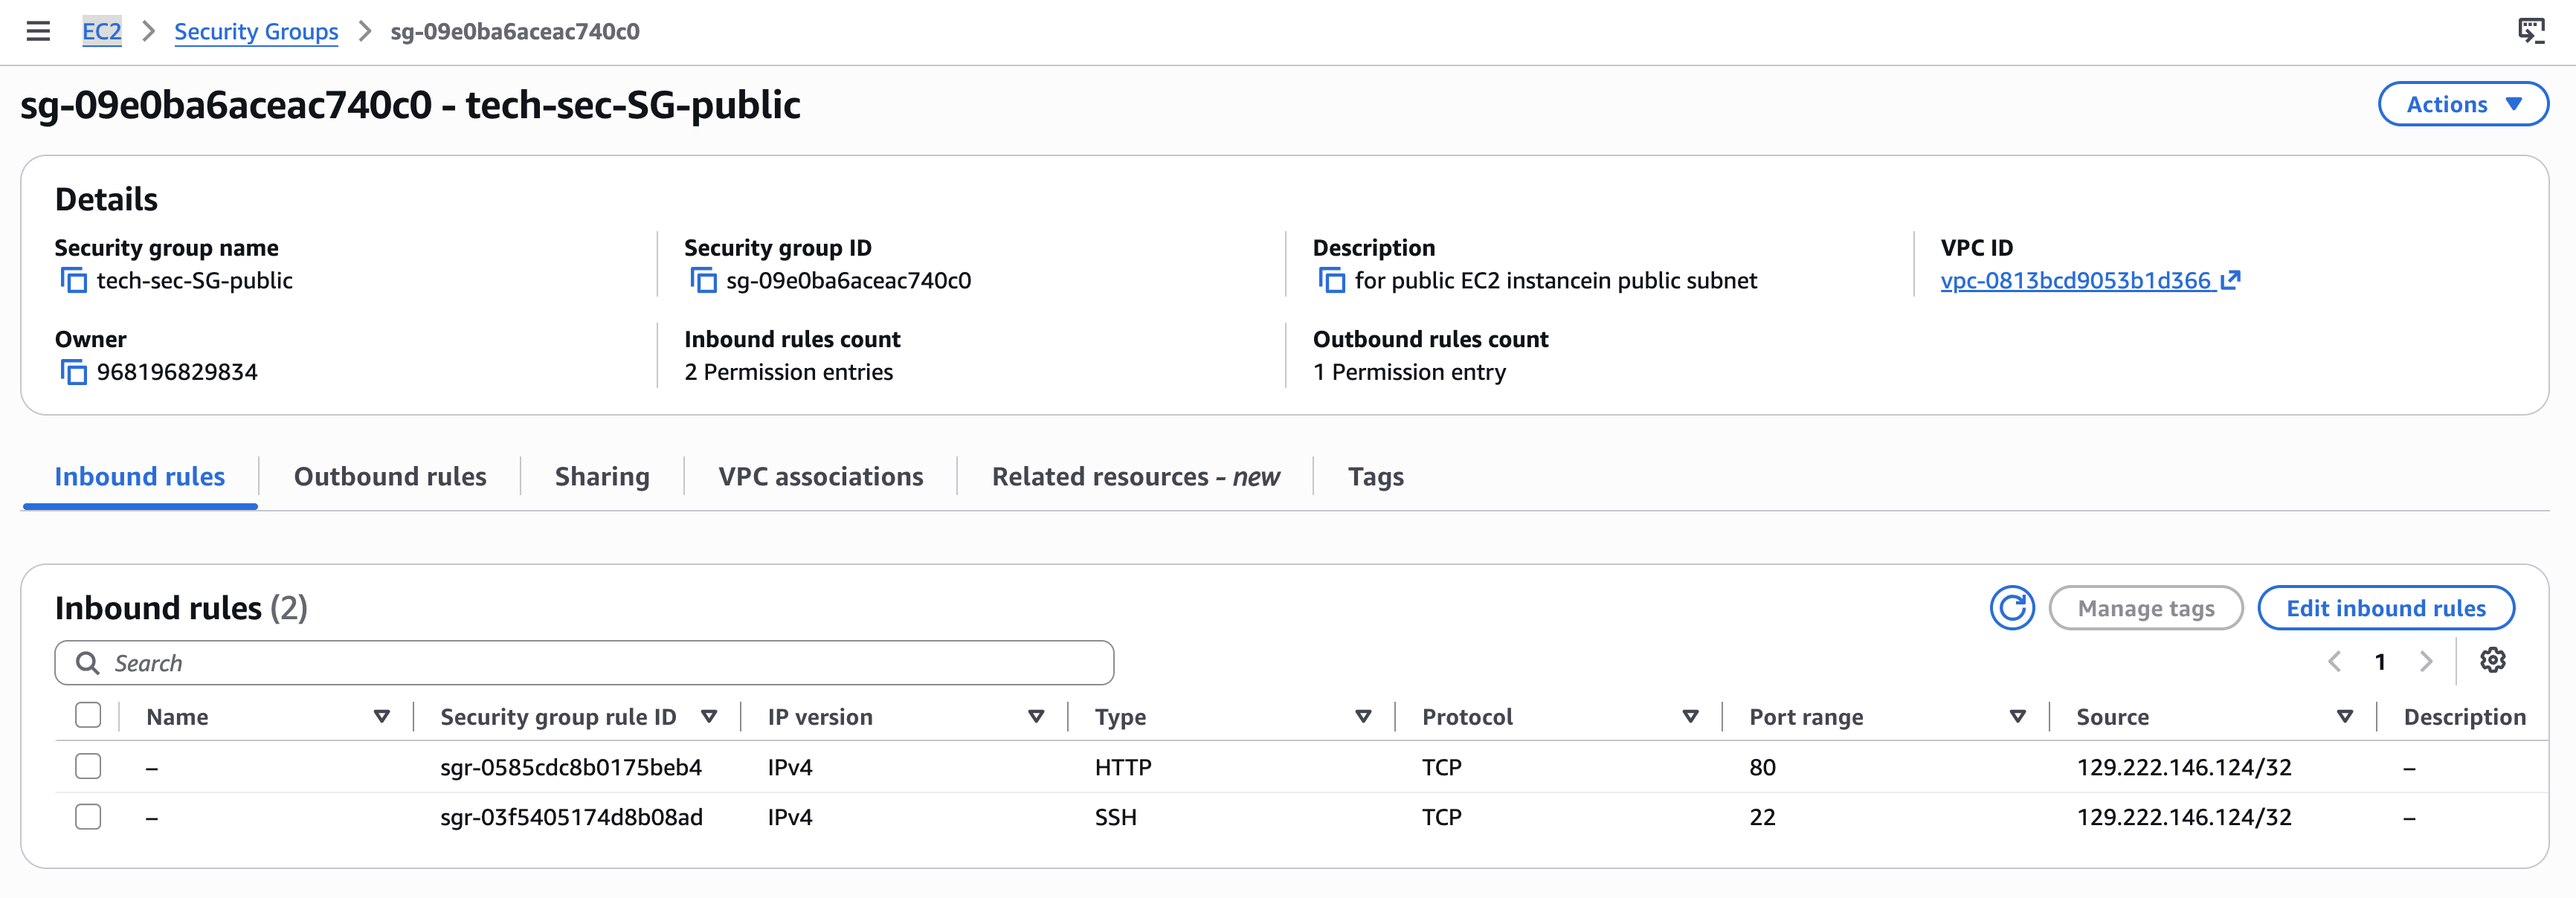
My outbound rules are also restricted so that the public EC2 can initiate SSH connections toward the private EC2.
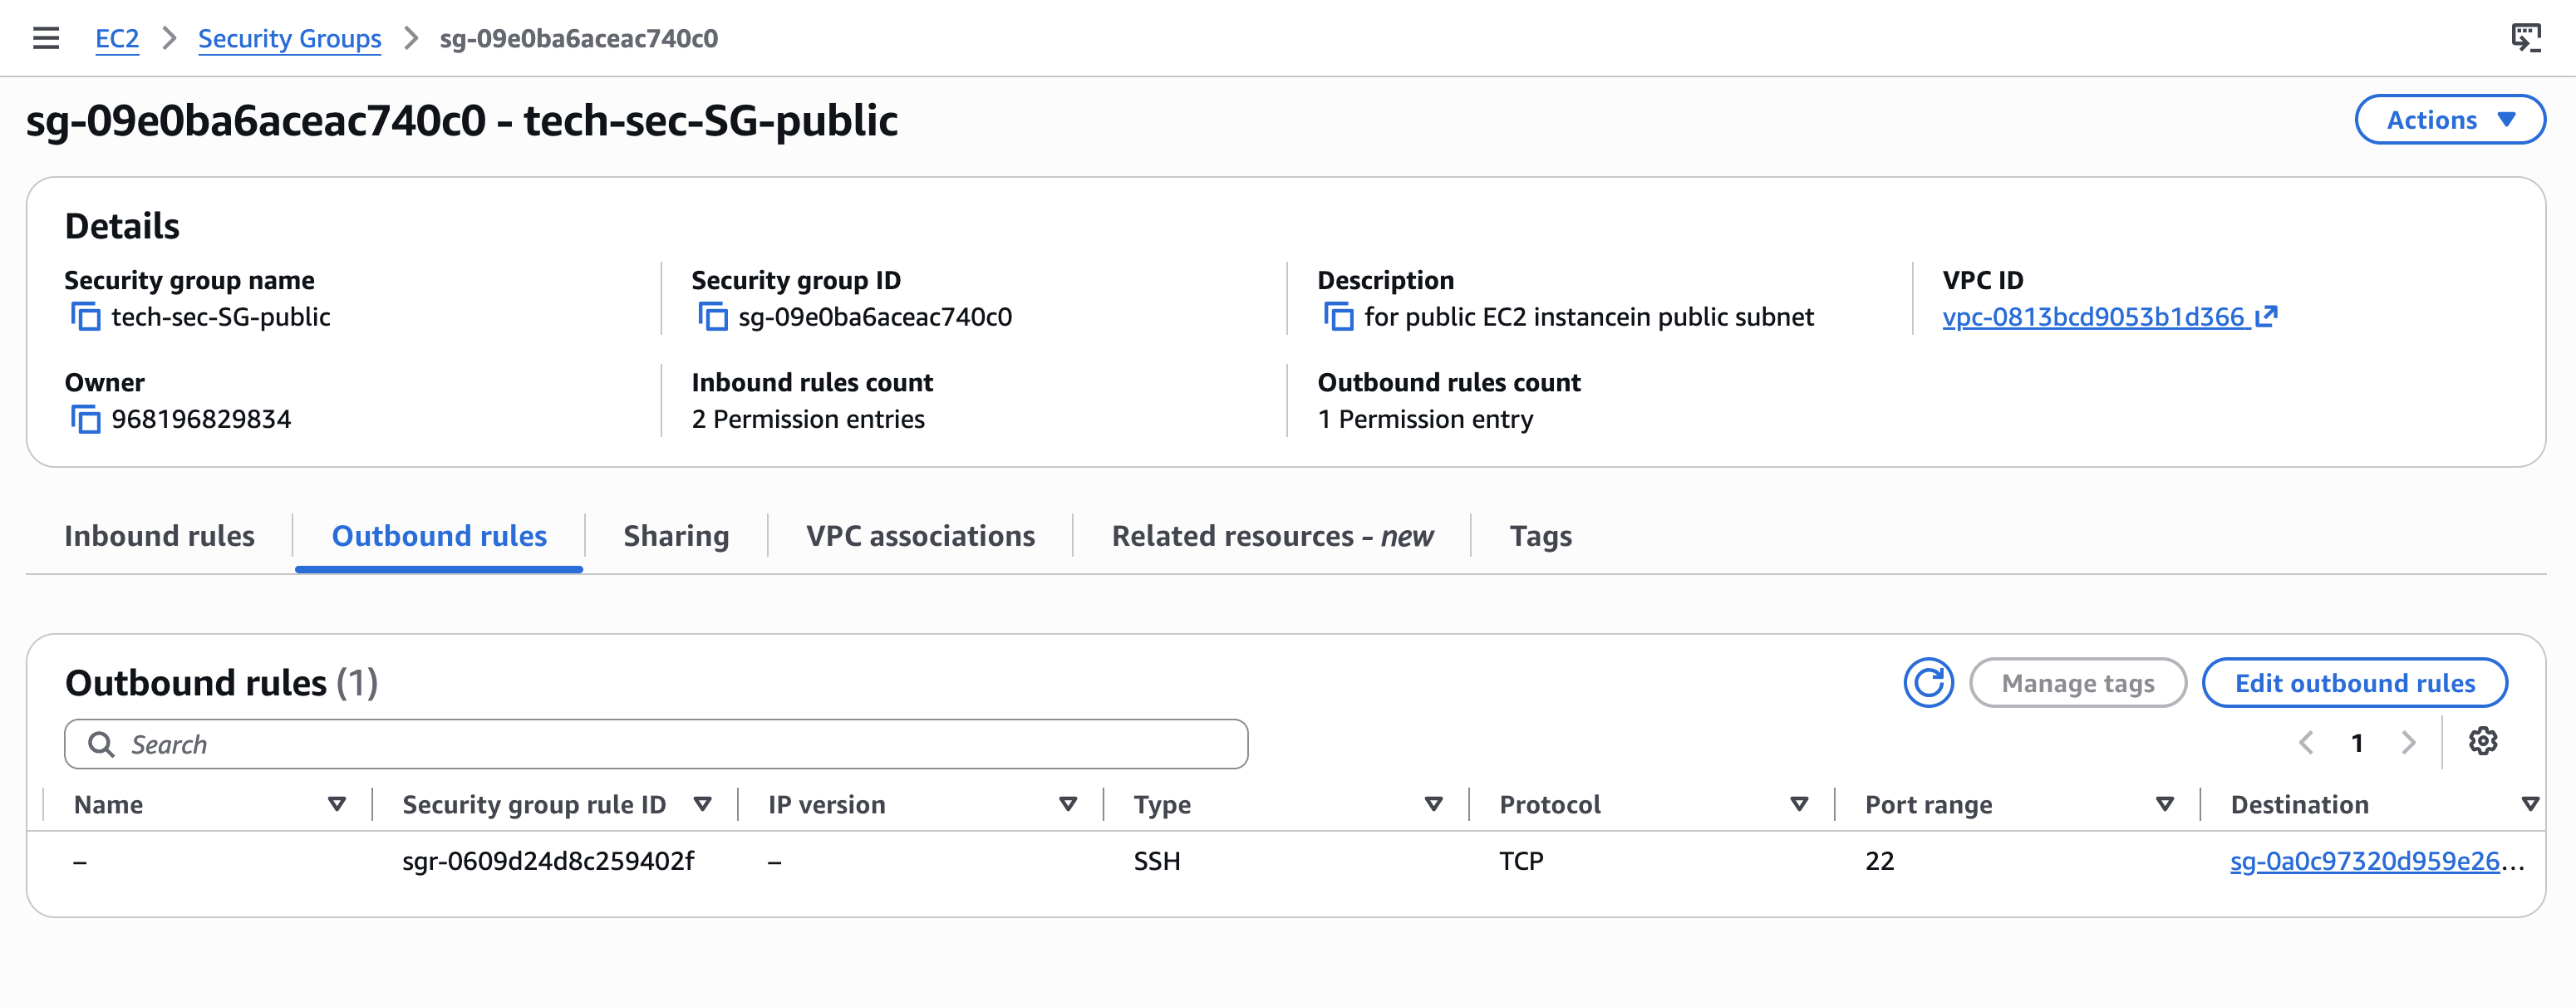
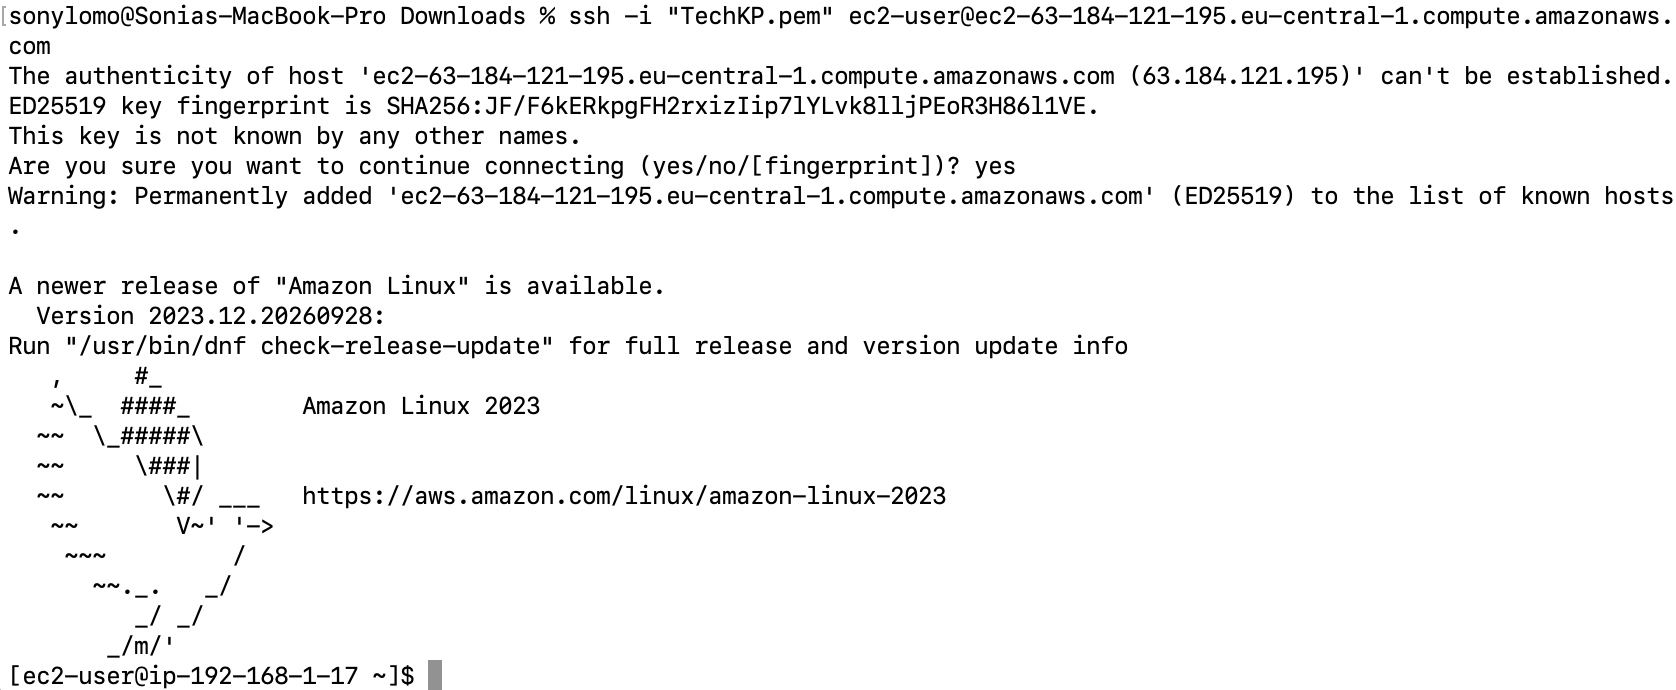
I still have access to SSH and HTTP from my IP:

ii. Private EC2
The private EC2 is even more restrictive. Its security group allows inbound SSH traffic from the public EC2’s security group.
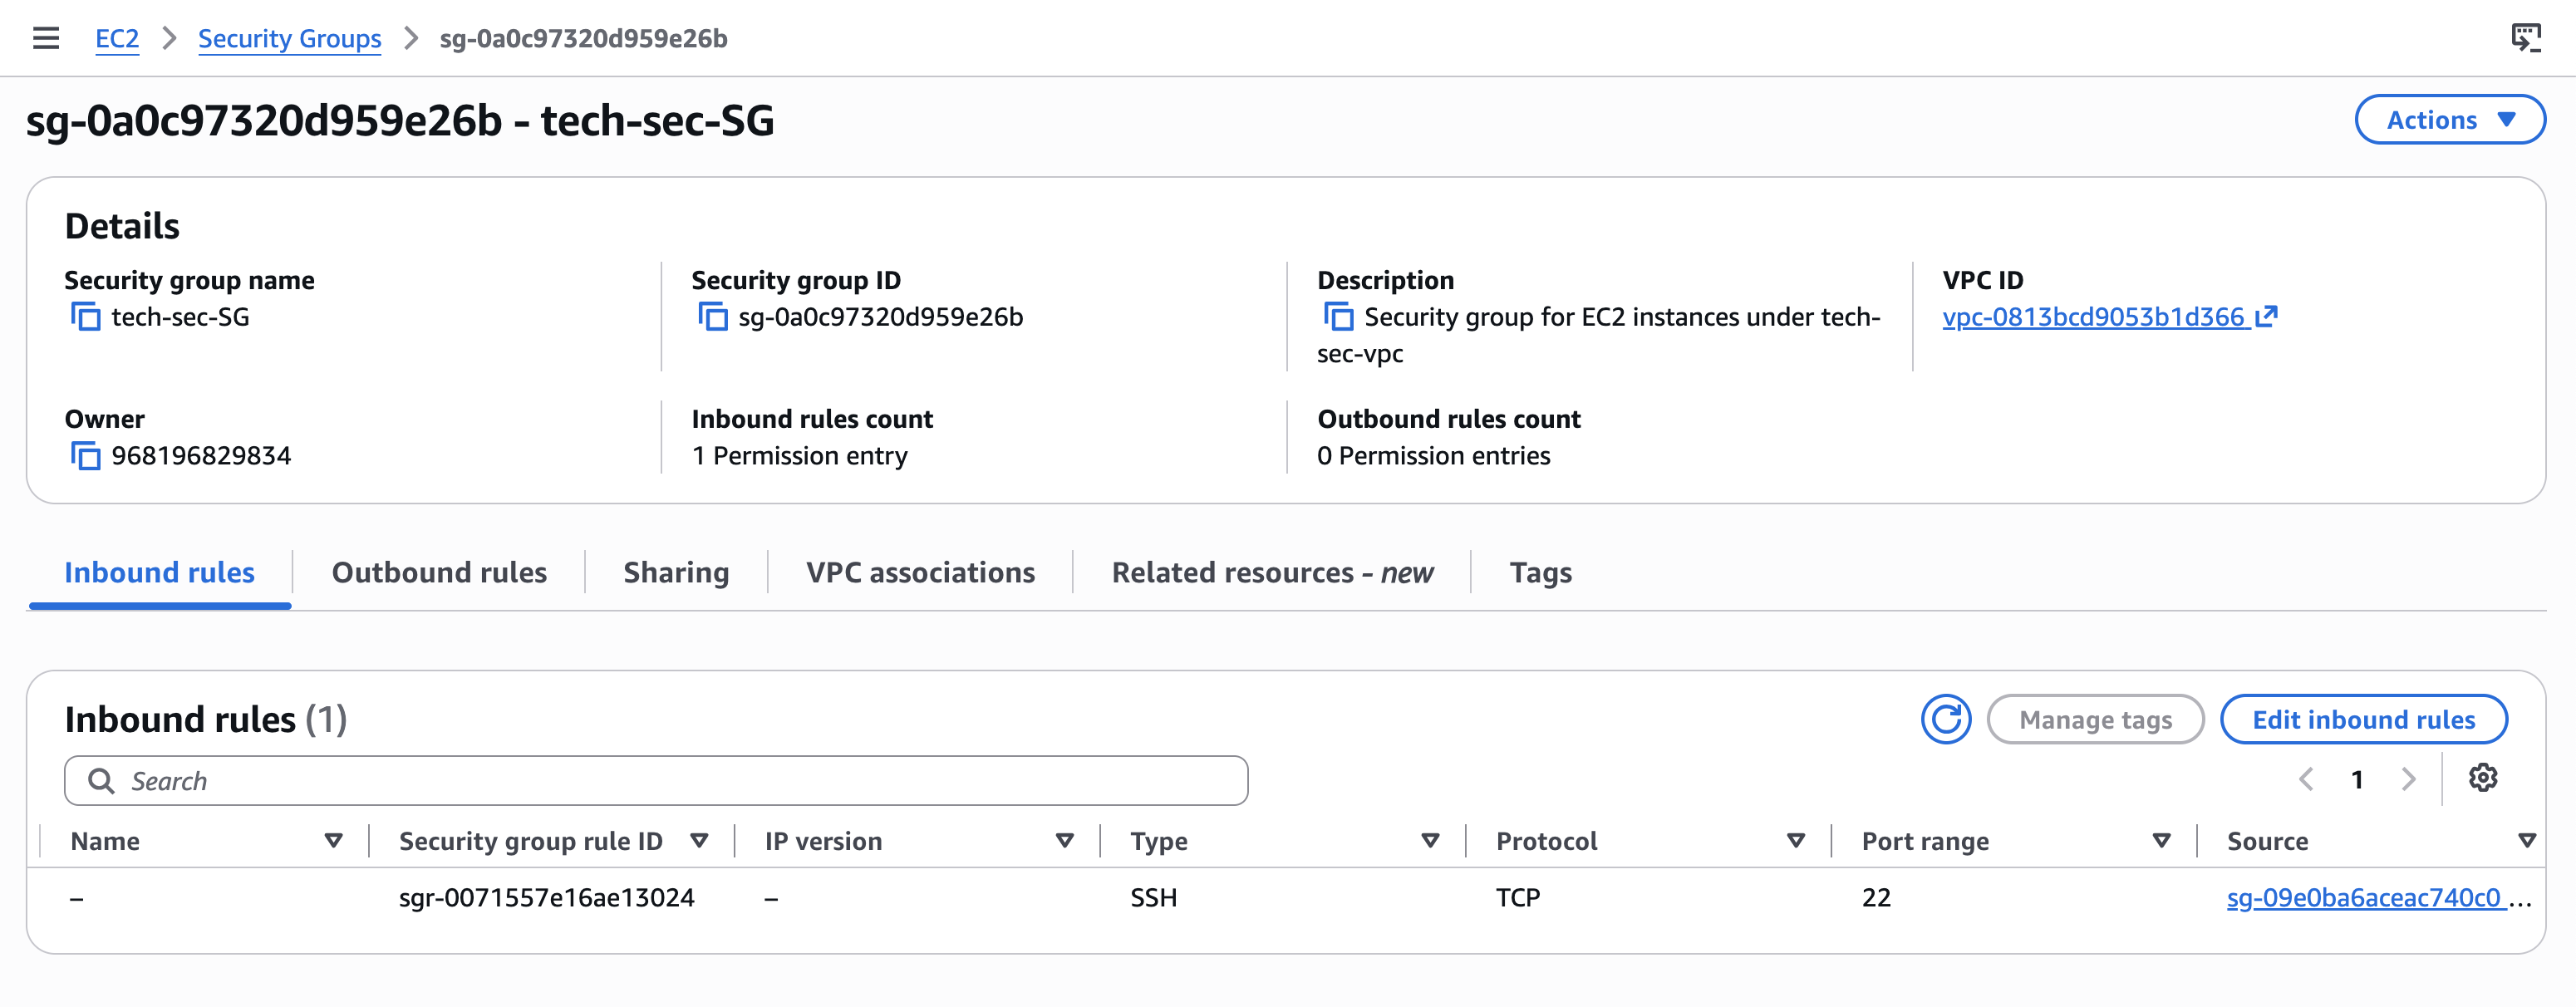
So instead of saying:
Anyone from anywhere can SSH into this instance.
I am effectively saying:
SSH is allowed, but only when the traffic originates from the specific security group I trust.
That gives me the following path:
My laptop
   |
   | SSH
   ▼
Public EC2
   |
   | SSH
   ▼
Private EC2
And there is no direct Internet to Private EC2 route.
For Outbound rules I removed the default allow all traffic rule:
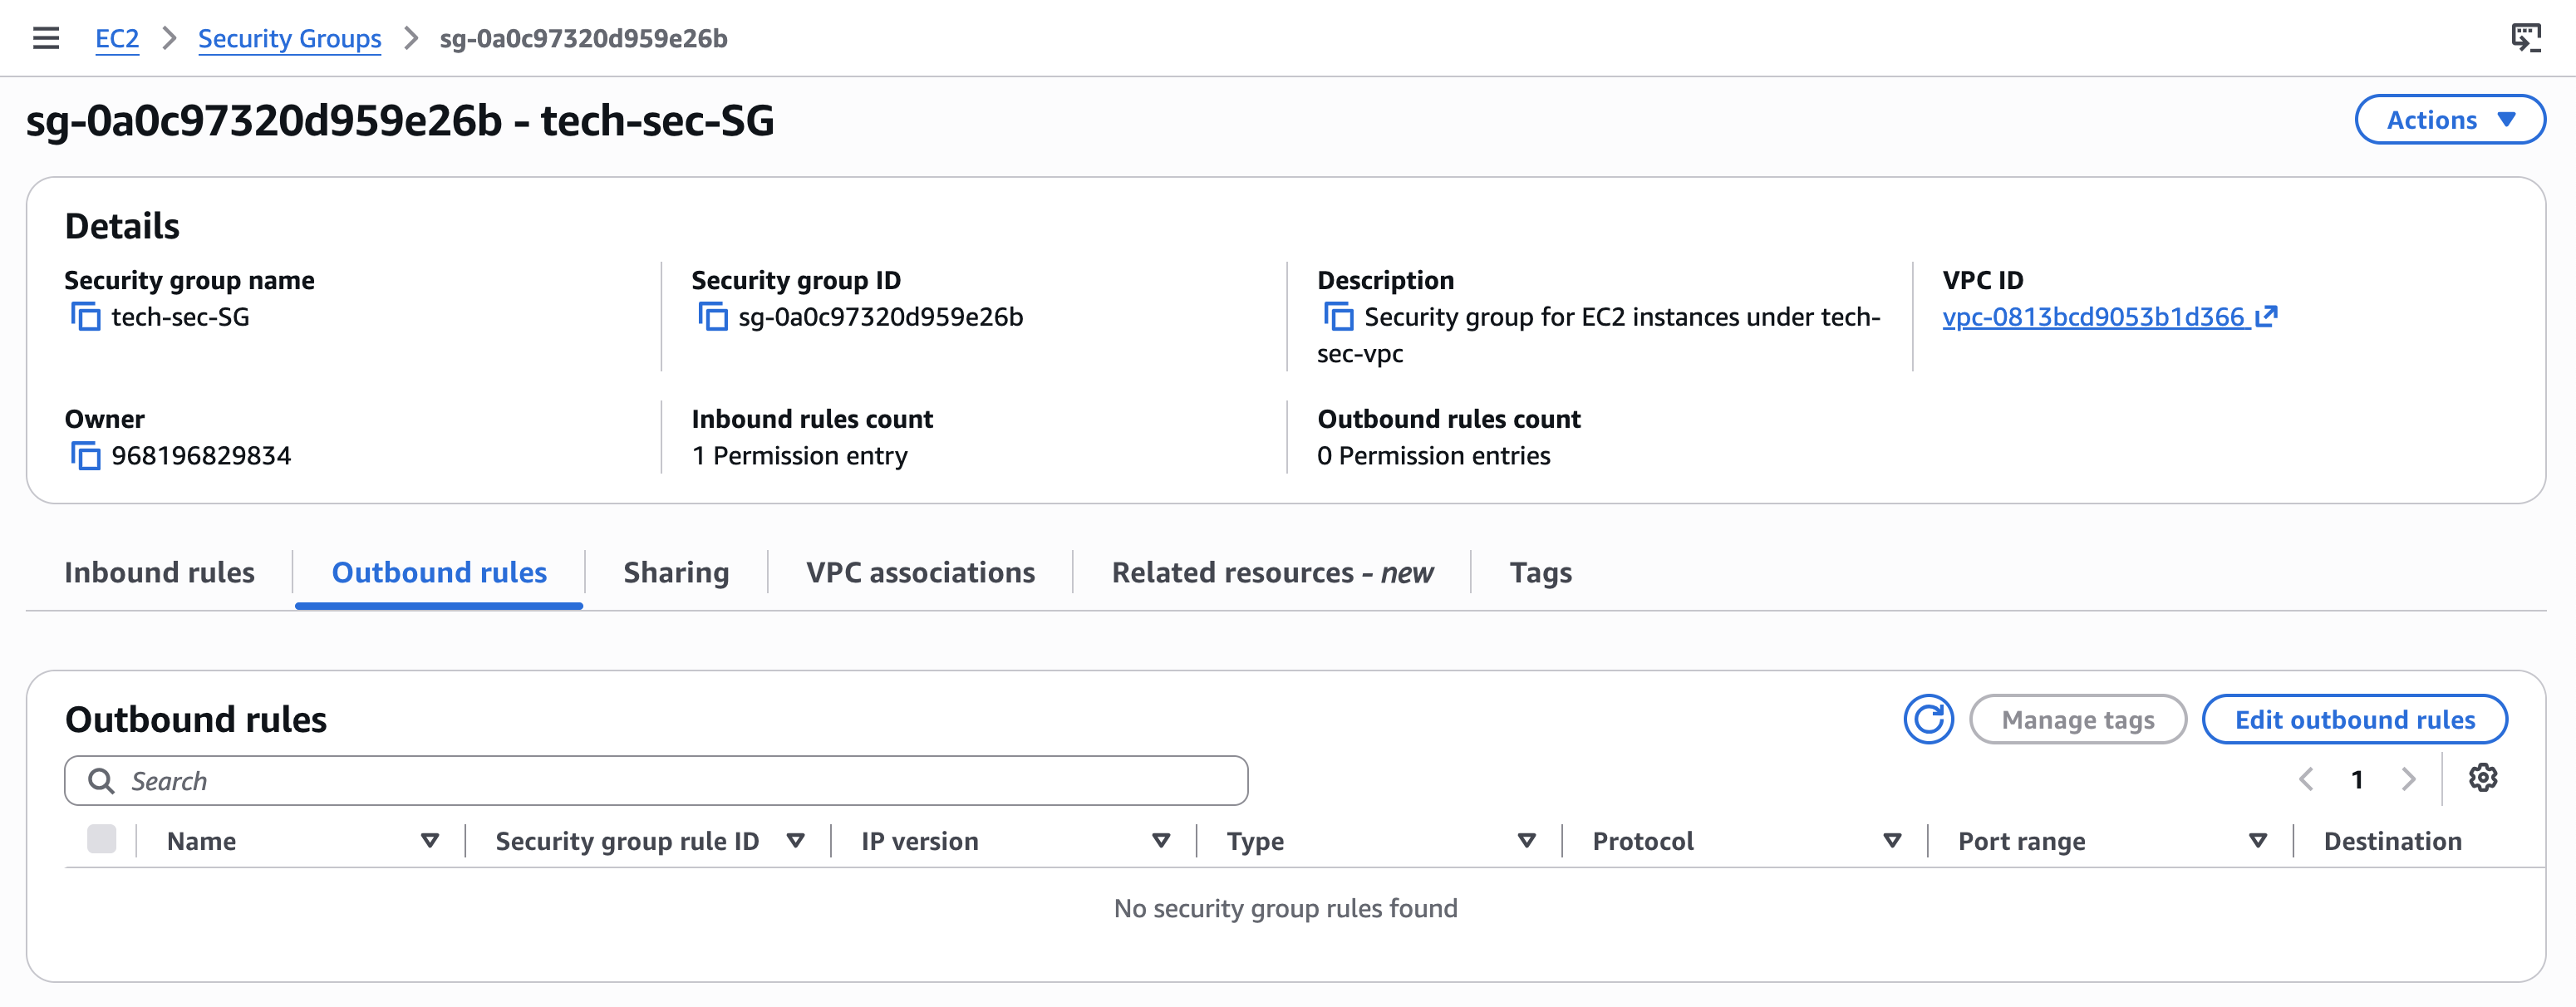
I tested the setup to make sure the legitimate traffic still worked after removing the broad default rules.
Because there is nothing quite like “improving security” and accidentally securing yourself out of your own server.
3. Adding a Second Layer With Network ACLs
Security Groups weren’t enough for this experiment. I wanted to understand what happens when you add Network ACLs (NACLs) on top.
NACLs operate at the subnet level, rather than the individual instance level.
Unlike Security Groups, which are stateful, NACLs are stateless. In other words, a NACL doesn’t remember that it already allowed a connection. If traffic needs to travel back, I have to explicitly allow that direction too.
And that is where things get interesting.
The ephemeral port plot twist
Let’s say my laptop connects to the public EC2 instance over HTTP and a response needs to make its way back:
REQUEST
Laptop (client) ───────────────► Server
       destination: 22

RESPONSE
Laptop (client) ◄─────────────── Server
       ephemeral port
The response doesn’t necessarily come back to my original client port in the way a beginner might expect when configuring a stateless ACL. The return traffic uses an ephemeral port range on the client side.
So my NACL rules need to account for those return ports.
For this project, I used the 1024-65535 range for the relevant return traffic.
This is one of those details that makes perfect sense after someone explains it and feels like AWS is personally trying to prank you before that. 🤧
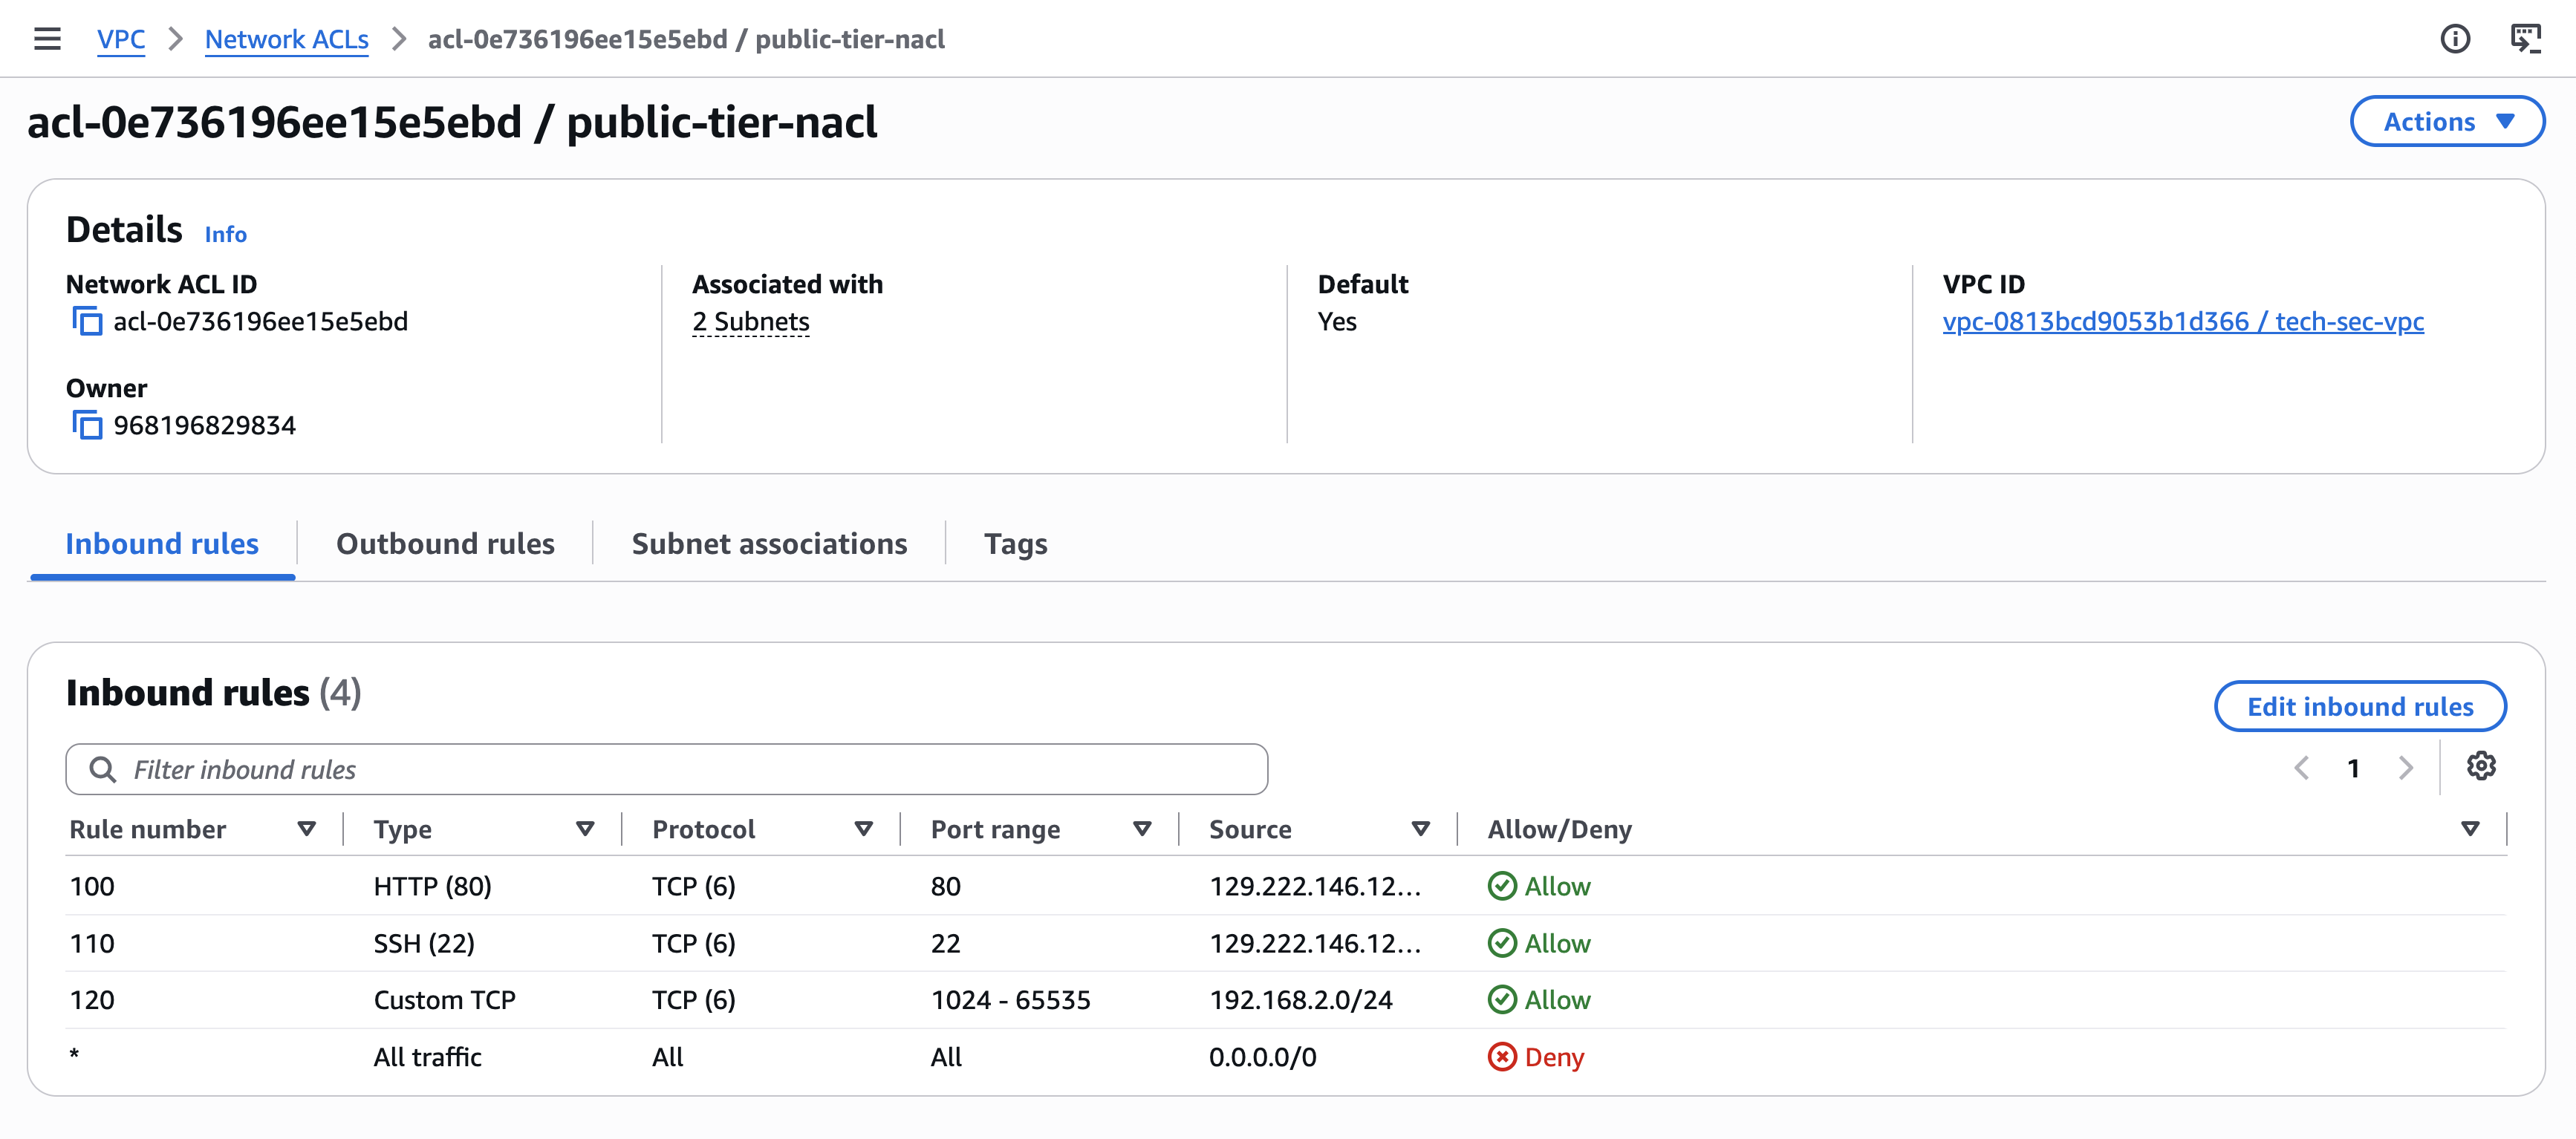
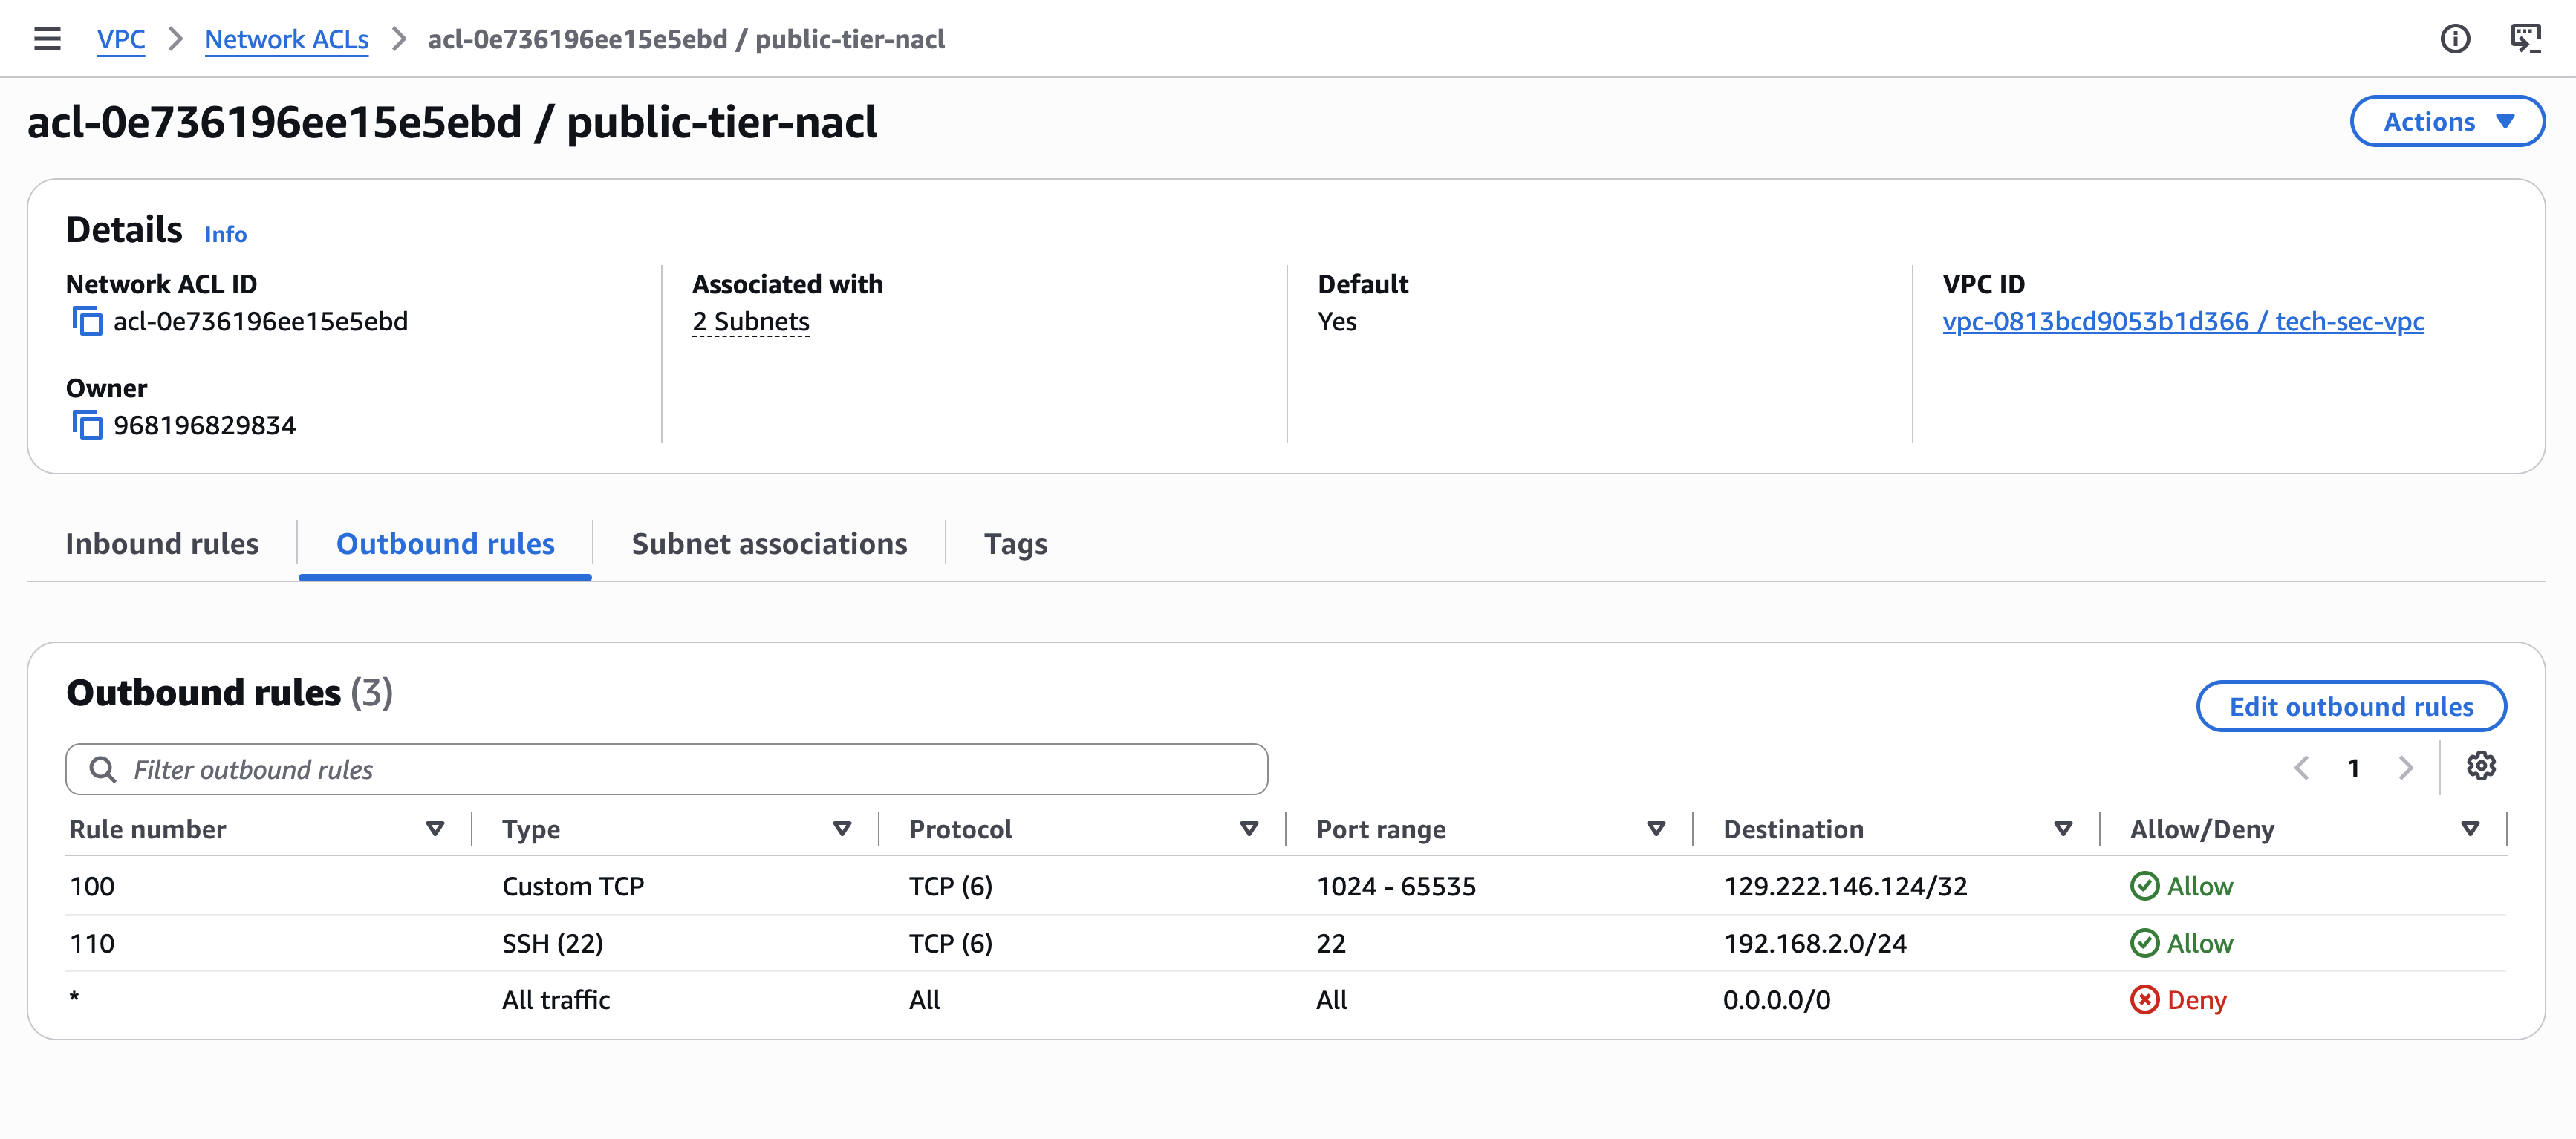
a) Public Subnet NACL
I allowed traffic needed for:
- SSH from my IP
- HTTP from my IP
- Return traffic to my IP through the ephemeral port range
- SSH traffic between the public and private instances
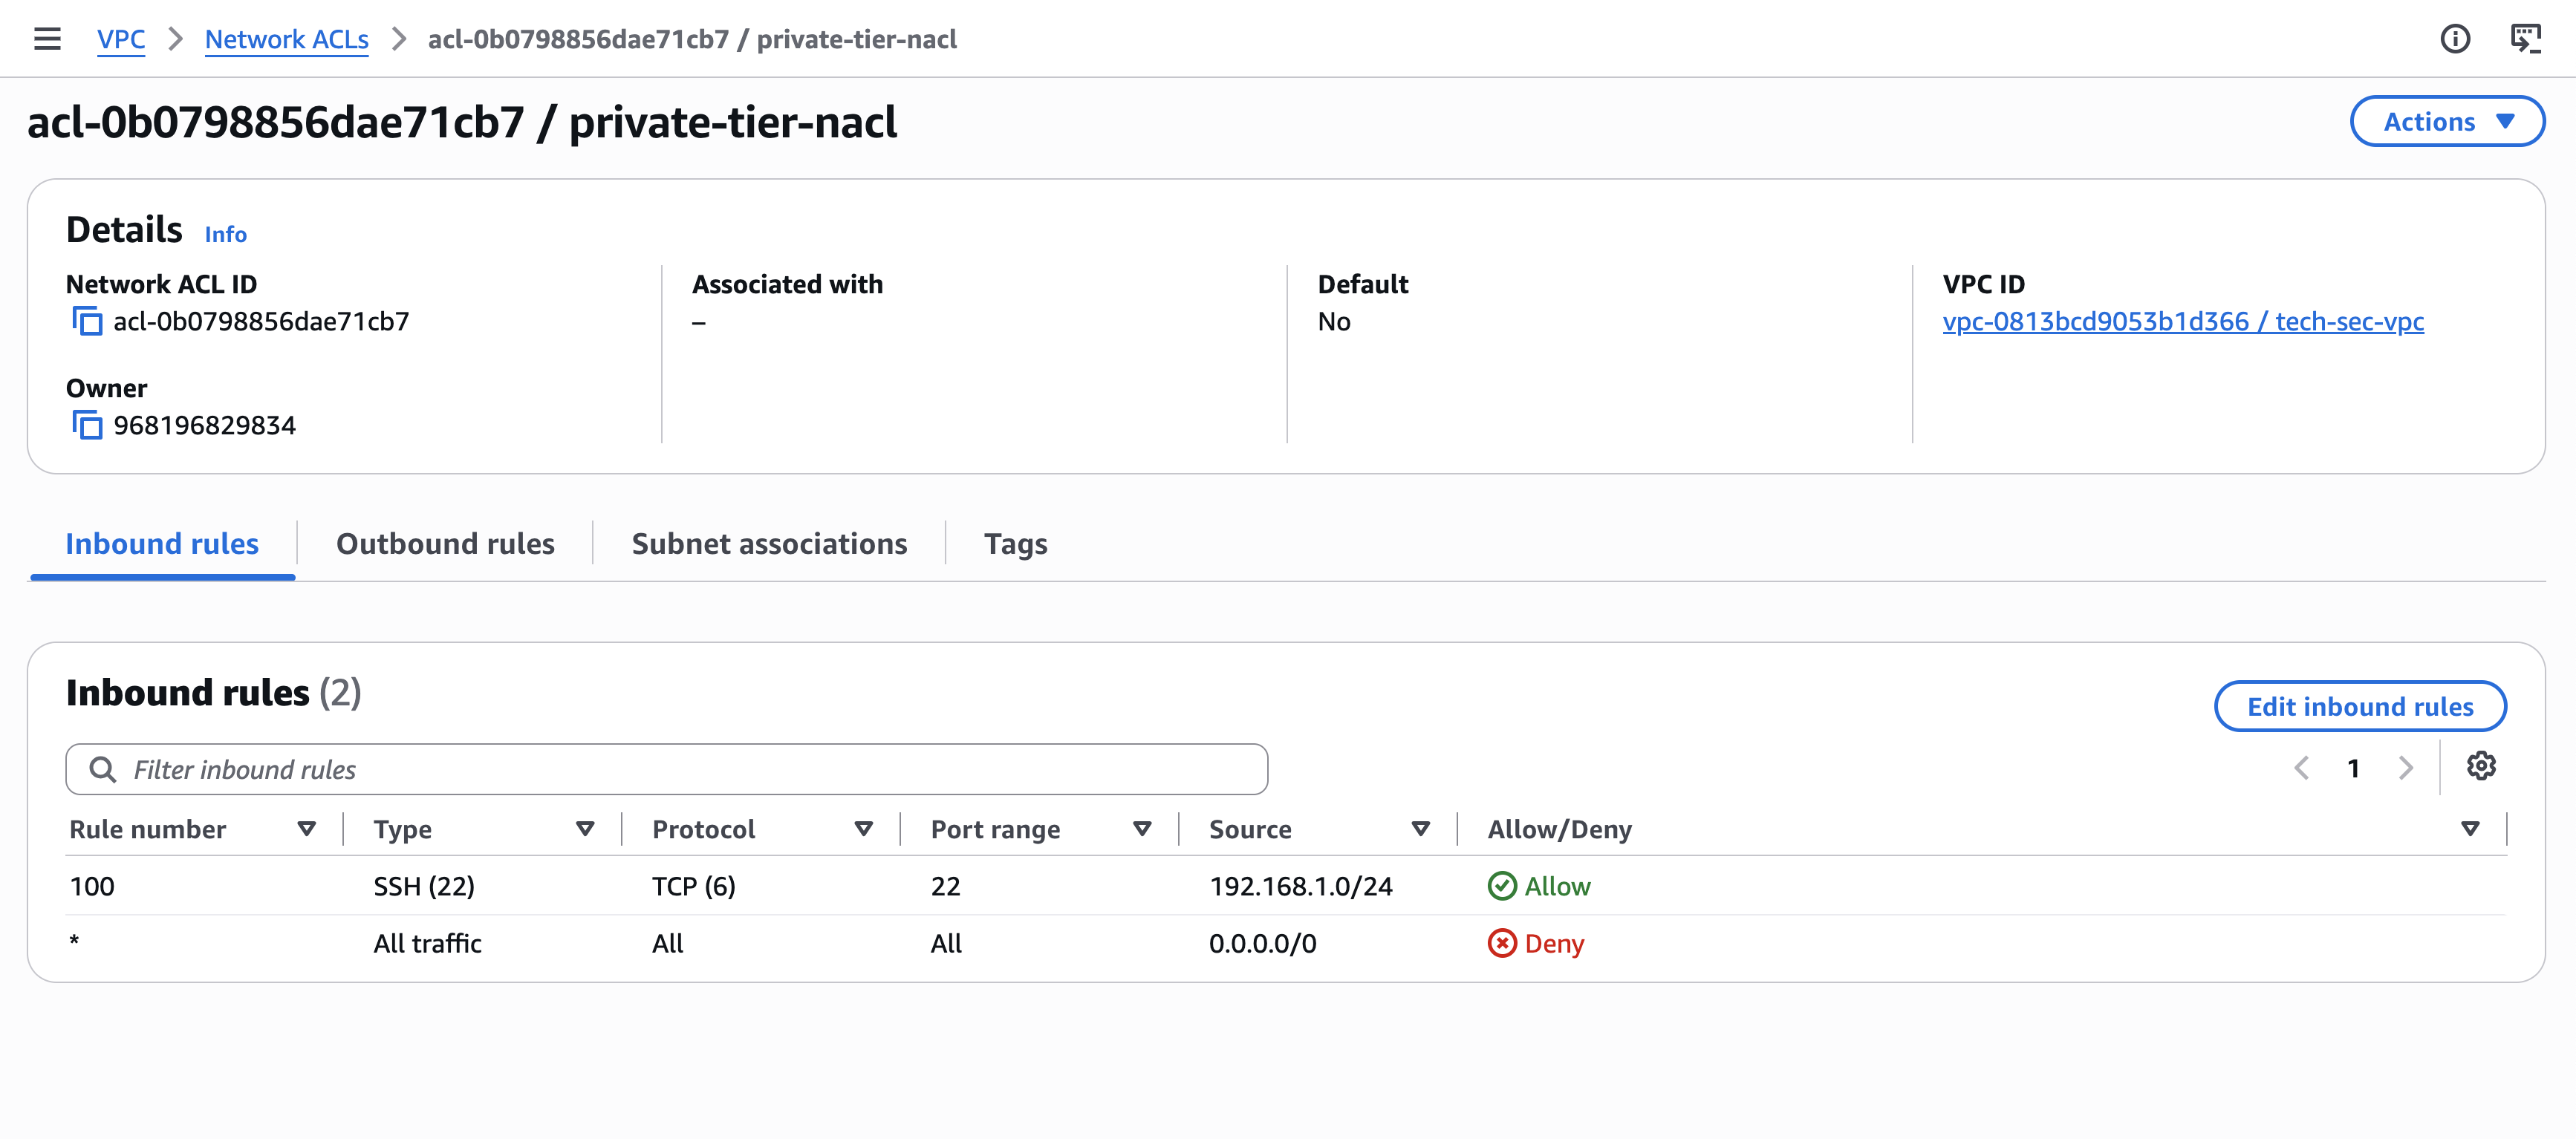
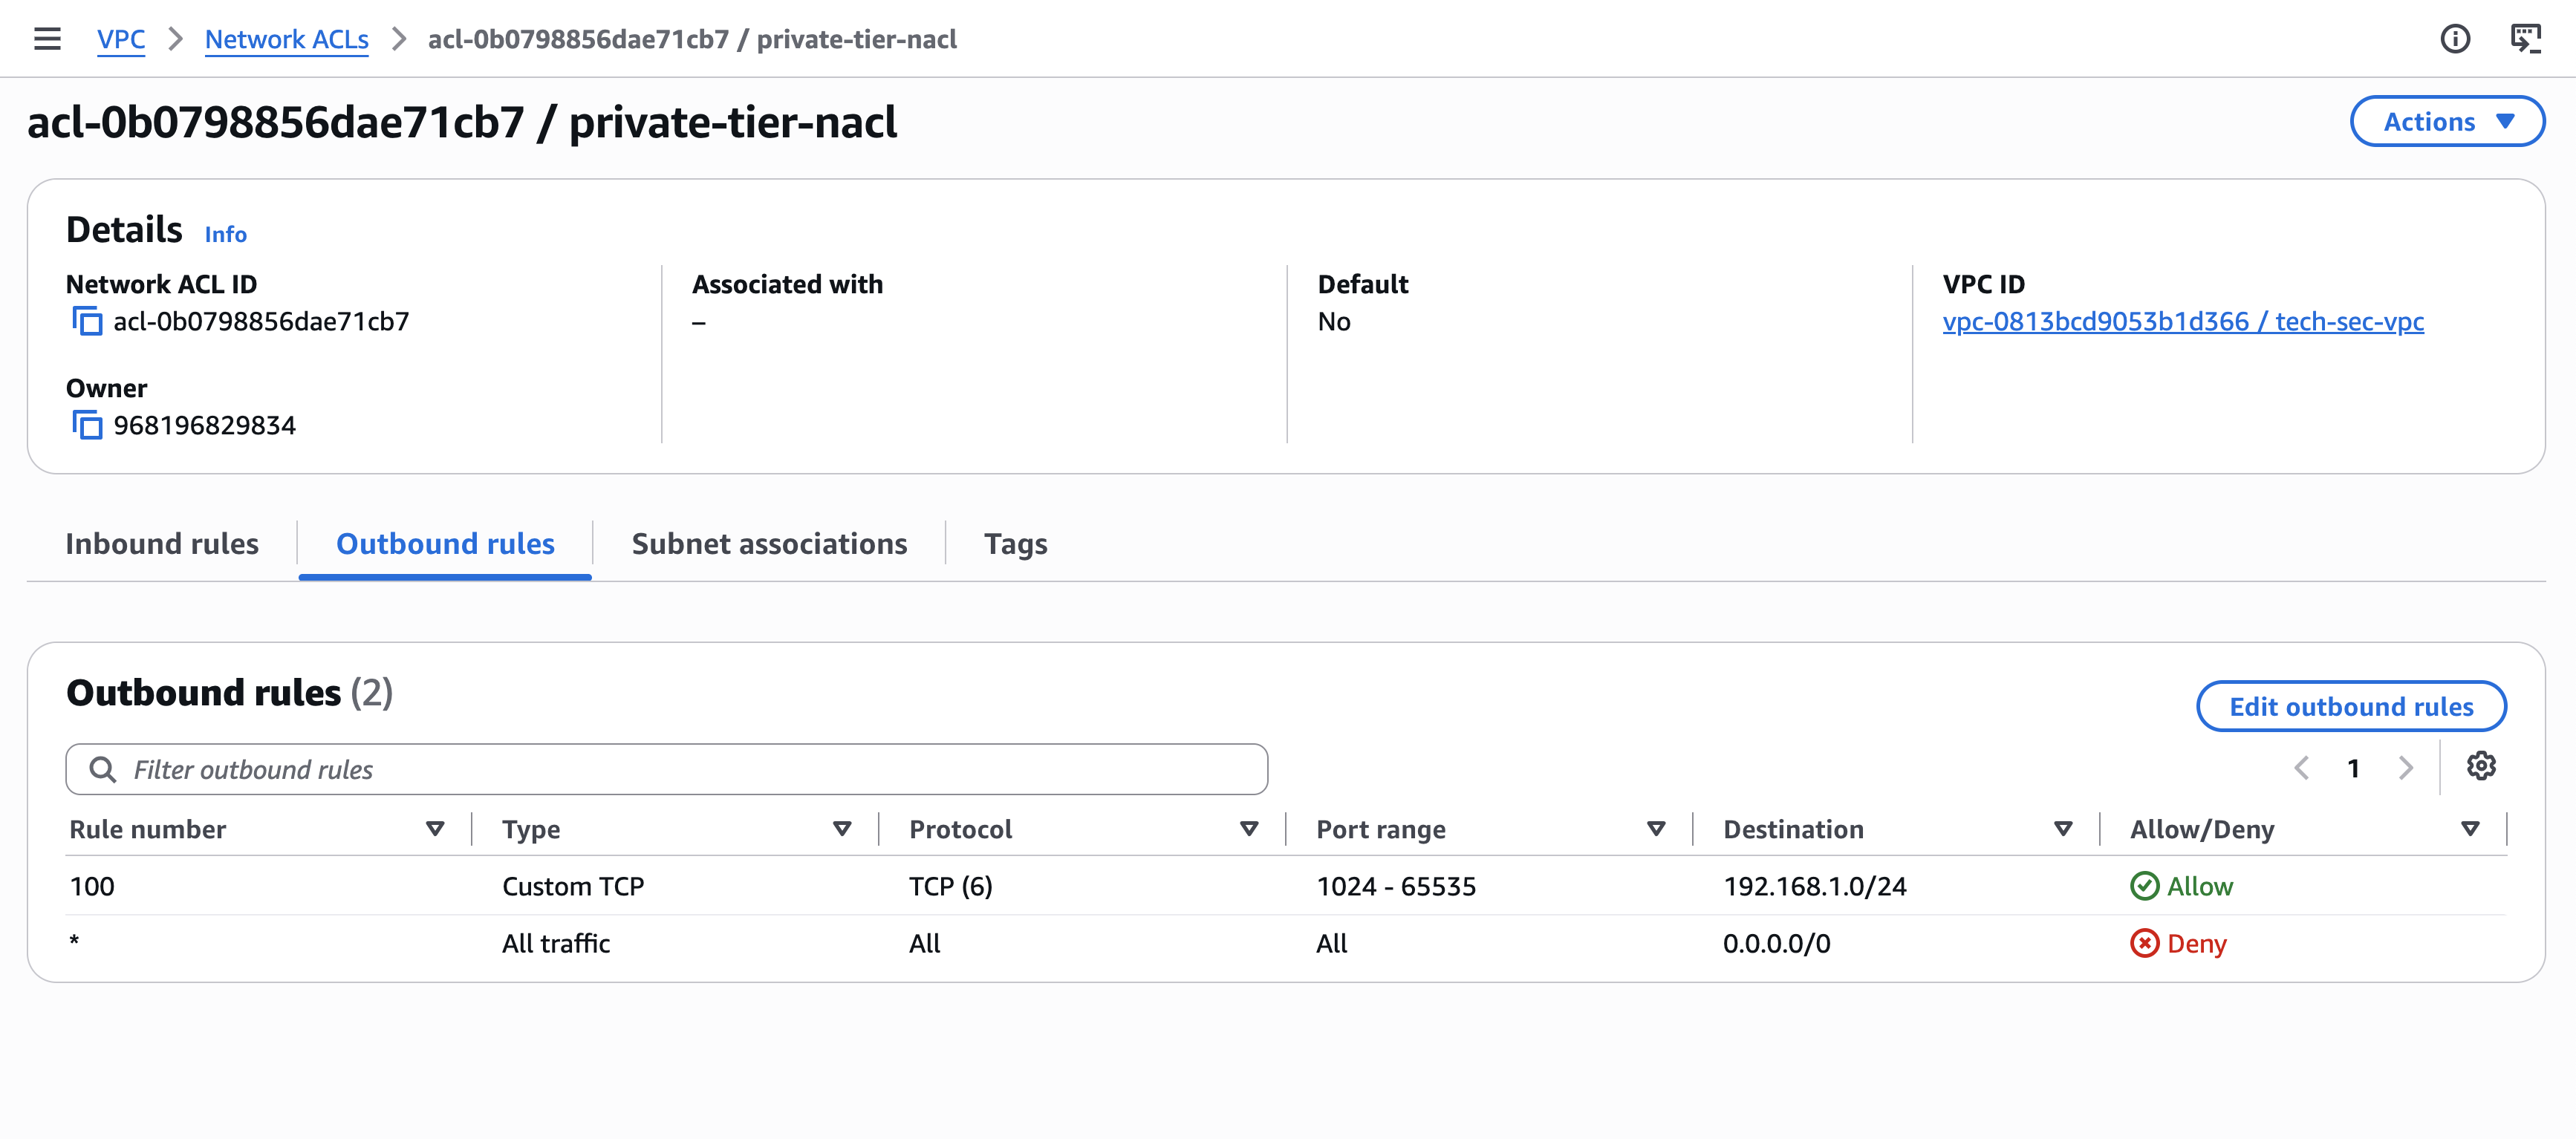
b) Private Subnet NACL
I allowed:
- SSH traffic from the public subnet
- The corresponding return traffic through ephemeral ports
So the rules weren’t simply duplicates of my Security Group configuration. I had to think about the direction of each connection and explicitly account for the return traffic.
4. Actually Connecting to the Private EC2
Now came the fun part.
How do I SSH into something that isn’t directly exposed to the internet?
One option I explored was SSH Agent Forwarding.
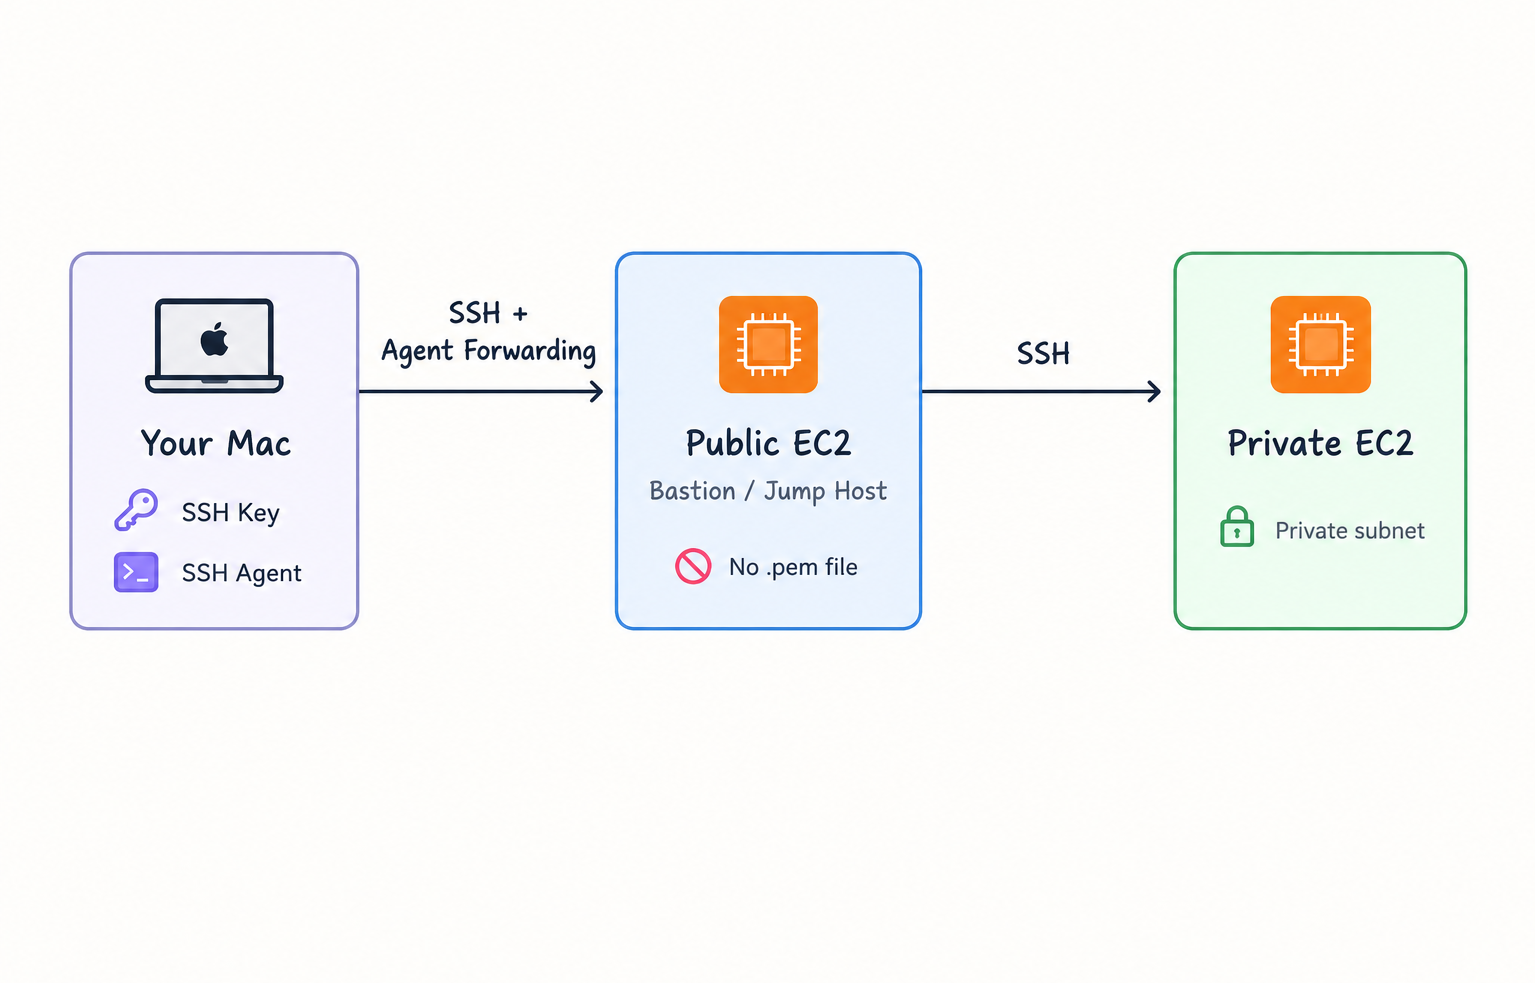
The nice thing about this approach is that my private key stays on my local machine rather than being copied onto the public EC2 instance.
First, I restricted my key’s permissions:
chmod 400 /path/to/your-key.pemThen I started my local SSH agent and loaded the key:
eval "$(ssh-agent -s)"
ssh-add /path/to/your-key.pem
I could verify that the key was loaded with:
ssh-add -lThen I connected to the public instance with agent forwarding enabled:
ssh -A ec2-user@YOUR_PUBLIC_EC2_PUBLIC_IPFrom there, I could SSH into the private instance using its private IP:
ssh ec2-user@YOUR_PRIVATE_EC2_PRIVATE_IPThe important part here is that the private key itself wasn’t copied onto the public server.
That said, SSH Agent Forwarding isn’t magic security dust. A compromised intermediate host can potentially abuse the forwarded agent during the session. In production environments, I’d evaluate alternatives such as a carefully configured bastion/ProxyJump setup or AWS-native access mechanisms depending on the architecture.
For this project, though, it was a useful way to understand how a private instance can be accessed without making it publicly reachable.
You can read more about it here: How to SSH Into a Private EC2 Instance Using Agent Forwarding
5. What Happens When Someone Changes the Rules?
At this point, the network was reasonably locked down. But then I asked a slightly more annoying question:
What happens if someone changes my security rules?
Imagine someone modifies the public security group and allows an unexpected port. Or someone changes the NACL. Or someone modifies a route table.
The network could become less secure without the workload itself changing.
So I deliberately made harmless test changes.
I added temporary rules to the security group and NACL, then went looking for evidence of what happened. And AWS had the evidence; it was sitting in CloudTrail Event History.
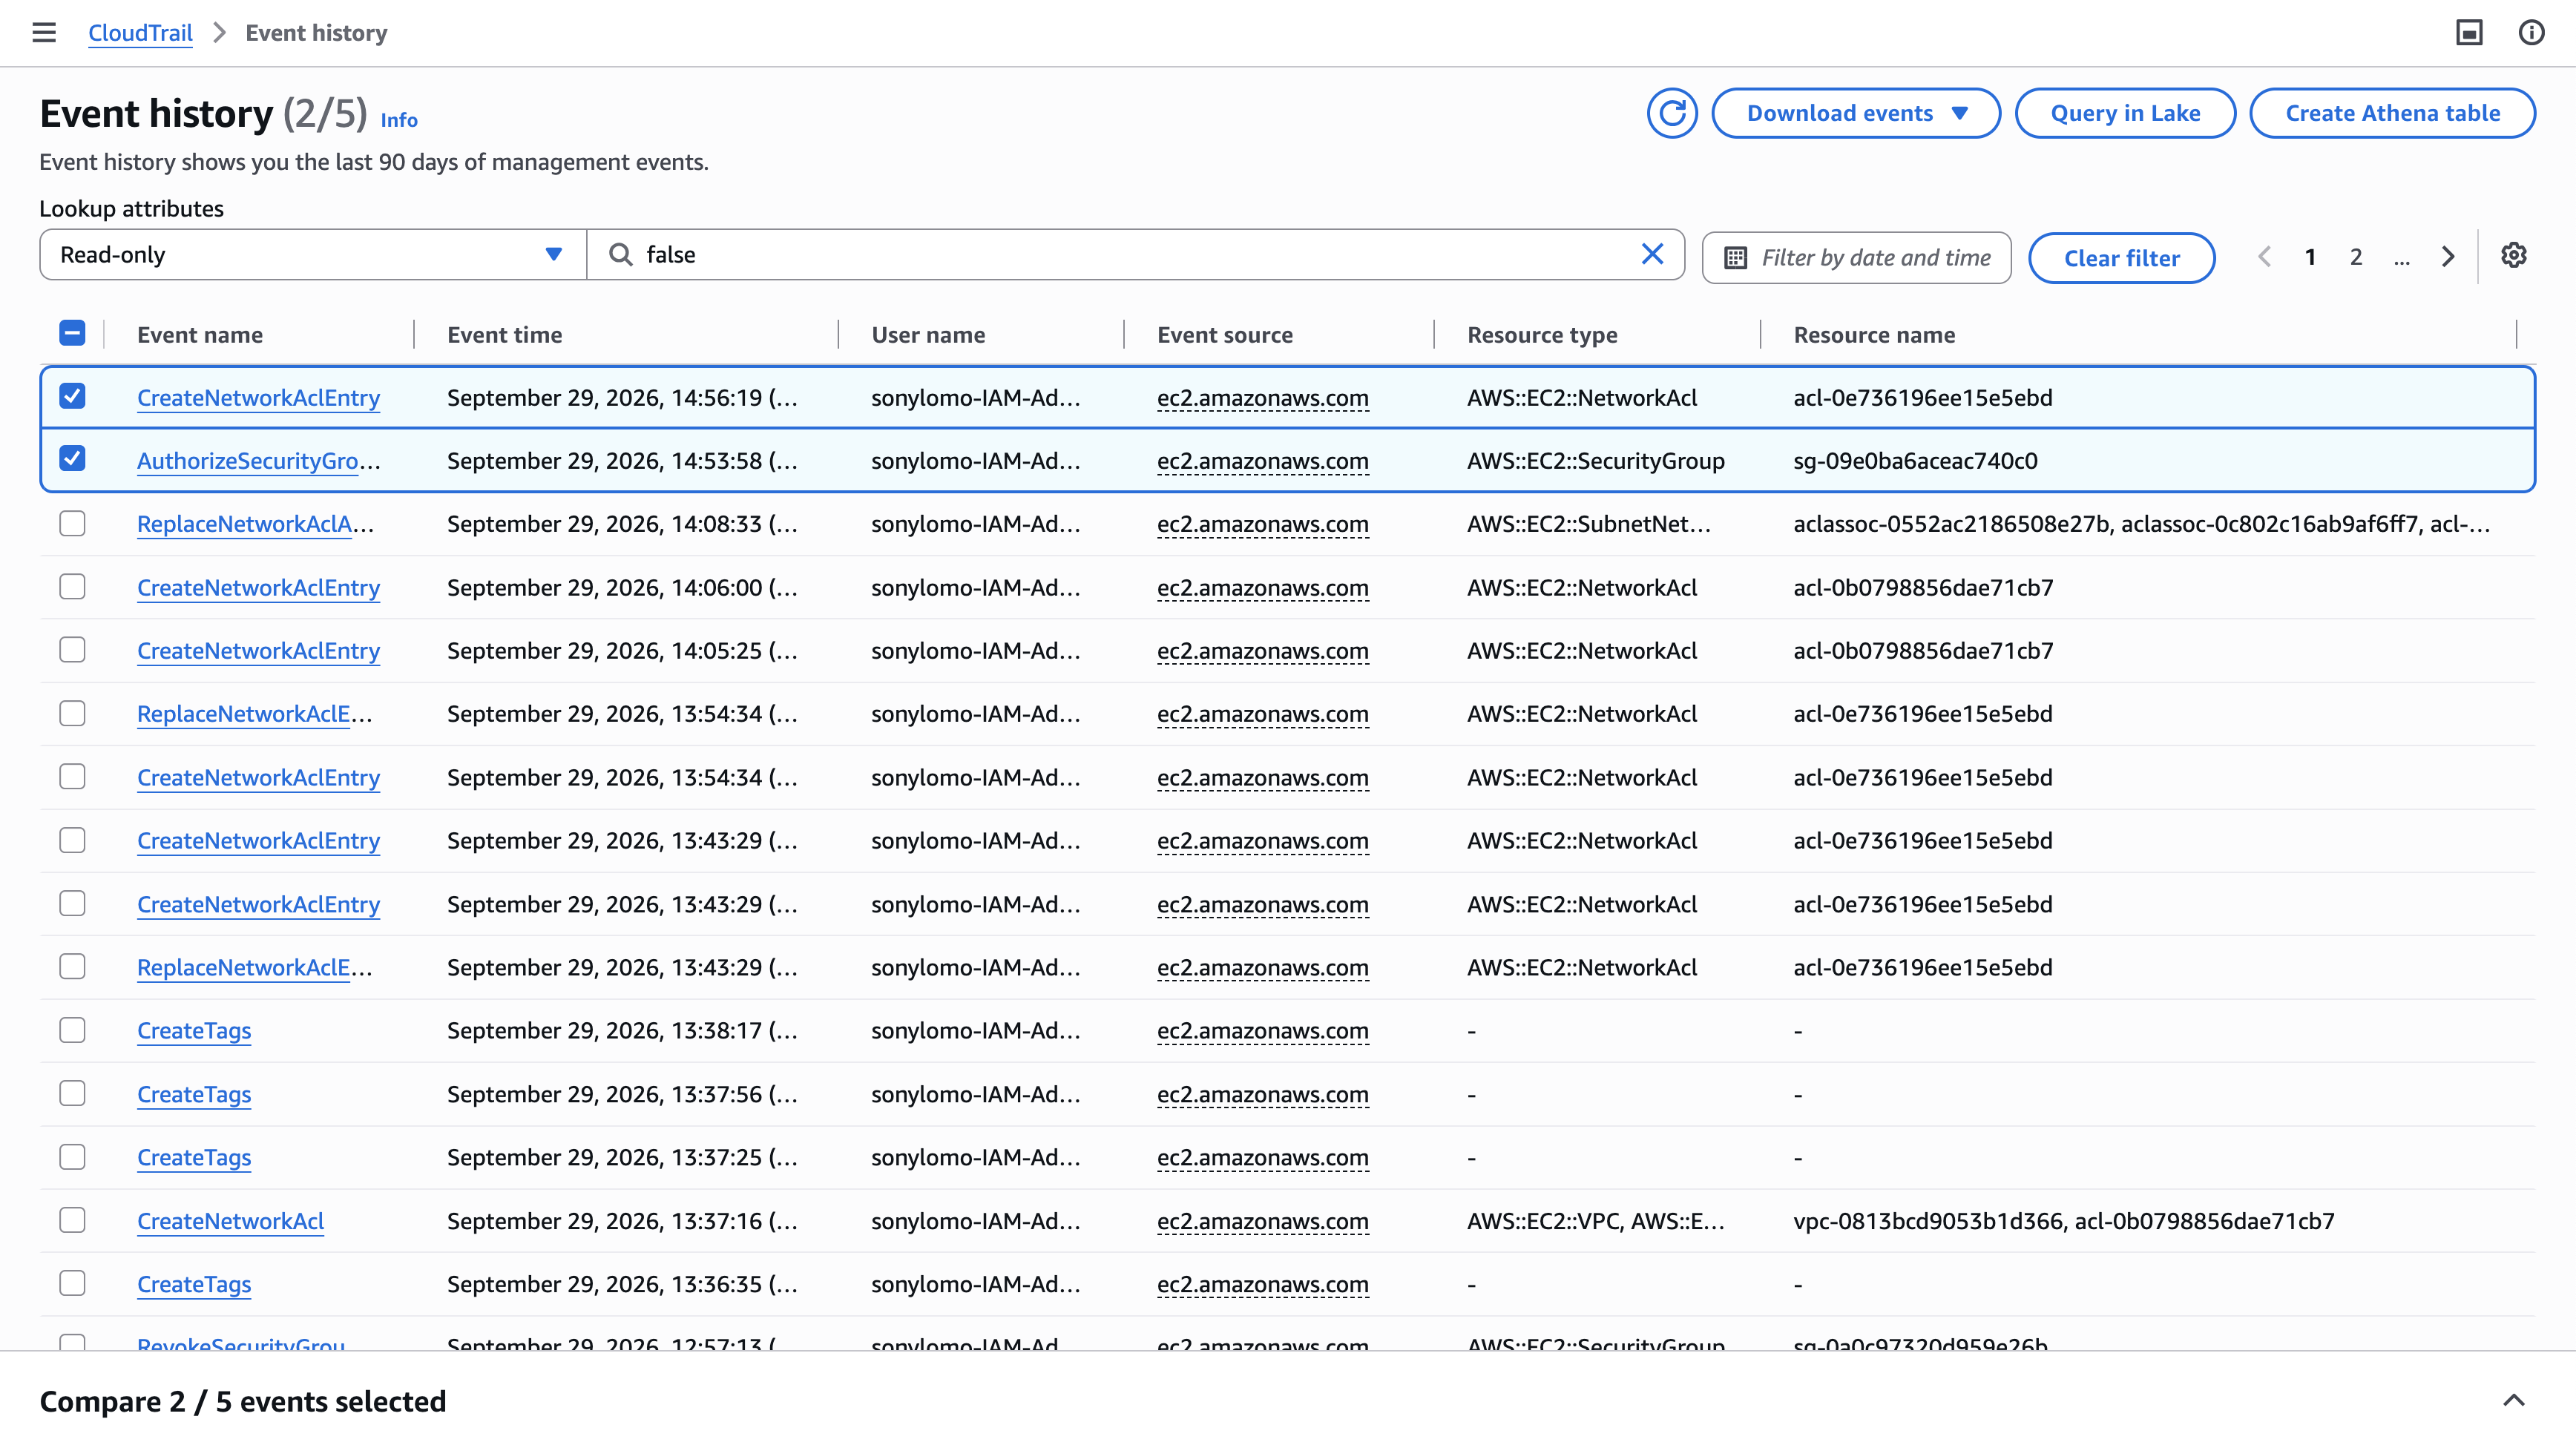
CloudTrail records AWS API activity, including actions made through the AWS Console, CLI, SDKs, and other AWS services.
I could inspect the event and see information such as:
- What API action happened
- When it happened
- Who performed it
- The source information
- Request parameters
- The resource involved
This was useful but, there was a problem.
CloudTrail was recording the activity.
It wasn’t automatically sending me an email saying, “Hey Sonia, someone just touched your firewall.”
That was the monitoring gap: I could investigate after the fact. What I wanted was detection.
6. Turning CloudTrail Records Into Actual Alerts
This is where CloudTrail, CloudWatch and SNS started working together.
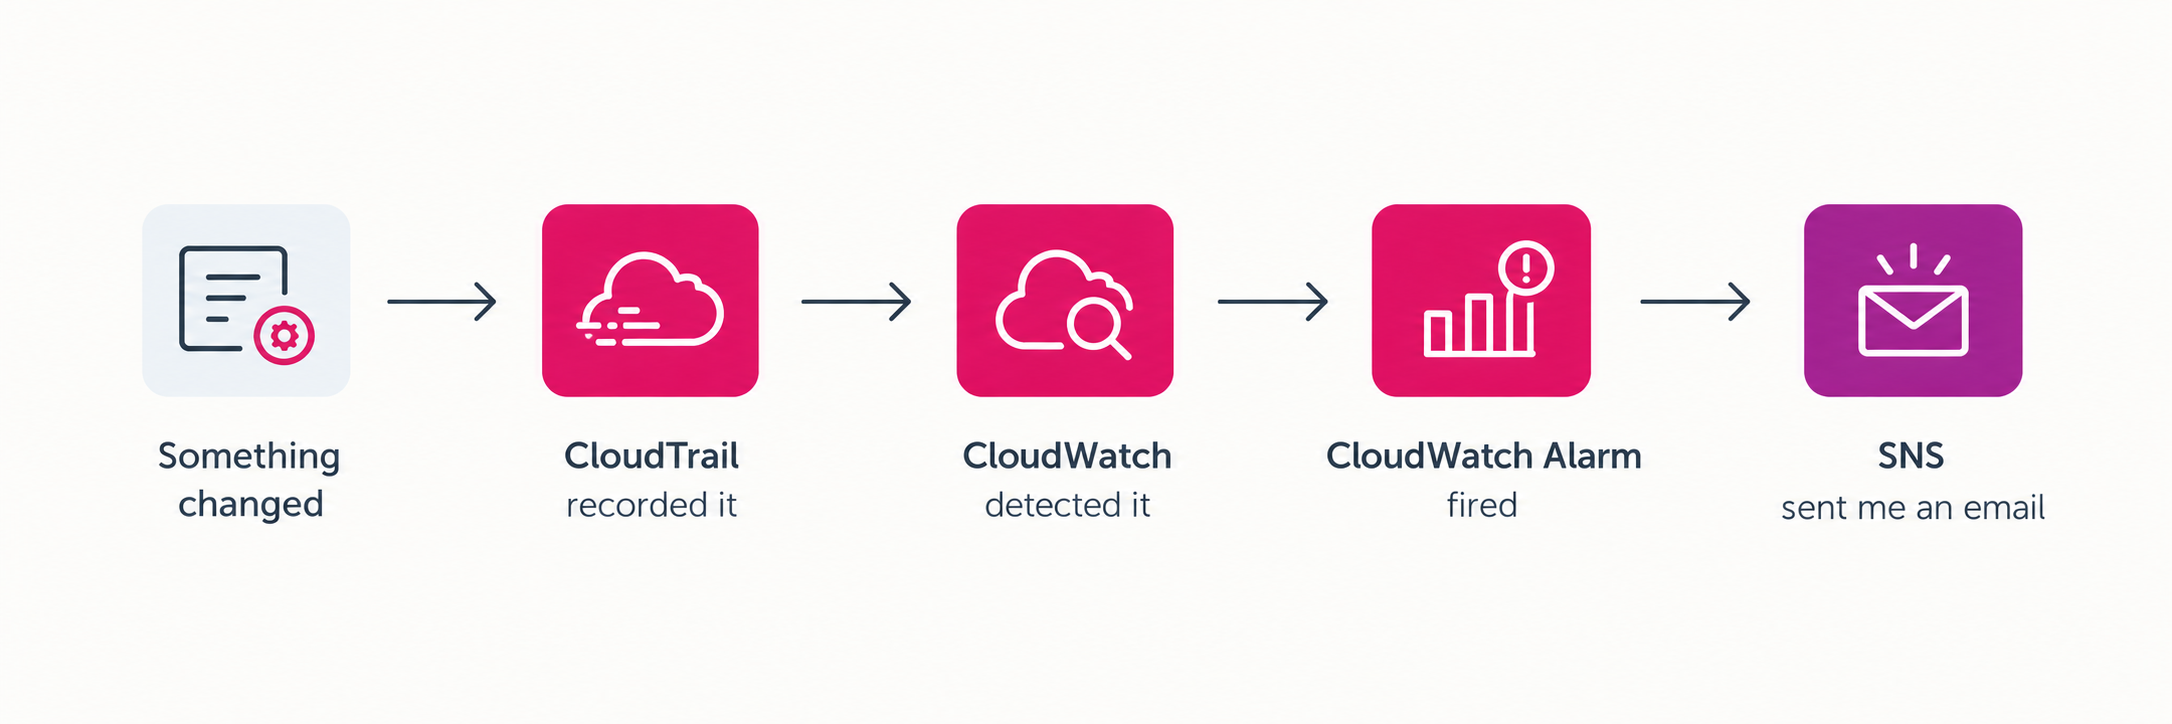
CloudTrail provides the audit trail, CloudWatch looks for the events I care about and SNS handles the notification.
So I created an ongoing CloudTrail trail called:
secure-vpc-monitoring-trailThe trail stores its logs in an S3 bucket.
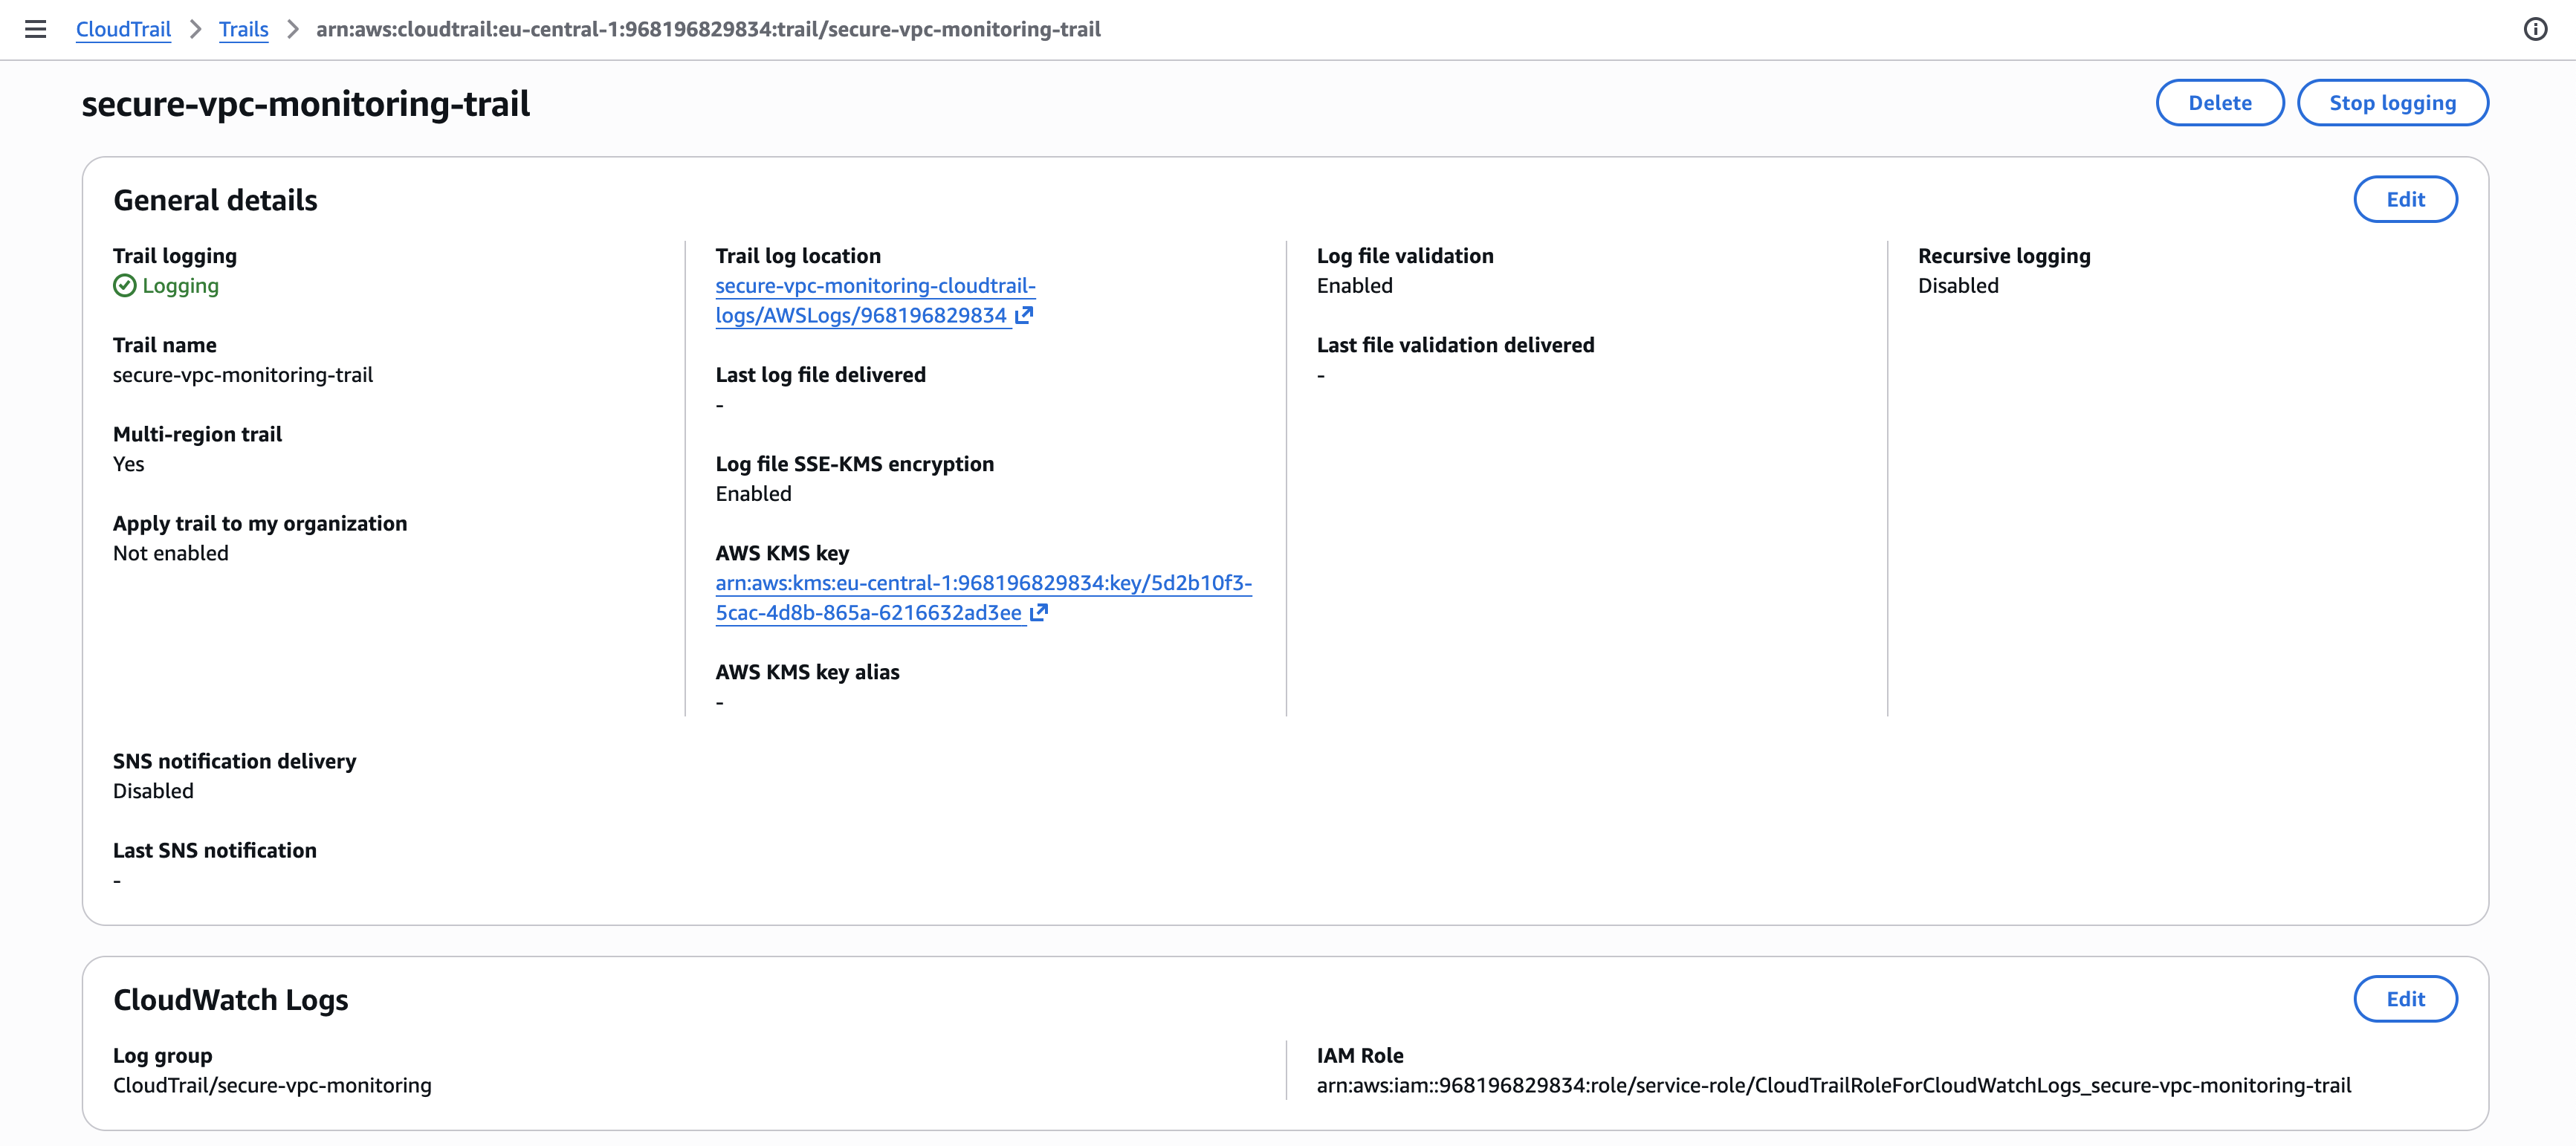
I also enabled:
- SSE-KMS encryption
- Log file validation
- CloudWatch Logs delivery
- Management events
The KMS key used the alias:
alias/secure-vpc-monitoring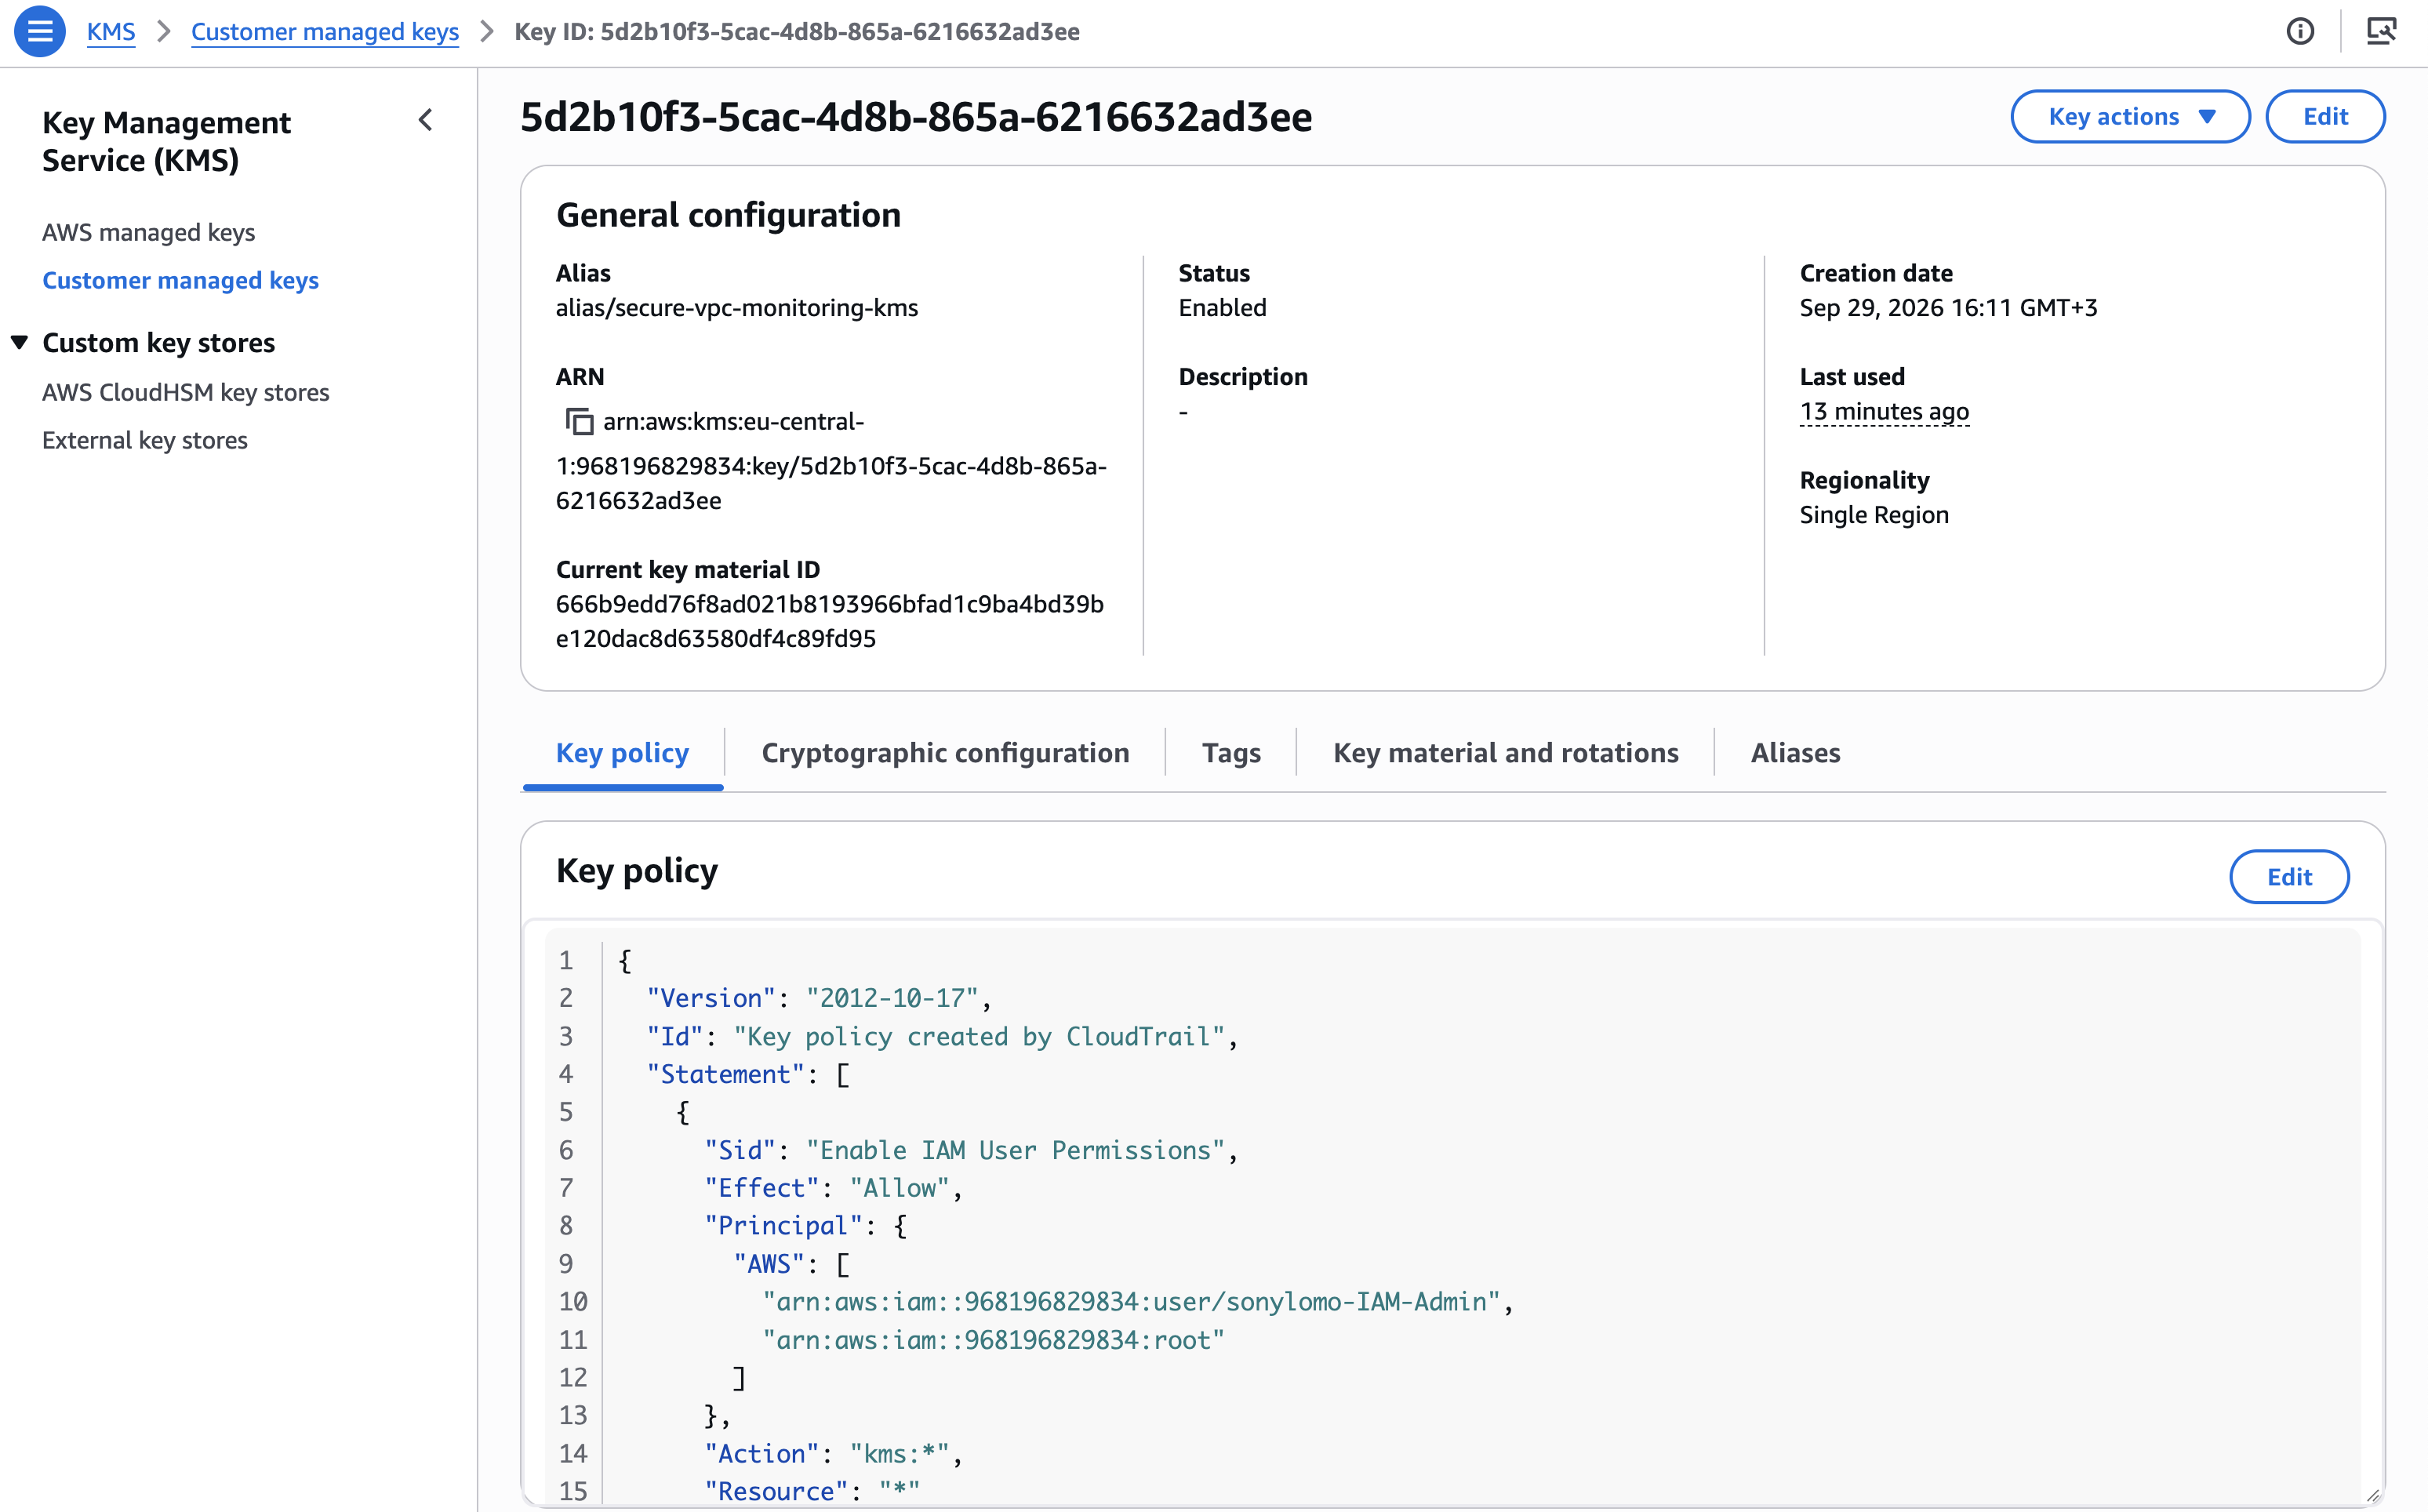
Why KMS?
The point here isn’t that KMS magically makes my entire AWS environment secure.
It protects the CloudTrail log files using server-side encryption with an AWS KMS key.
That gives me control over who can use the key to encrypt and decrypt those logs.
I also enabled CloudTrail log file validation.
That gives CloudTrail a mechanism for detecting whether delivered log files have been modified or deleted after delivery.
So my audit trail isn’t just:
Here are some logs.
It is closer to:
Here are encrypted logs, plus integrity evidence that can be used to verify them.
Much more useful for something I’m calling a security monitoring system.
7. Setting up CloudWatch to Actually Notice Changes
CloudTrail gives me the events. CloudWatch gives me the monitoring and alarm machinery.
I connected my CloudTrail trail to a CloudWatch Logs group:
CloudTrail/secure-vpc-monitoringThen I created metric filters.
This is where the system gets clever.
A metric filter looks through incoming log events for patterns I care about and turns matching events into metric values.
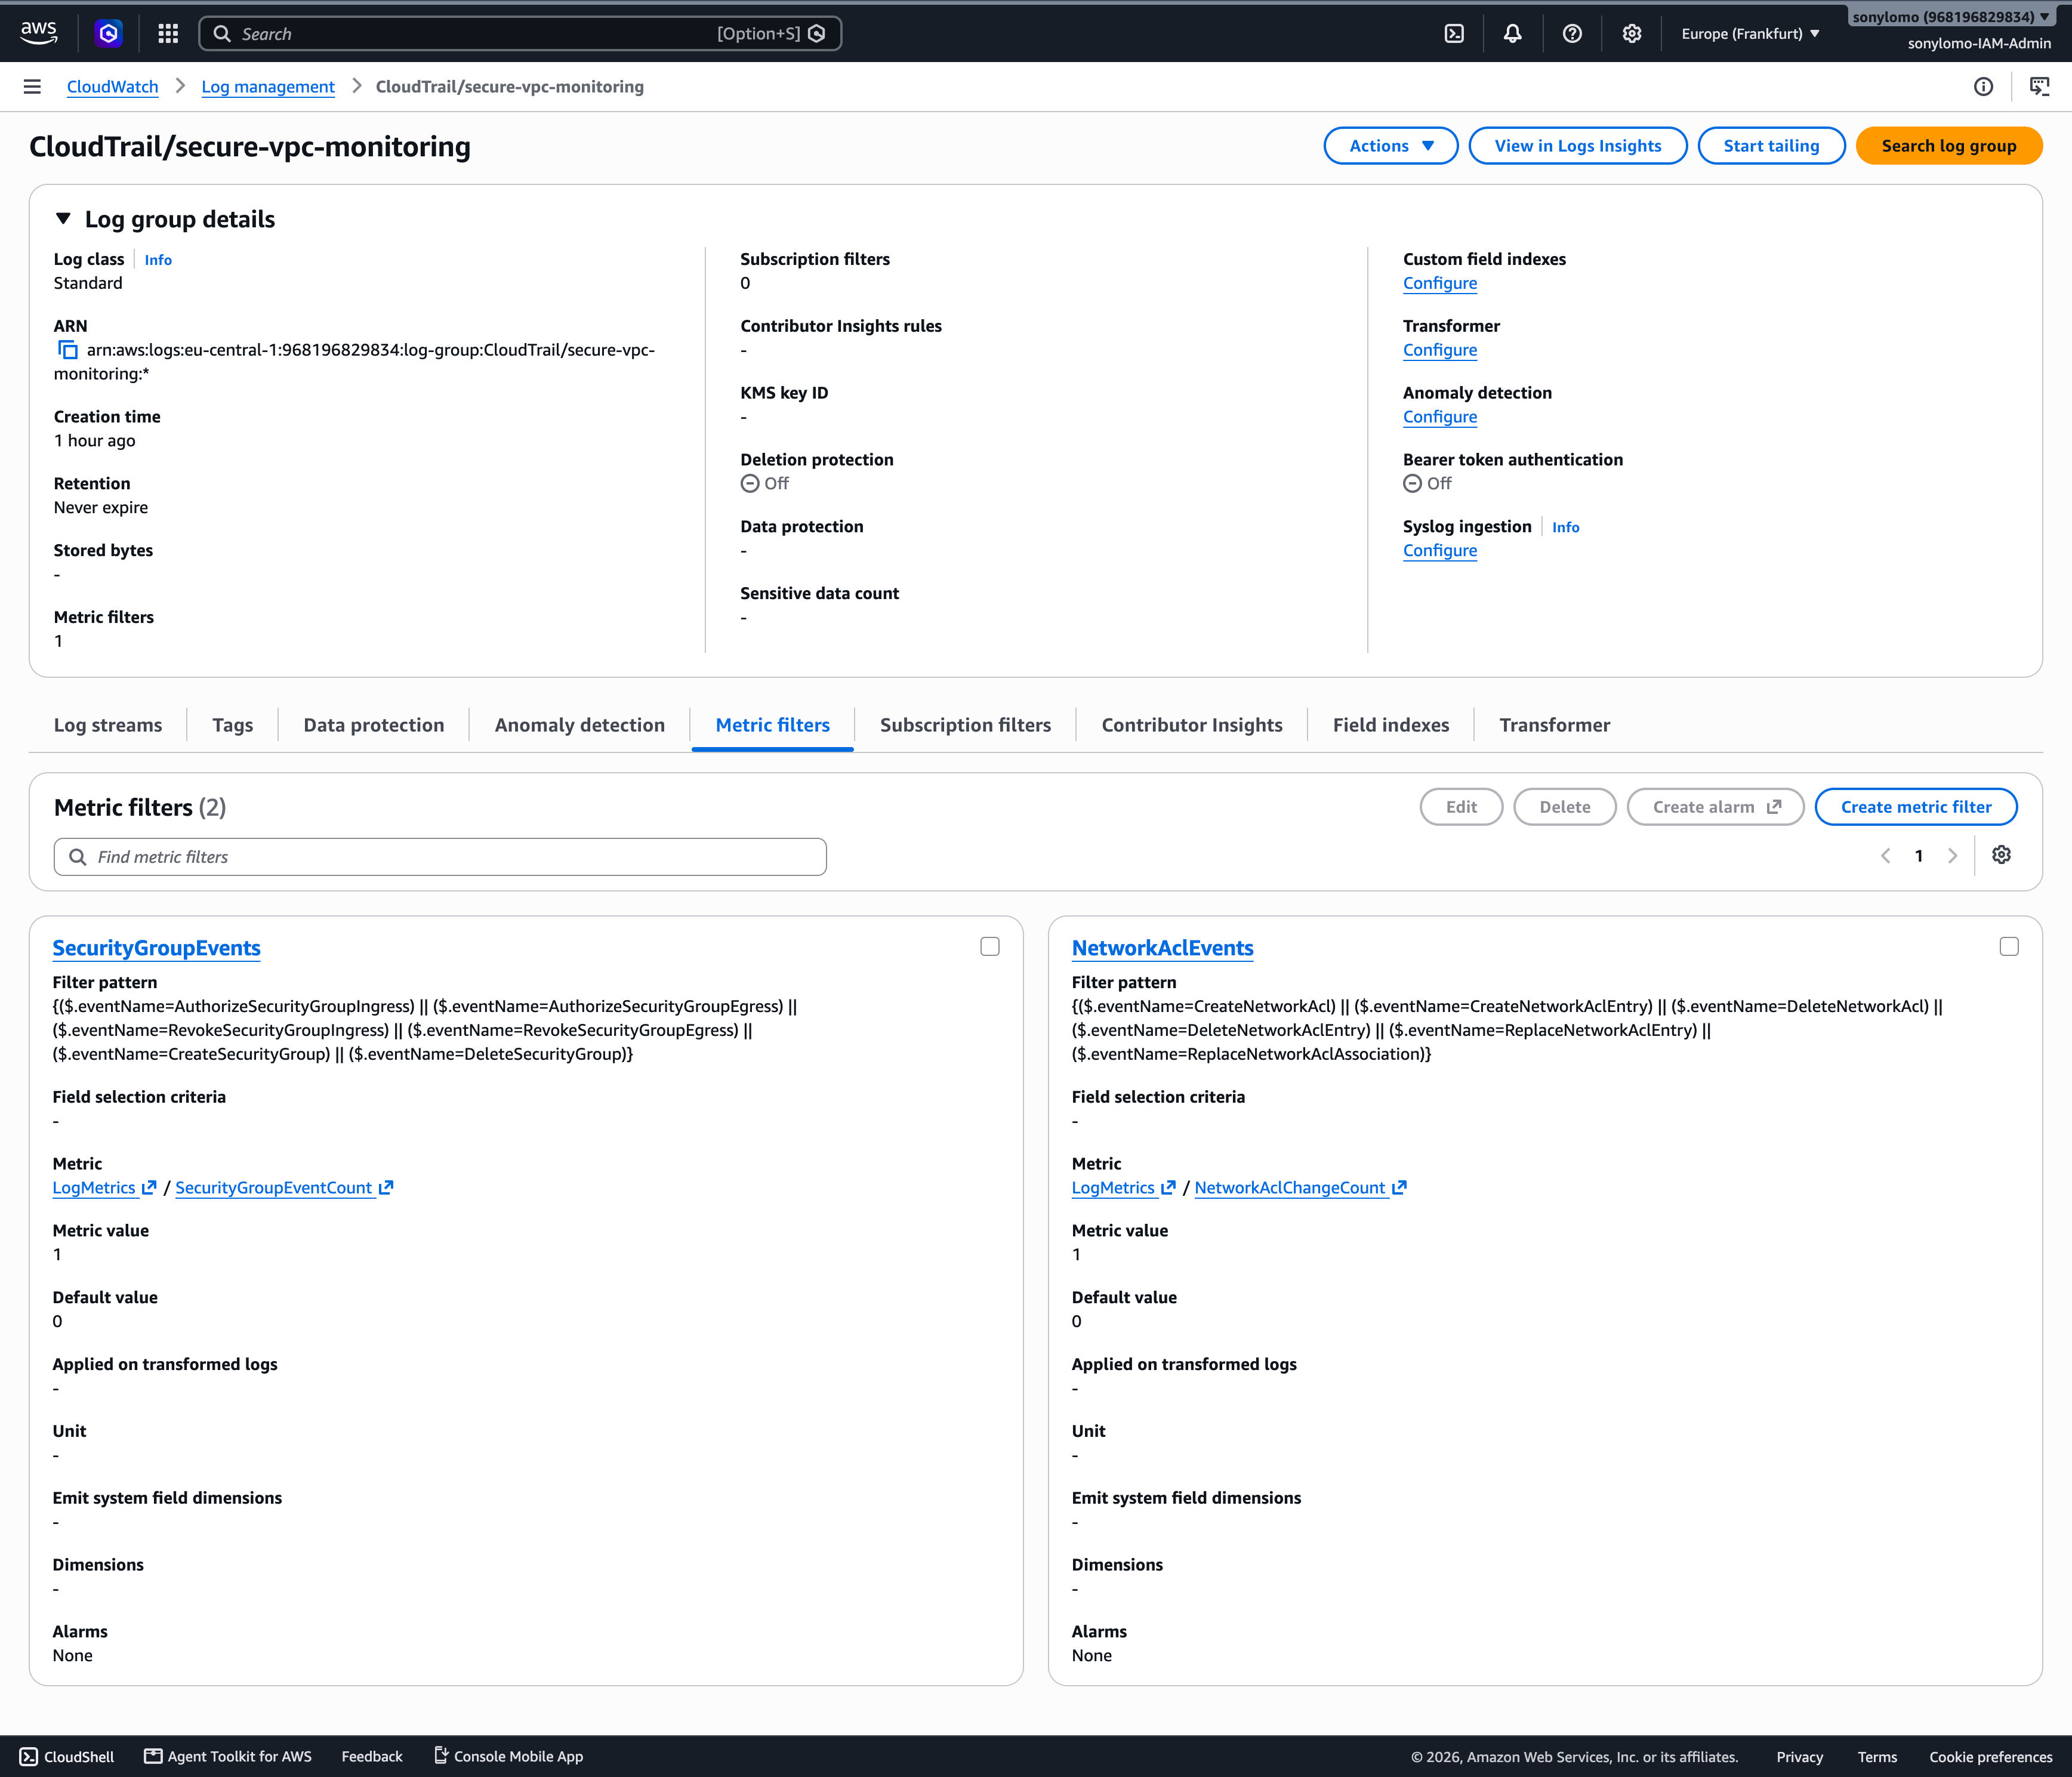
a) Monitoring Security Group Changes
I created a CloudWatch Logs metric filter to look for Security Group changes.
My security-group filter watches for events such as:
AuthorizeSecurityGroupIngress
AuthorizeSecurityGroupEgress
RevokeSecurityGroupIngress
RevokeSecurityGroupEgress
CreateSecurityGroup
DeleteSecurityGroup
The filter pattern I used was:
{($.eventName=AuthorizeSecurityGroupIngress) ||
 ($.eventName=AuthorizeSecurityGroupEgress) ||
 ($.eventName=RevokeSecurityGroupIngress) ||
 ($.eventName=RevokeSecurityGroupEgress) ||
 ($.eventName=CreateSecurityGroup) ||
 ($.eventName=DeleteSecurityGroup)}
Every matching event contributes to the metric.
I called the filter:
SecurityGroupEventsand the metric:
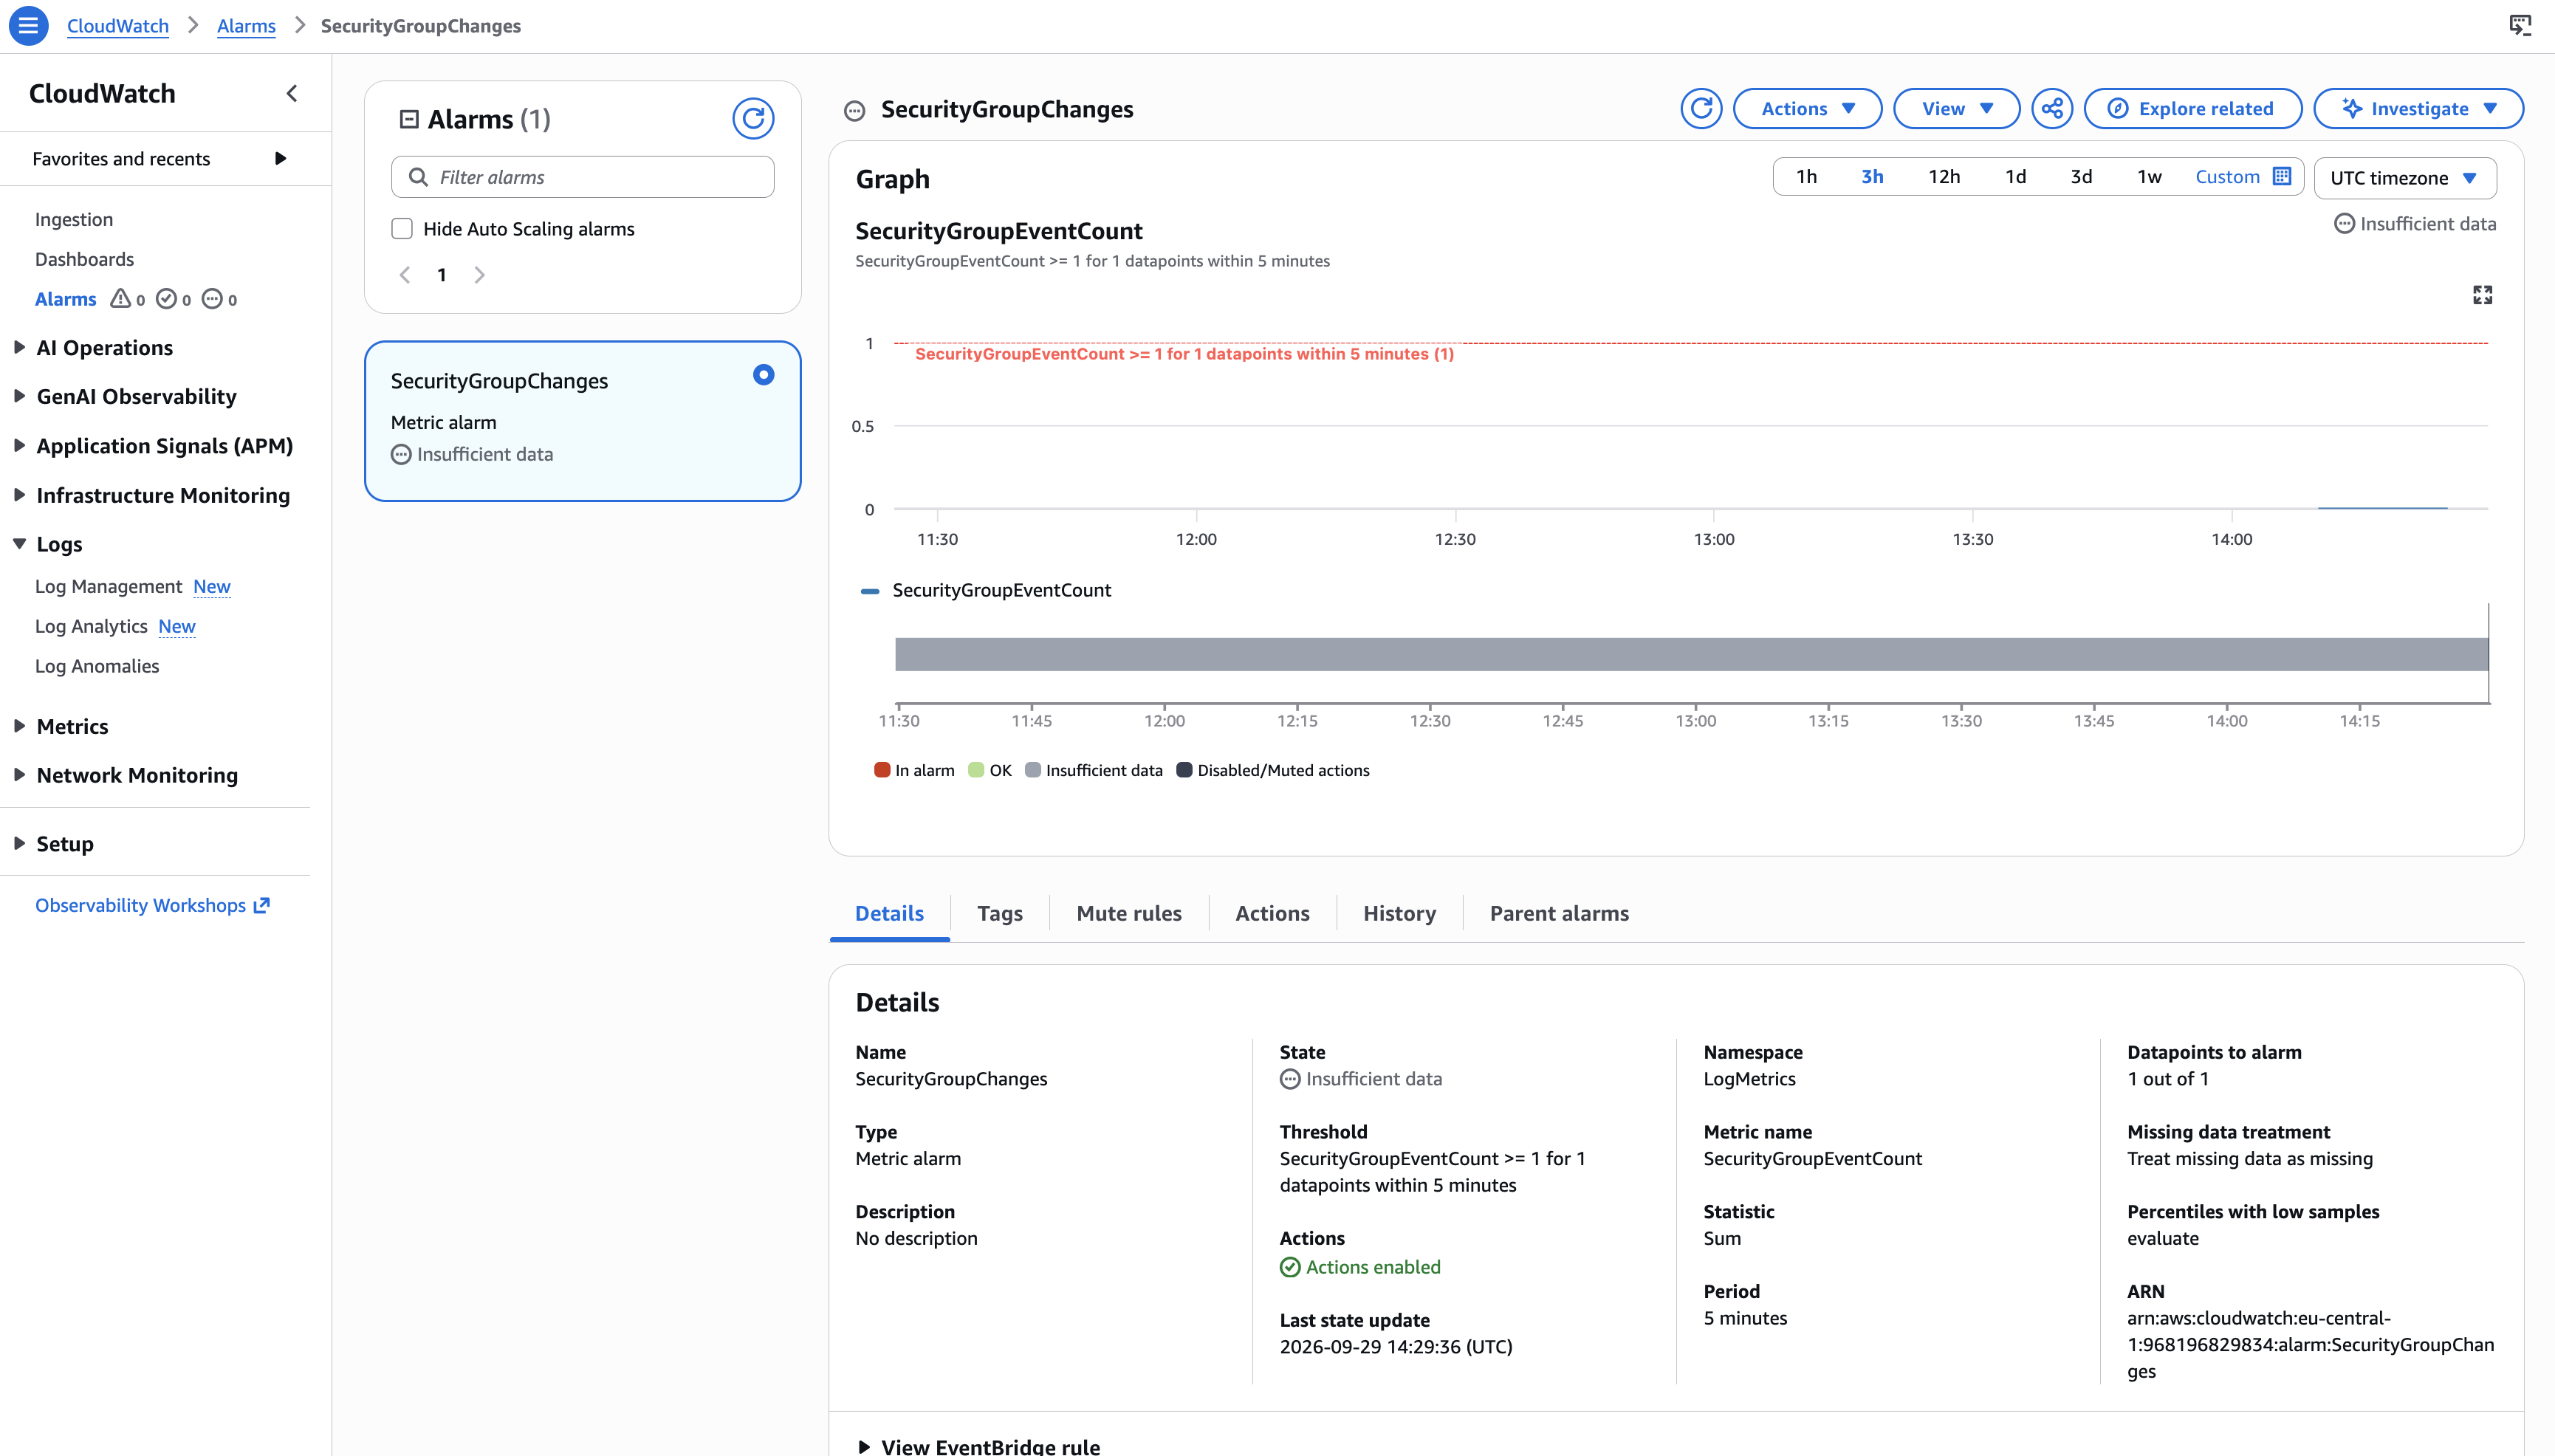
SecurityGroupEventCountThen I created a CloudWatch alarm based on that metric.
b) Monitoring NACL Changes
I created a second filter for network ACL changes.
It watches for events including:
CreateNetworkAcl
CreateNetworkAclEntry
DeleteNetworkAcl
DeleteNetworkAclEntry
ReplaceNetworkAclEntry
ReplaceNetworkAclAssociation
The filter pattern was:
{($.eventName=CreateNetworkAcl) ||
 ($.eventName=CreateNetworkAclEntry) ||
 ($.eventName=DeleteNetworkAcl) ||
 ($.eventName=DeleteNetworkAclEntry) ||
 ($.eventName=ReplaceNetworkAclEntry) ||
 ($.eventName=ReplaceNetworkAclAssociation)}
I then created a separate metric and alarm for those events.
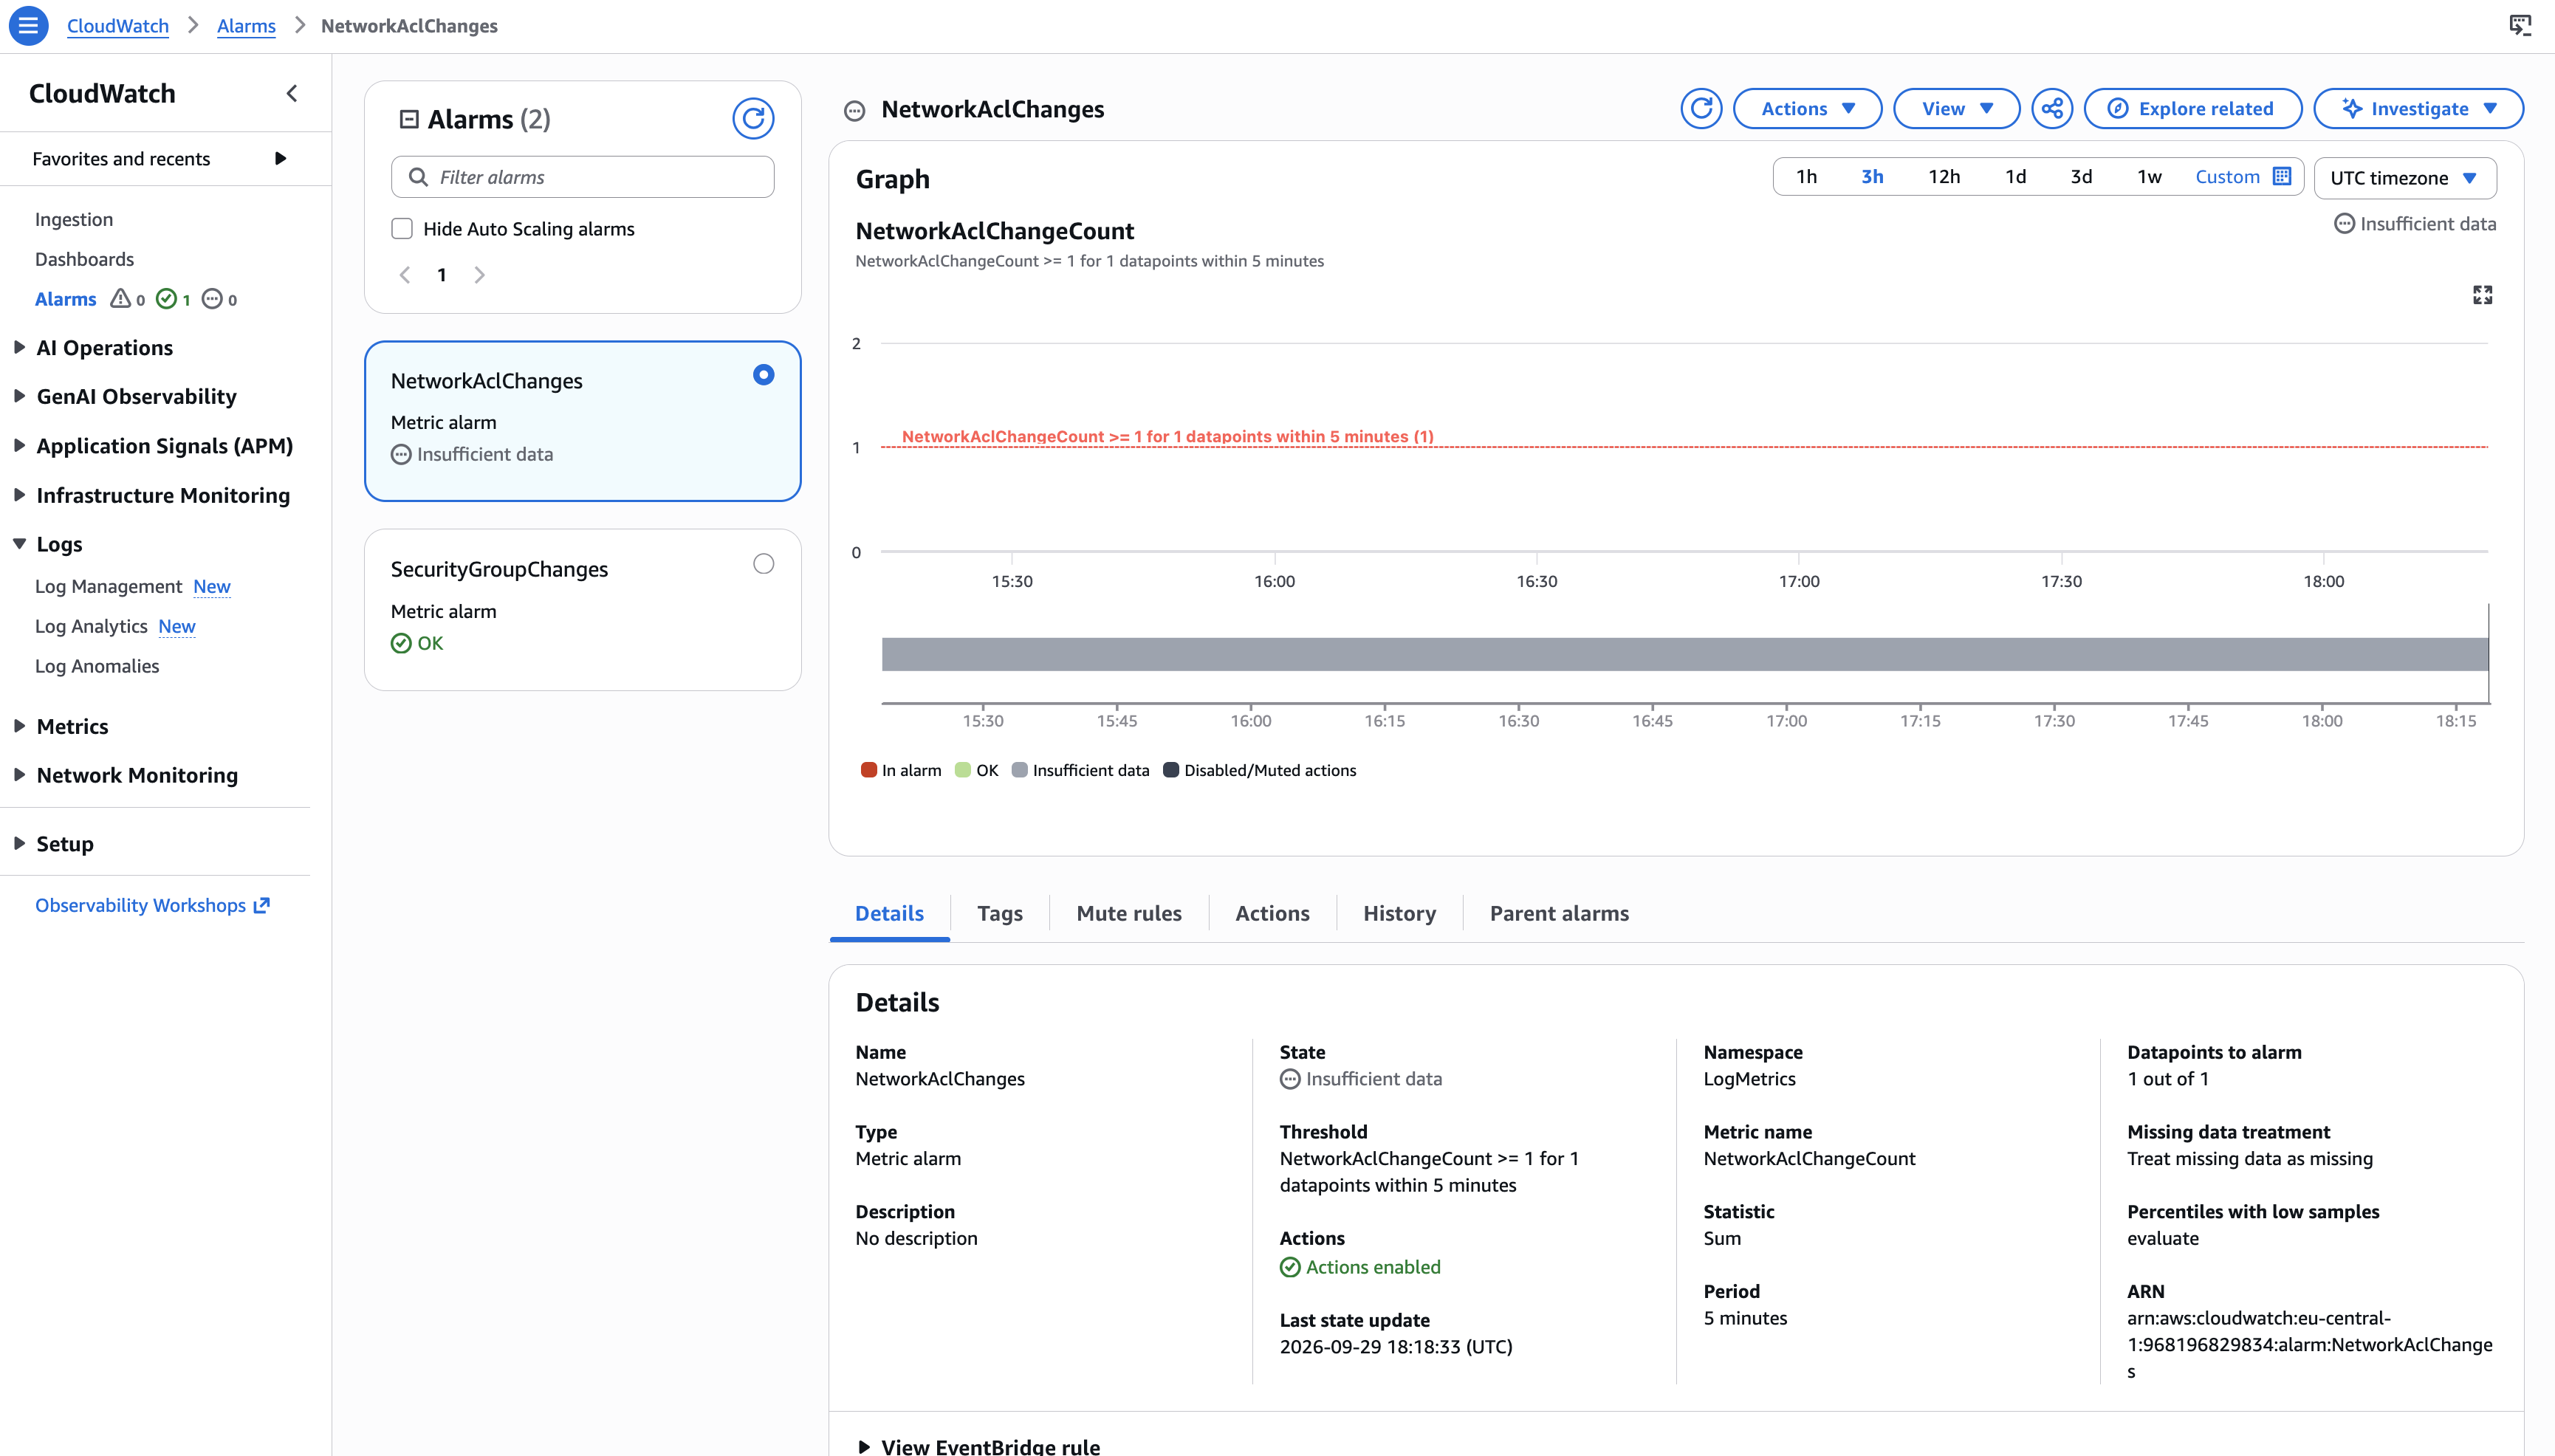
So now I had two monitoring paths:
Security Group Change ──► CloudWatch Alarm
NACL Change ────────────► CloudWatch Alarm
This is much more useful than manually checking CloudTrail every time I get suspicious.
8. Amazon SNS
An alarm changing state is great.
But unless I’m sitting in the AWS console refreshing the page every five seconds like a person who has completely lost the plot, I still need a notification system.
Enter Amazon SNS.
I created a Standard SNS topic:
secure-vpc-security-alerts
Then I added an email subscription.
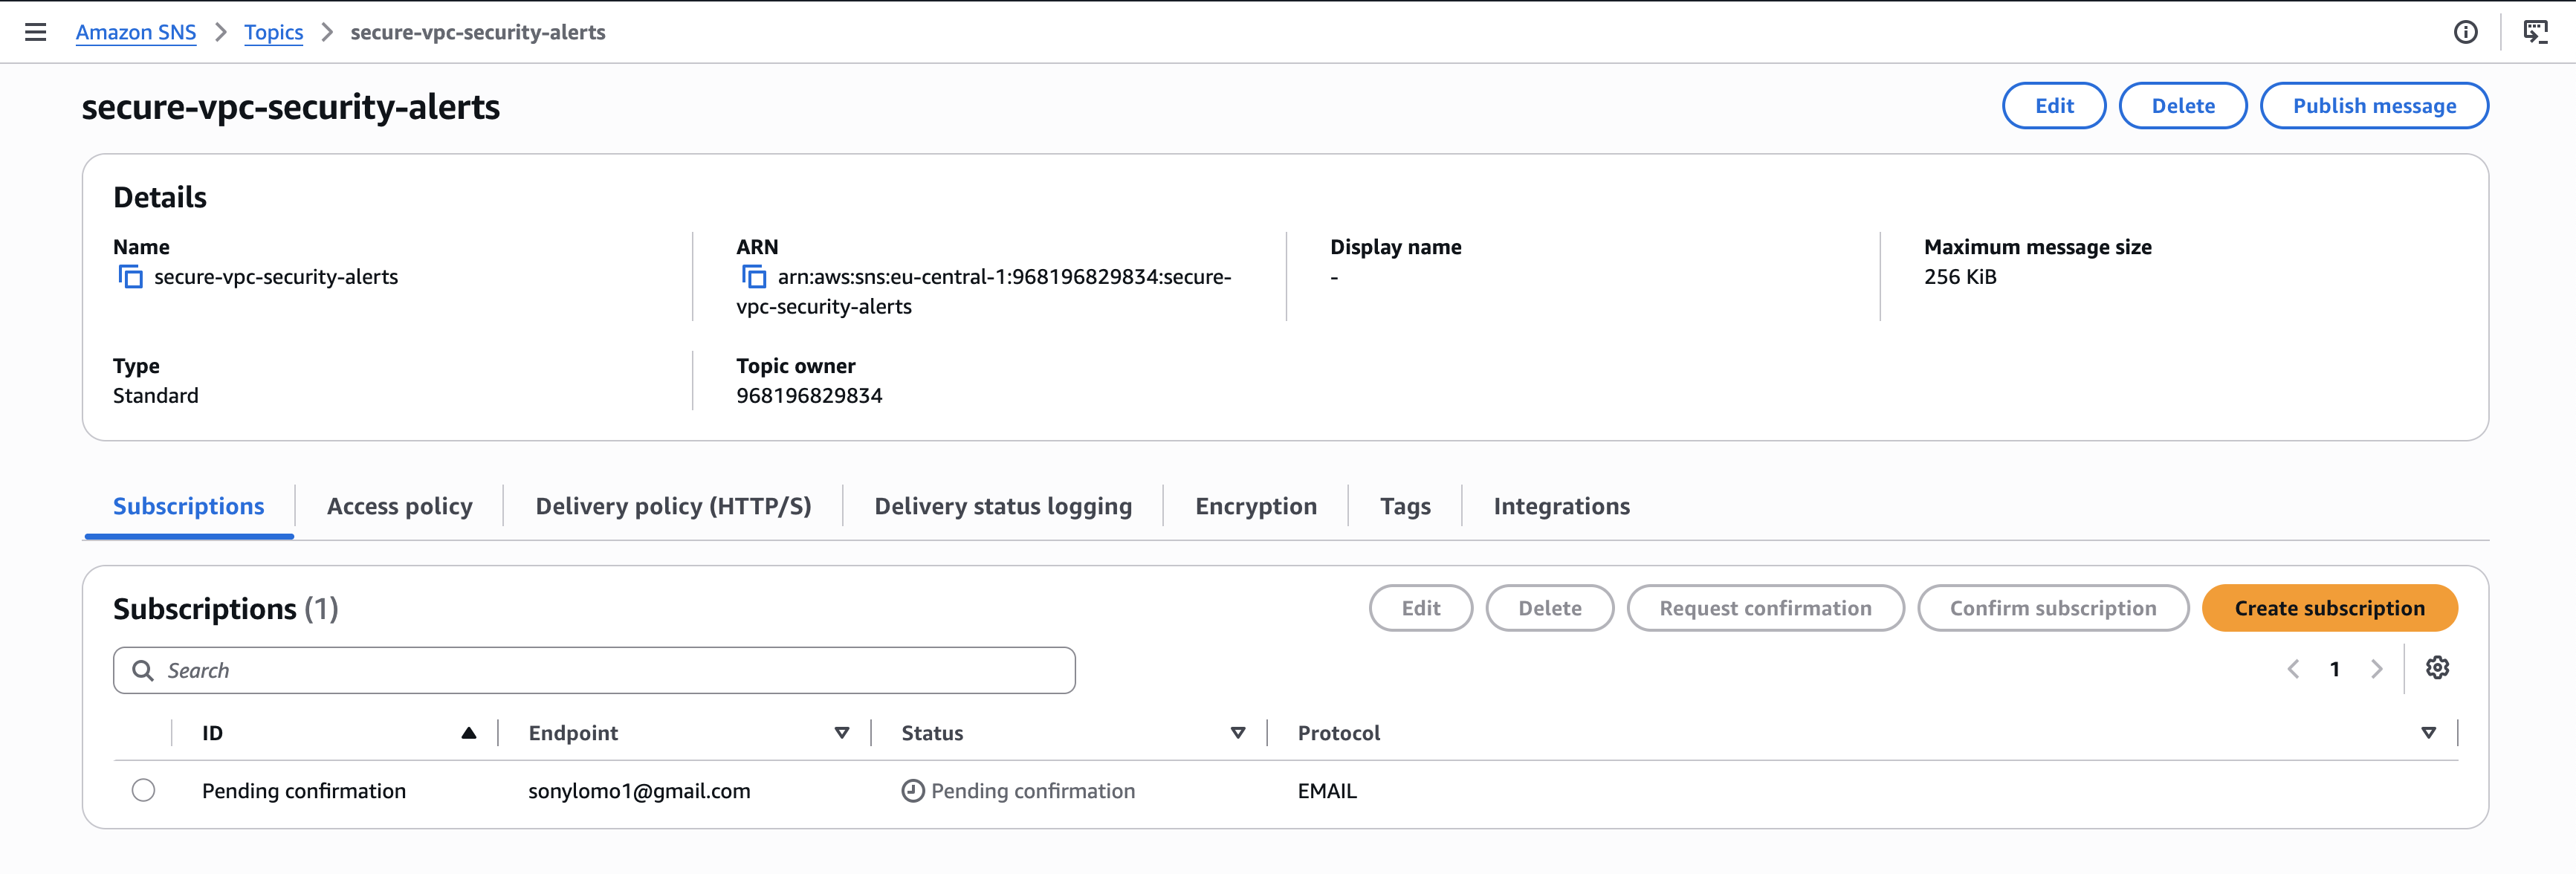
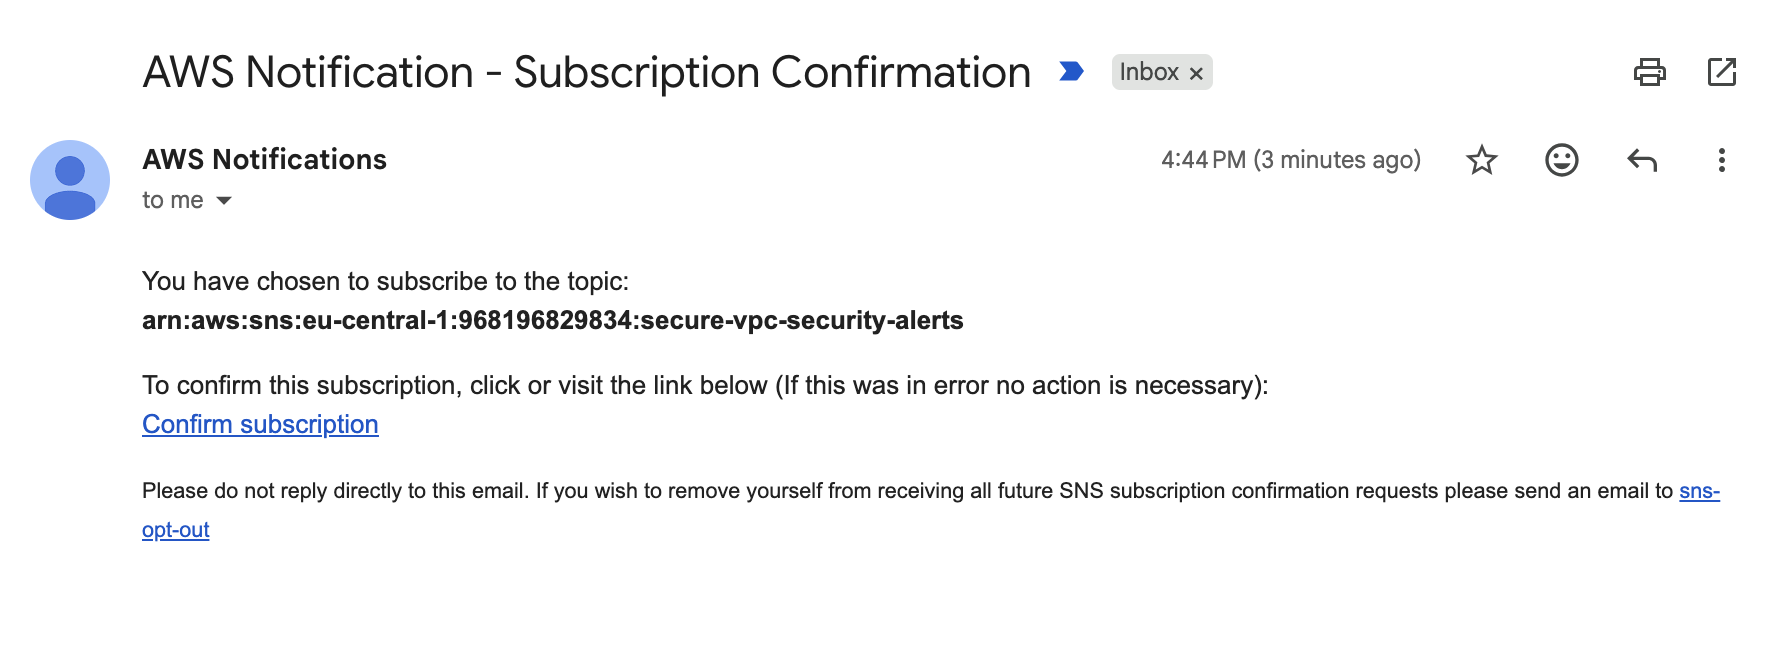
And then AWS sent me a confirmation email for my email subscription. Because apparently even my security alerts need email verification before they’re allowed to have a personality.
Once I confirmed the subscription, the topic was ready to receive notifications from my CloudWatch alarms.
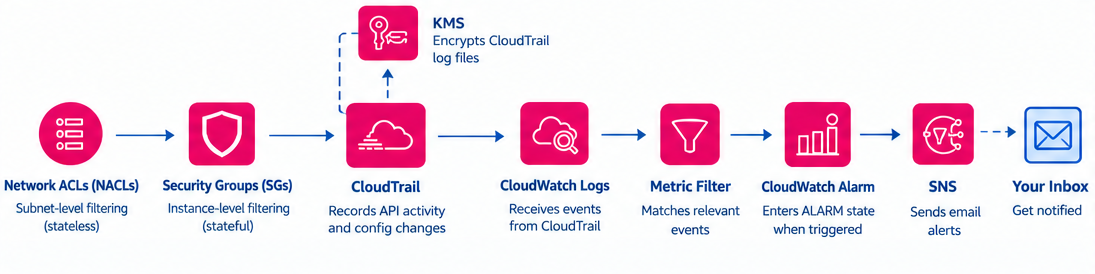
The final monitoring path became:
9. Testing the Alarm System
Of course, I couldn’t build an alarm system and simply trust it. I needed to test its limits.

So I made reversible test changes to my Security Group and NACL.
For example, I added a temporary test rule using TCP port 12345. These were deliberately harmless monitoring tests.
Then I waited for the CloudTrail event to make its way through the pipeline.
CloudTrail recorded the API calls.
CloudWatch Logs received the events.
The metric filters matched them.
The corresponding CloudWatch alarms eventually entered the ALARM state.
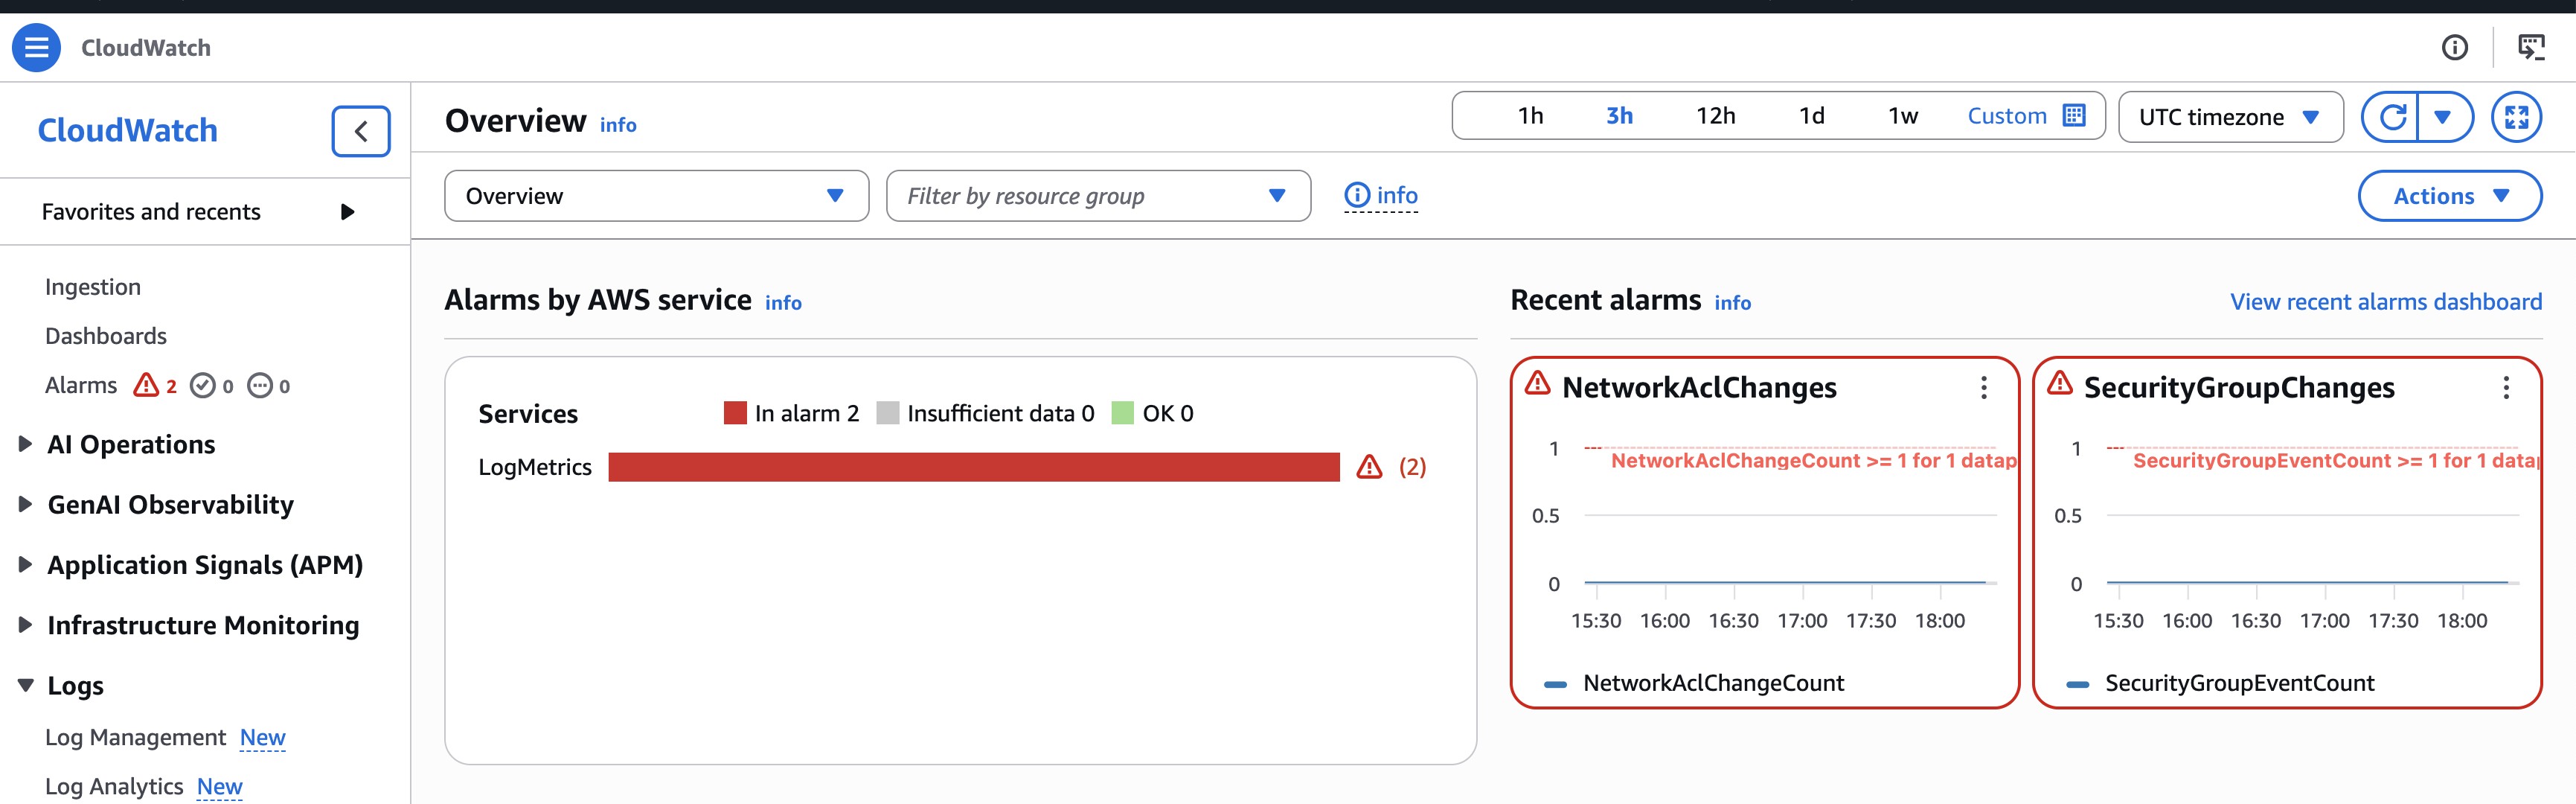
And SNS sent the notifications to my inbox.

There is a small timing detail here that is worth mentioning.
CloudTrail does not promise that an event will appear instantly. AWS documents that CloudTrail typically delivers logs within an average of about five minutes, although delivery can take longer.
So if you make a test change and immediately start yelling at CloudWatch because nothing happened yet…
Give it a minute.
Or five.
Maybe touch grass.
Once the events arrived, I could verify the entire chain.
I could see:
- The original configuration change
- The CloudTrail event
- The matching CloudWatch metric
- The CloudWatch alarm changing state
- The SNS notification in my inbox
That was the point where the project stopped being a collection of AWS services and started feeling like an actual monitoring system.
10. The Bonus Mission: Catch Route Table Drift
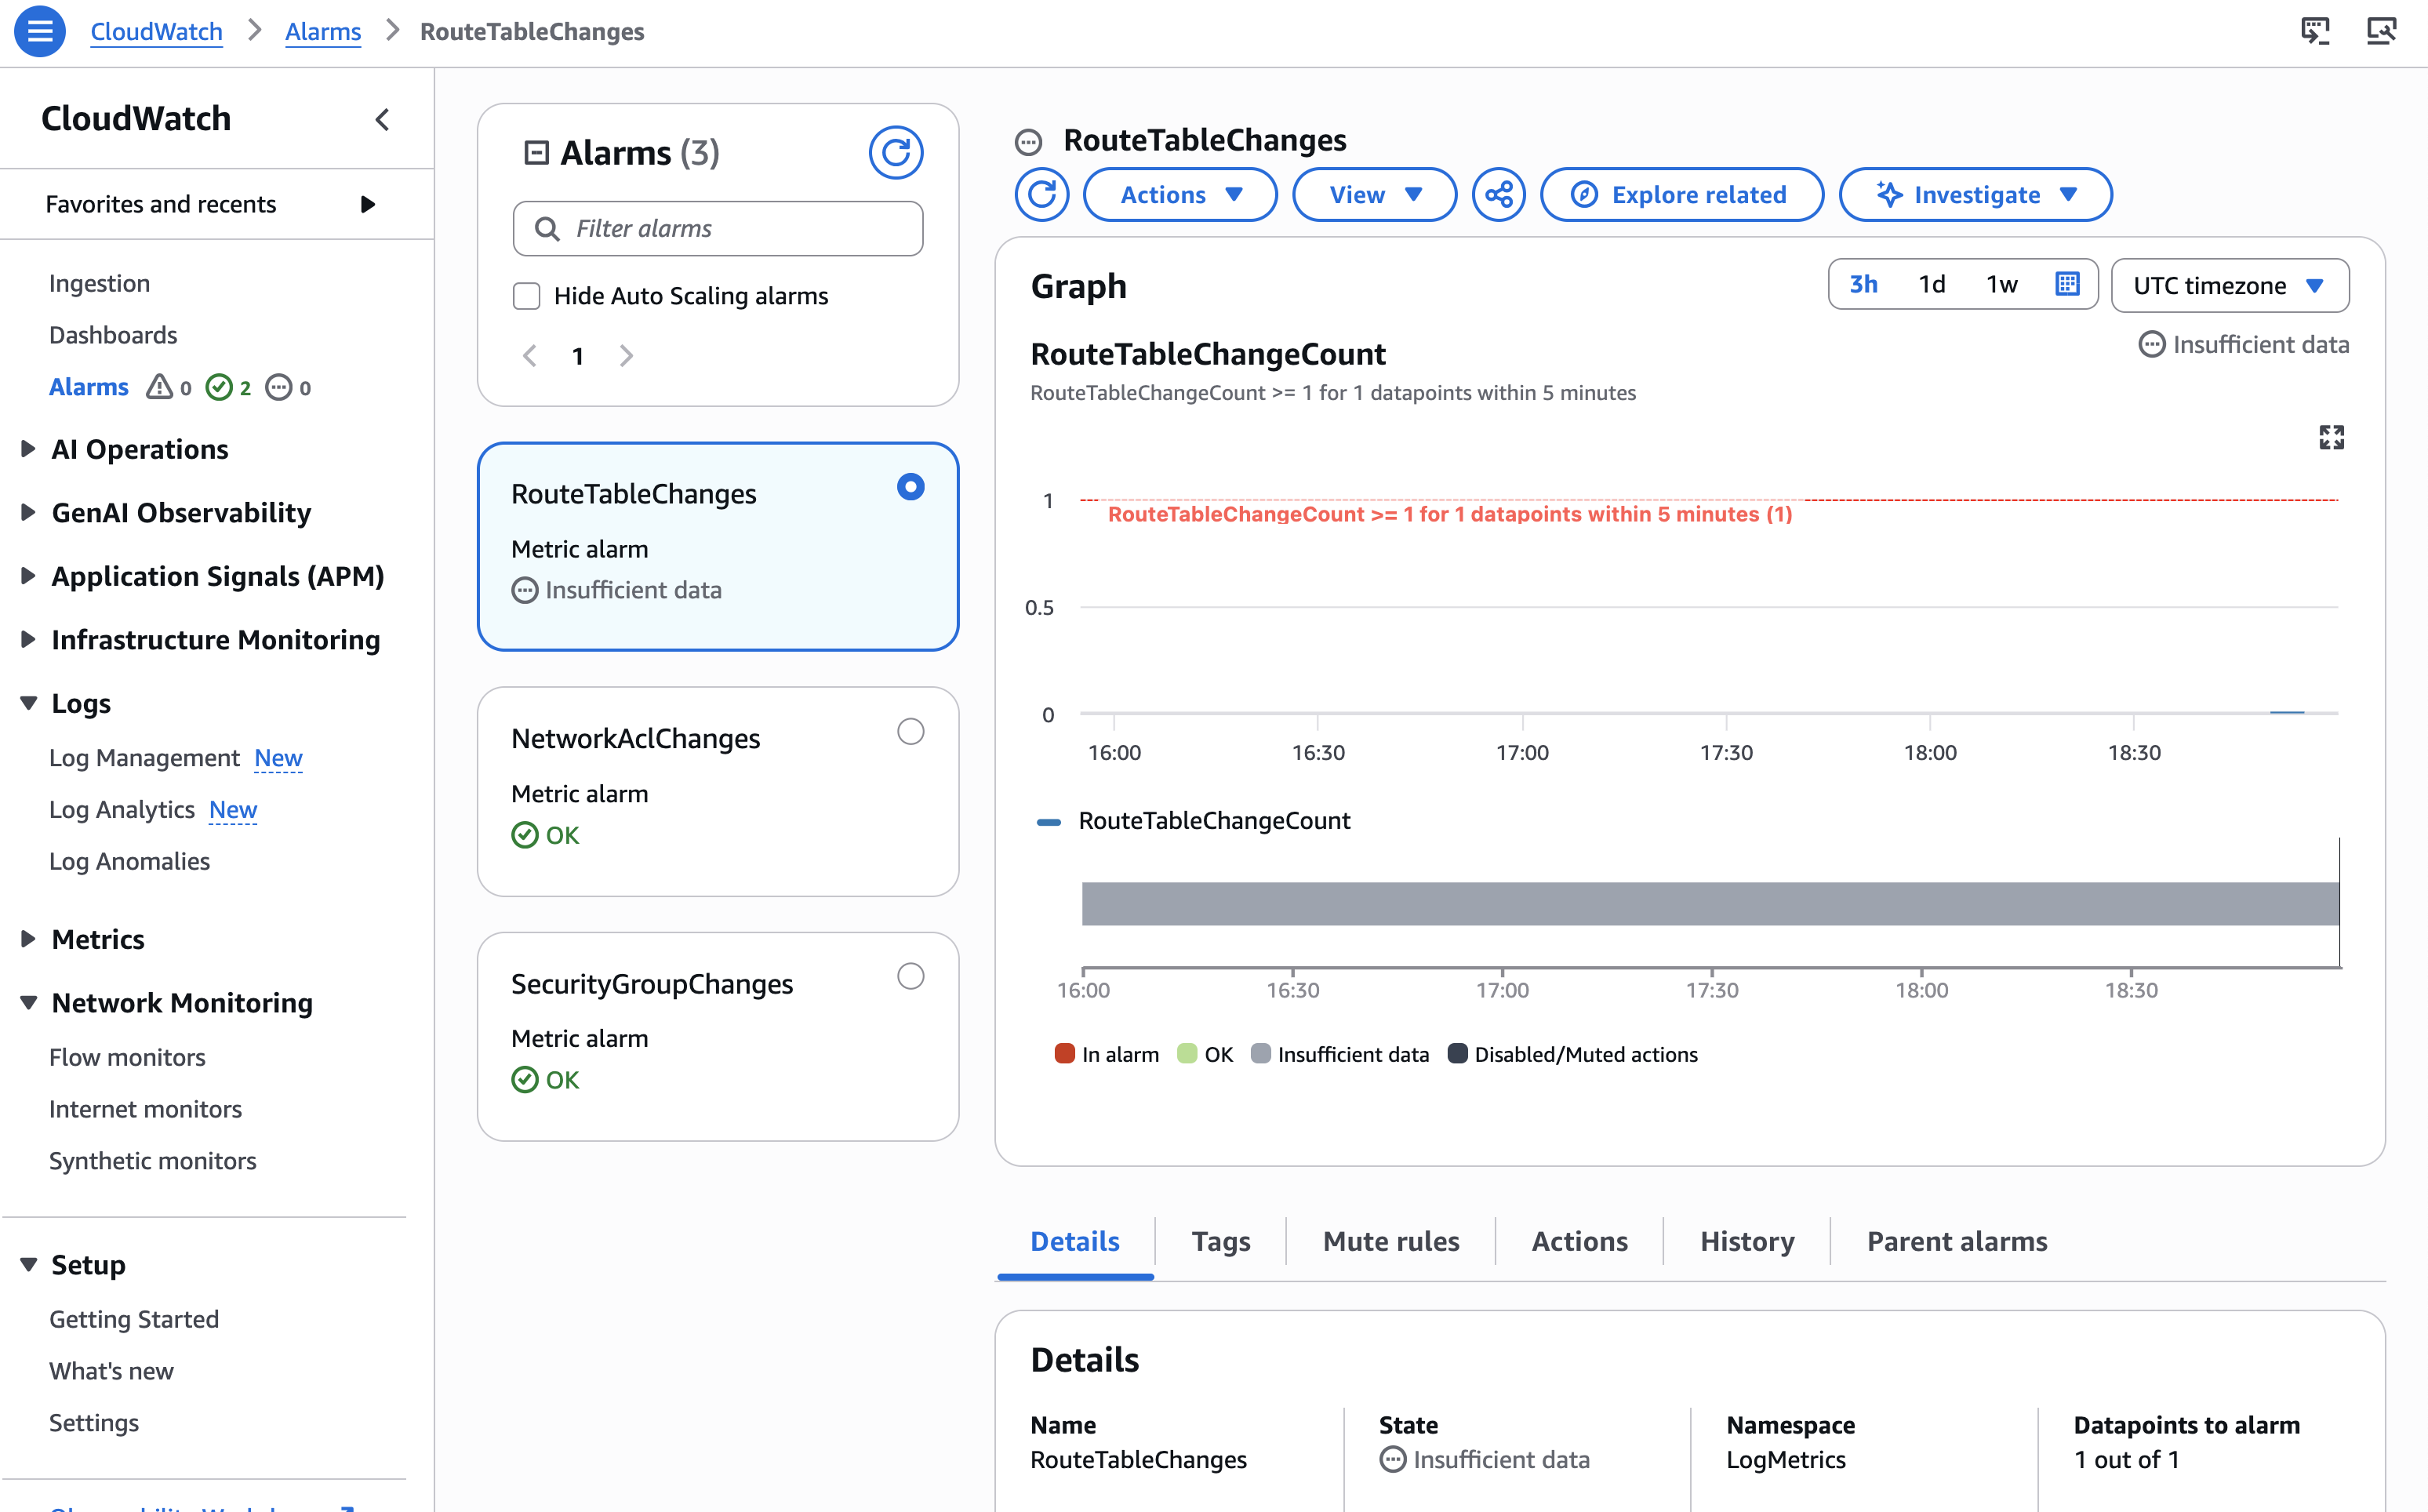
I decided to take the monitoring one step further. If I’m monitoring security groups and NACLs, why not monitor route-table changes too?
Routing is one of those things where a small configuration change can have a surprisingly large effect. But I also didn’t want to accidentally mess with the live network while testing.
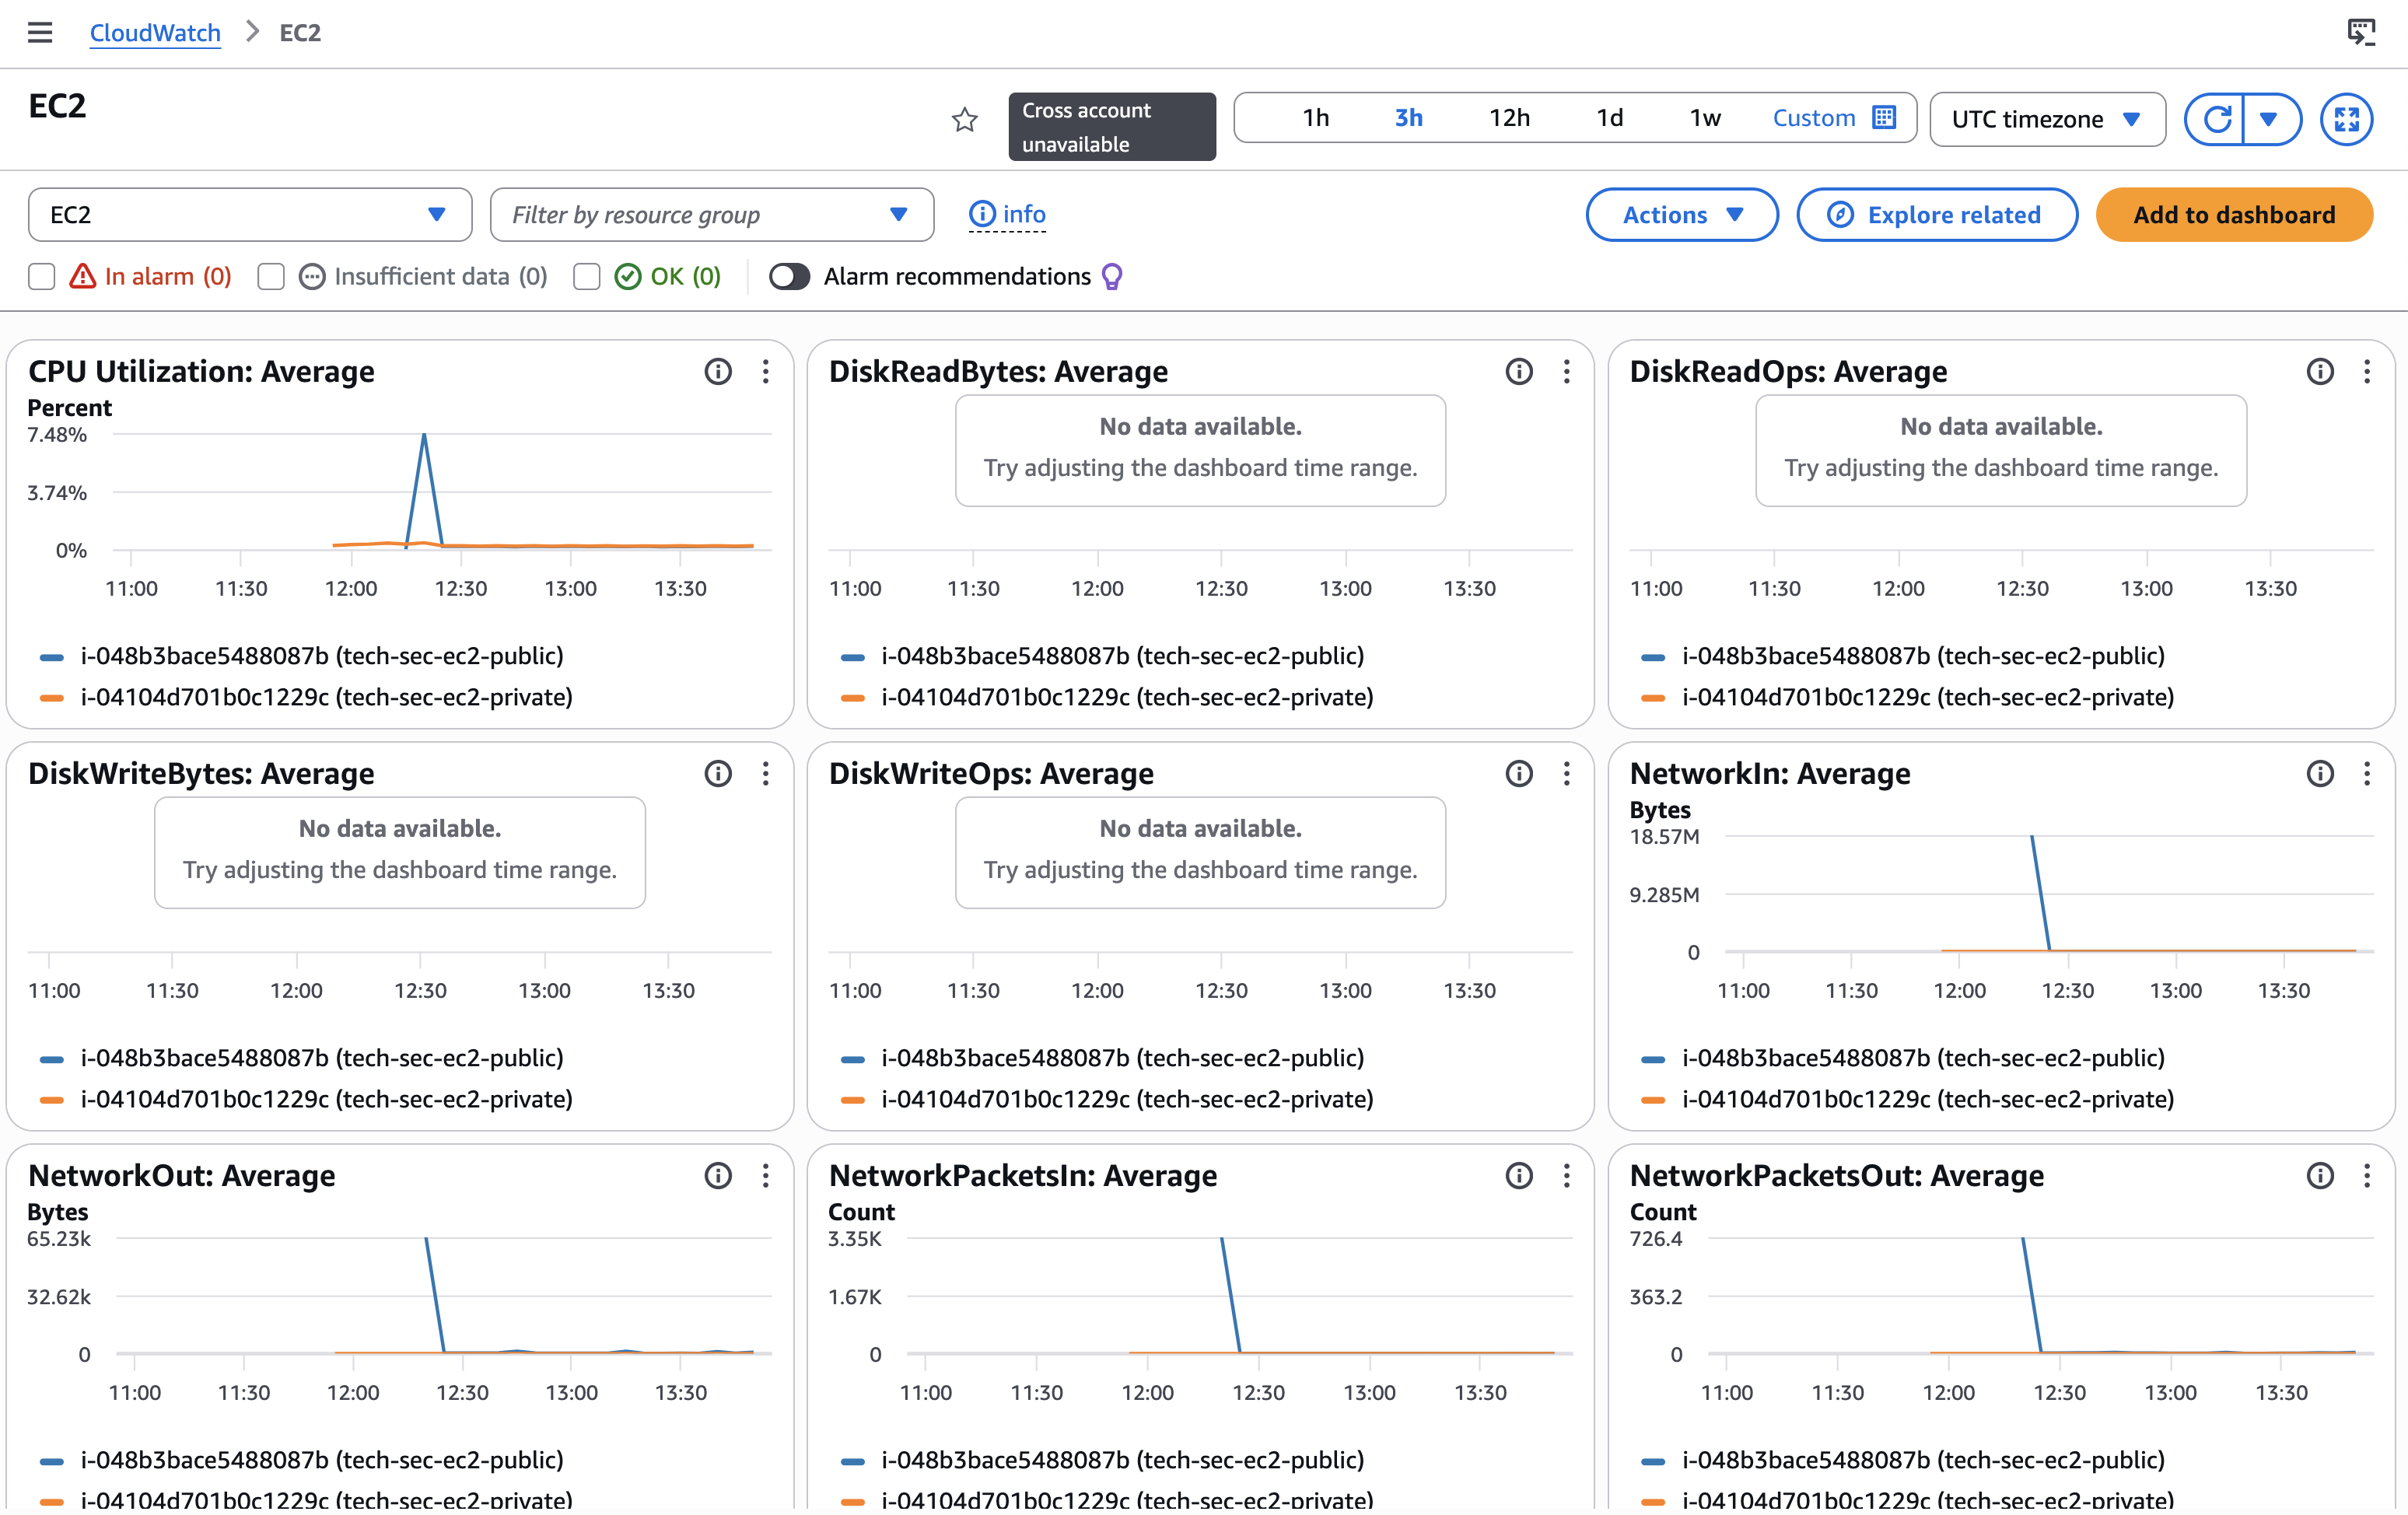
So I created a separate test route table that wasn’t associated with a live subnet.
I could create and delete the route table to generate CloudTrail events without changing the routing behavior of my existing workloads.
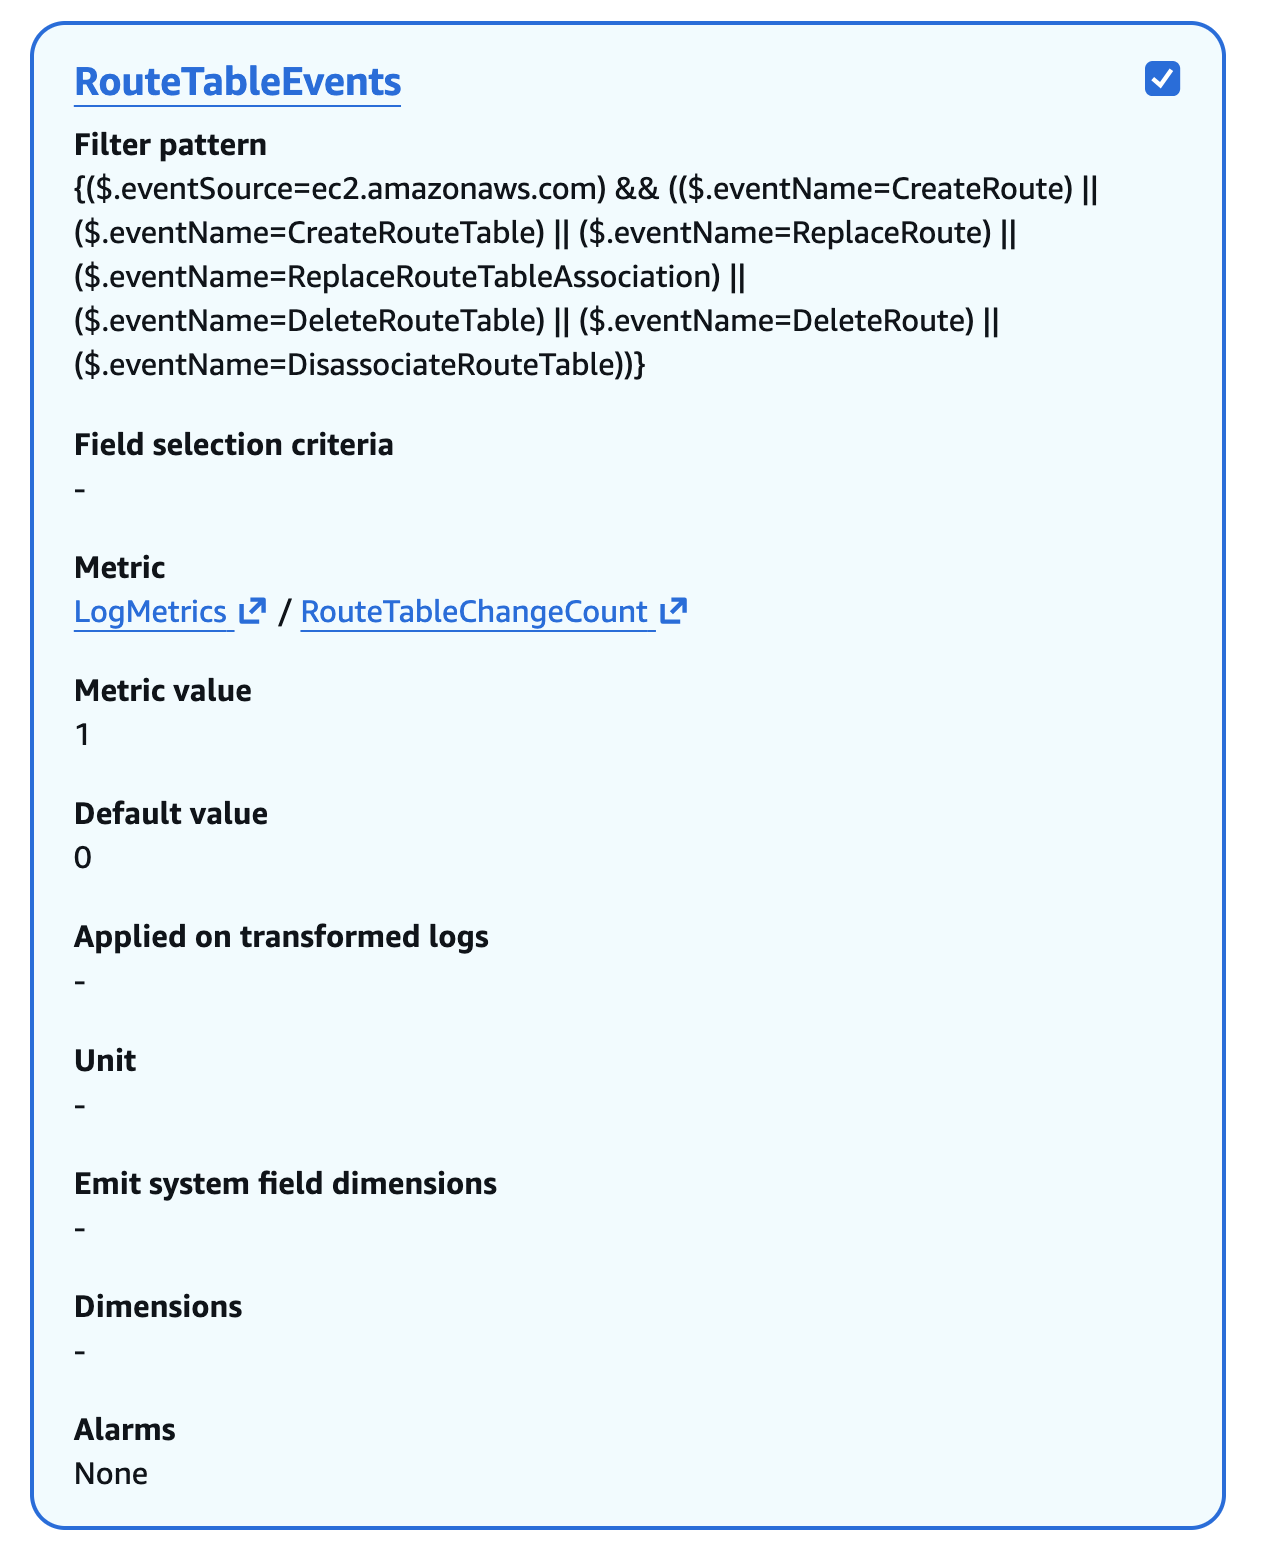
Basically:
Live VPC
 ├── Public subnet → untouched
 ├── Private subnet → untouched
 │
 └── Unattached test route table
             ↓
       Create / Delete
             ↓
         CloudTrail
             ↓
        CloudWatch
             ↓
            SNS
The test route table was deliberately disposable.
I could create it, trigger the monitoring system, receive the alert, inspect the CloudTrail event and then delete it. No live subnet associations were changed.
11. What the Final Architecture Looks Like
By the end, I had several layers working together.
Layer 1: Network isolation
The VPC separates the workloads into public and private subnets.
The private subnet does not have a route to an Internet Gateway.
Layer 2: Security groups
The public EC2 instance only accepts the traffic I actually need from my IP.
The private EC2 instance only accepts SSH traffic from the public EC2 security group.
Layer 3: Network ACLs
The NACLs provide subnet-level traffic controls.
Because they’re stateless, I explicitly accounted for return traffic using the required ephemeral-port ranges.
Layer 4: Audit logging
CloudTrail records the AWS API activity involved in changing these controls.
Layer 5: Encrypted audit storage
CloudTrail delivers its log files to S3, with SSE-KMS encryption configured for the trail and log file validation enabled.
Layer 6: Detection
CloudWatch Logs receives the CloudTrail events.
Metric filters look for security-group and NACL changes.
CloudWatch alarms react when matching events occur.
Layer 7: Notification
SNS delivers the alarm notifications to my email.
13. What I Actually Learned
The AWS console makes a lot of these things look deceptively simple: click a checkbox, add a rule, create an alarm then, voilà!
But actually understanding what is happening underneath is a different story.
a) CloudTrail and CloudWatch have different jobs
CloudTrail is about AWS activity and API events.
CloudWatch is about monitoring those events and other telemetry, turning matching events into metrics, and creating alarms.
One thing this project helped me understand much better was the difference between these two services.
CloudTrail = “Who did what?”
CloudTrail records AWS API activity.
It helps answer questions like:
- Who changed this Security Group?
- What API call was made?
- When did it happen?
- Where did the request come from?
CloudWatch = “What’s happening and should I care?”
CloudWatch can collect and analyze logs and metrics, create alarms, and trigger notifications or other actions.
In this project, I used it to turn specific CloudTrail events into measurable signals and then alarms.
b) Alerts need a delivery mechanism
An alarm sitting inside CloudWatch doesn’t help much if nobody is watching it.
SNS gave my alarms somewhere to go.
In this case, that somewhere was my inbox.
c) Testing security controls is part of building them
I didn’t want to simply configure the rules and declare victory.
I intentionally made controlled changes to prove that:
- CloudTrail recorded them
- CloudWatch detected them and triggered the alarms
- The alarms changed state
- SNS delivered the notification
- The legitimate traffic still worked after the test rules were removed
That last part is especially important.
Security controls are only useful if they don’t accidentally destroy the workload they’re supposed to protect.
14. What I’d Do Next
This project gave me a pretty solid foundation for thinking about network security and auditability in AWS.
But there is still a lot more to explore.
The next logical step would be deeper threat detection with services such as Amazon GuardDuty, rather than focusing only on configuration changes.
Amazon GuardDuty approaches security from a different angle. It’s a managed threat-detection service that continuously analyzes AWS telemetry and looks for suspicious or potentially malicious activity.
I’d also like to explore more automated responses.
Because receiving an email saying:
Someone changed something suspicious.
is useful.
Receiving the email while AWS automatically investigates or responds to the event?
Now we’re cooking.
There is also a lot more to learn around:
- IAM least privilege
- AWS Config
- Security Hub
- GuardDuty
- automated remediation
- centralized logging
- multi-account security
- infrastructure as code
- incident response
Which means, naturally, I have successfully turned one AWS project into approximately seventeen future AWS projects.
15. Final Takeaway
The biggest thing I took away from this project is that security and monitoring are two different problems.
I can spend hours building restrictive Security Group and NACL rules.
But if nobody notices when those rules are changed, I still have a visibility problem.
The more complete approach is:
Prevent → Record → Detect → Alert → Respond
And that’s a much more interesting way for me to think about AWS security than simply memorizing which checkbox to tick in the console.
I came into this project wanting to harden a VPC.
I left with a much better understanding of how AWS networking, audit trails and monitoring fit together.
The broader lesson here was becoming pretty clear:
Network security isn’t just about blocking traffic. It’s also about knowing when the rules controlling that traffic change.
And most importantly, cloud security will teach you mindfulness. 🧘🏾♀️
Have a project or engineering opportunity in mind? Get in touch with Sonia.