
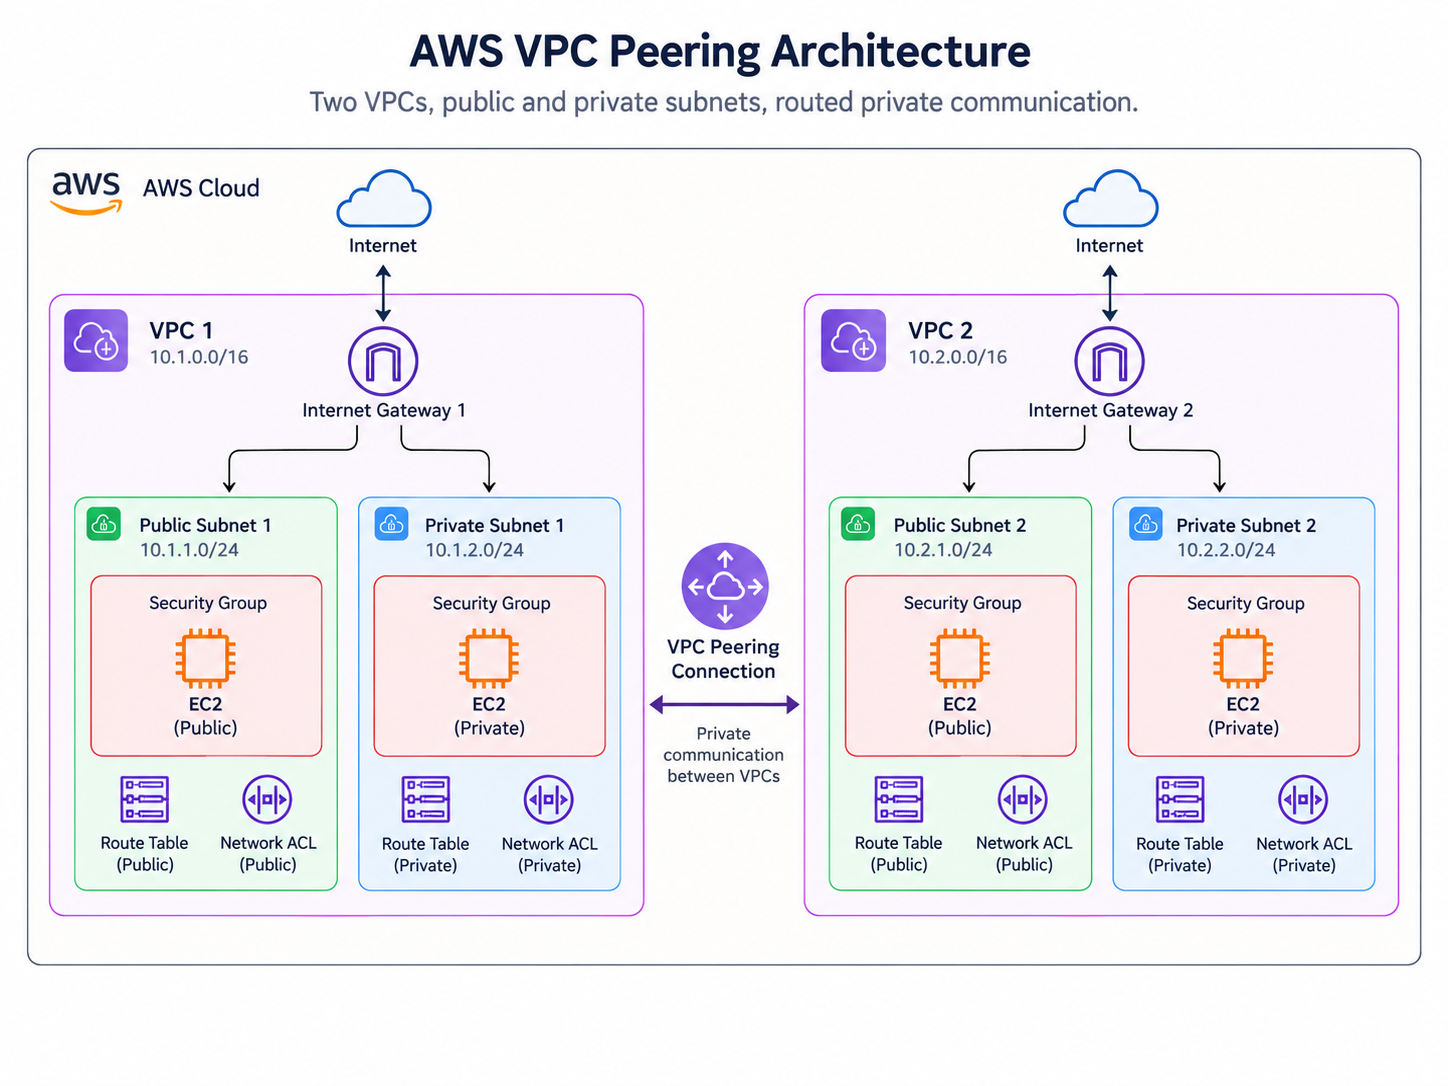
Apparently, creating one AWS network wasn’t enough for me. So naturally, I created two.
For this project, I built two separate Amazon VPCs, gave each one a public and private subnet, launched EC2 instances into all four subnets, configured routing and network security, and then connected the two VPCs using VPC Peering.
The goal was simple:
Make resources in two completely separate VPCs communicate using their private IP addresses, without sending that traffic through the public internet.
Several route tables, Security Groups, NACL rules, failed SSH attempts, and a minor interrogation of AWS later… we got there.
What Is Amazon VPC?
Amazon VPC stands for Amazon Virtual Private Cloud.
A VPC gives you a logically isolated network inside AWS where you can control things like:
- IP address ranges
- Subnets
- Route tables
- Internet access
- Security Groups
- Network ACLs
- How resources communicate with each other
Think of it as building your own little network inside AWS. Except AWS owns the land, the roads, the electricity, the routers…
So maybe you’re renting a very configurable gated estate.
My Architecture
For this project, I created two VPCs:
VPC 1: 10.1.0.0/16
VPC 2: 10.2.0.0/16
These CIDR ranges intentionally don’t overlap.
That’s important because AWS doesn’t support VPC peering between VPCs with overlapping IPv4 CIDR ranges. Otherwise AWS wouldn’t know which network a destination belongs to.
Each VPC contains:
- 1 public subnet
- 1 private subnet
- 1 EC2 instance in each subnet
- Separate route tables for each subnet
- Security Groups for the EC2 instances
- Network ACLs for the subnets
Each VPC also has its own Internet Gateway to provide internet connectivity to resources that need it in the public subnet.
So across the project, I had:
- 2 VPCs
- 4 subnets
- 4 EC2 instances
- 4 subnet route tables
- 2 Internet Gateways
- Security Groups
- Network ACLs
- 1 VPC peering connection
Tiny AWS city.
Population: four EC2 instances.
Infrastructure budget: emotionally expensive.
Part 1: Building the Networks
Step 1: Create the VPCs
I started by creating my two VPCs using the AWS VPC Visual Resource Map.
For each VPC, I created:
- one public subnet
- one private subnet
- route tables
- an Internet Gateway
My public subnet route tables include a route similar to:
0.0.0.0/0 → Internet GatewayThat route is one of the things that allows a subnet to function as a public subnet.
Calling a subnet private-subnet does not actually make it private. AWS does not care about your naming conventions or your feelings.
For IPv4 internet access, a subnet is considered public when its route table has a route to an Internet Gateway, while an individual EC2 instance also needs public addressing and the appropriate security configuration to communicate directly with the internet.
My private subnets don’t have a direct Internet Gateway route.
Can I Share Route Tables Across the Two VPCs?
At one point I wondered whether I could create one shared public route table and one shared private route table across all four subnets.
Nope.
Route tables belong to a specific VPC. One route table can be associated with several subnets within that VPC, but you cannot create a route table in VPC 1 and associate it with a subnet in VPC 2.
VPC Peering connects the networks. It doesn’t merge them into one giant VPC.
They’re dating. They haven’t moved in together.
Step 2: Launch the EC2 Instances
Next, I launched four EC2 instances:
VPC 1
Public Subnet
└── Public EC2

Private Subnet
└── Private EC2
VPC 2
Public Subnet
└── Public EC2

Private Subnet
└── Private EC2I also used EC2 User Data to install Nginx automatically on my instances.
For the public EC2 instances, I retrieved the public IPv4 address from the EC2 Instance Metadata Service and displayed it on the webpage.
And naturally, my production-quality HTML said:
Tell your mum to come see me at this public address 😘
Because professional cloud infrastructure requires professional copywriting.
One improvement I would make here is to handle public and private instances differently.
For my private EC2 instances, retrieving the private IPv4 address makes more sense than requesting a public address that doesn’t exist.
For example:
TOKEN=$(curl -s -X PUT \
  -H "X-aws-ec2-metadata-token-ttl-seconds: 21600" \
  http://169.254.169.254/latest/api/token)

PRIVATE_IP=$(curl -s \
  -H "X-aws-ec2-metadata-token: $TOKEN" \
  http://169.254.169.254/latest/meta-data/local-ipv4)
That would also make identifying the instance during testing much easier.
Part 2: Enter VPC Peering
What Is VPC Peering?
A VPC peering connection creates a private network connection between two VPCs.
Once properly configured, resources in each VPC can communicate with resources in the other VPC using their private IP addresses. That means traffic doesn’t need to travel through the public internet. Exactly what I wanted.
VPC Peering can also work between:
- VPCs in the same AWS account
- VPCs in different AWS accounts
- VPCs in the same AWS Region
- VPCs across supported AWS Regions
For this project, I only needed two VPCs and one peering connection.
Requester vs Accepter
Creating a VPC peering connection involves two sides:
- The Requester VPC initiates the peering request.
- The Accepter VPC accepts or rejects it.
Very diplomatic.
Relationship established.
Unfortunately, accepting the peering request doesn’t magically make the EC2 instances communicate. Because apparently networking relationships require paperwork too.
AWS: Peering connection: Active ✅
Me: Great, so they can communicate now?
AWS: Lmao no.
Step 3: Update the Route Tables
A peering connection gives the VPCs a possible network path. But the route tables still need to know when to use it.
For VPC 1, I added a route similar to:
Destination: 10.2.0.0/16
Target:      pcx-xxxxxxxx
And in VPC 2:
Destination: 10.1.0.0/16
Target:      pcx-xxxxxxxx
The pcx-... target is the VPC peering connection.
Because I intentionally created a separate route table for each of my four subnets, and I wanted all four EC2 instances to be able to reach the peer VPC, I added the appropriate peering route to all four relevant route tables.
But here’s the important part:
I wasn’t modifying four route tables simply because four route tables existed.
The rule is:
Add the peering route to the route table associated with every subnet that needs to communicate with the peer VPC.
If I only wanted:
VPC 1 Private Subnet
          ↕
VPC 2 Private Subnet
then only those two subnet route tables would need the peer route.
Public vs Private Traffic
This project also fixed something in my mental model.
Initially, I thought:
VPC Peering is mainly useful for private subnets.
That’s not quite right.
Resources inside either public or private subnets can communicate over a VPC peering connection.
What matters is that the traffic crossing the peering connection uses private IP addressing.
So even an EC2 instance living inside a public subnet can communicate with an instance in the peer VPC using its private IP.
Being in a public subnet doesn’t mean every conversation has to happen on the internet.
Part 3: Security Groups
Routing tells AWS:
Where should this packet go?
Security Groups ask:
Fine. But should I actually let it into this EC2 instance?
For this project I needed rules for:
- HTTP
- SSH
- ICMP
When I started testing with ping, my Security Groups needed to permit ICMP traffic.
One mistake I made during troubleshooting was thinking: 0.0.0.0/0 was the obvious source to use.
It works. But for a VPC peering test, it is unnecessarily broad. If I’m testing an EC2 instance in VPC 2 from VPC 1, I can allow ICMP from:
10.1.0.0/16And in the other direction:
10.2.0.0/16That makes the intent of the rule much clearer.
I’m saying: “Let my peered VPC ping this server.”
Instead of: “Everybody on IPv4, come say hi.”
0.0.0.0/0 fixes many networking problems.
In roughly the same way removing your front door fixes problems with forgetting your keys. 🙃
Part 4: Network ACLs
Then I introduced another security layer, Network Access Control Lists, or NACLs.
Security Groups and NACLs both filter traffic, but they don’t behave the same way.
Security Groups apply to network interfaces attached to resources such as EC2 instances.
NACLs operate at the subnet boundary.
NACLs Belong to a VPC
At first I thought I couldn’t have one NACL for my public subnets and another for my private subnets. I actually can.
A Network ACL belongs to a single VPC, and one NACL can be associated with multiple subnets within that VPC.
For example:
VPC 1

Public NACL
└── Public Subnet

Private NACL
└── Private Subnet
What I can’t do is create a NACL inside VPC 1 and attach it to a subnet in VPC 2.
Also:
- One NACL can be associated with multiple subnets.
- Each subnet can only be associated with one NACL at a time.
Custom NACLs Start Very Unfriendly
A newly created custom NACL denies traffic that isn’t explicitly allowed by a rule.
Which led me through roughly this workflow:
Create NACL
↓
Associate subnet
↓
Lose connectivity
↓
Confusion
↓
Remember that I created the NACL
AWS networking is sometimes just solving crimes where you’re also the suspect.
Security Groups Remember. NACLs Don’t.
This is probably my favorite distinction: Security Groups are stateful.
If they allow an incoming connection, response traffic for that established connection is automatically allowed.
NACLs are stateless. Inbound and outbound traffic are evaluated separately.
Think of a Security Group as a watchman who remembers you:
Oh, you’re the person I just allowed in. You can leave.
A NACL is a watchman who forgets your face before you’ve even reached the gate:
Inbound packet: “I was literally just here.”
NACL: “Never seen this man in my life.”

That stateless behavior became particularly important when I tested SSH. Allowing TCP port 22 inbound doesn’t automatically guarantee that SSH will work.
The connection enters using: TCP 22 but the response traffic has to be permitted through the appropriate outbound ephemeral port range. For general testing, that may mean allowing a high TCP range such as: 1024-65535 depending on the operating systems and clients involved.
This explained one of the weirdest things I saw during the project: SSH suddenly worked when I temporarily allowed all traffic through the NACL.
I hadn’t actually fixed the rule. I had bulldozed the gate.
Part 5: EC2 Instance Connect
Next I wanted to SSH into my EC2 instances.
I hadn’t configured traditional long-lived SSH key pairs during launch, so I explored EC2 Instance Connect.
An important correction to my original understanding: EC2 Instance Connect doesn’t simply “manage key pairs for you.” Instead, it provides a way to push a temporary SSH public key to a supported instance when you initiate a connection.
That reduces the need to permanently provision the same SSH public key on the instance beforehand.
Troubleshooting EC2 Instance Connect
My first attempt did not exactly go according to plan.
Initially, I was troubleshooting things like:
- Security Group rules
- Public IP addressing
- SSH access
- EC2 Instance Connect configuration
The important distinction I eventually understood was that EC2 Instance Connect and EC2 Instance Connect Endpoint solve related but different problems.
EC2 Instance Connect vs EC2 Instance Connect Endpoint
With direct EC2 Instance Connect over public networking, the instance still needs the required networking configuration to be reachable. That’s where public addressing can matter.
For example, one troubleshooting path I explored involved public IP addressing and Elastic IPs:
But giving a private EC2 instance an Elastic IP just so I can SSH into it isn’t the architecture I actually want. For my private instances, the better solution was an EC2 Instance Connect Endpoint
An EC2 Instance Connect Endpoint lets me connect to an EC2 instance using its private IP address. That means my private EC2 instances don’t need:
- Public IPv4 addresses
- Elastic IP addresses
- Direct internet connectivity just for SSH access
Setting Up My Instance Connect Endpoints
I created EC2 Instance Connect Endpoints in the VPCs where I needed access to private instances. I then configured the endpoint and EC2 Security Groups appropriately.
A clean pattern looks something like this:
EC2 Instance Connect Endpoint SG

Outbound:
TCP 22 → EC2 Security Group
And on the target EC2:
EC2 Security Group

Inbound:
TCP 22 ← Instance Connect Endpoint Security Group
This gives me much more deliberate SSH access than simply opening:
TCP 22 ← 0.0.0.0/0The endpoint becomes a controlled doorway for administrative access.
Part 6: Testing VPC Peering
Finally, it was time to determine whether all this infrastructure actually worked. From an EC2 instance in VPC 1, I pinged an EC2 instance in VPC 2 using its private IP address:
ping 10.2.10.113Then I tested in the opposite direction:
ping 10.1.13.230Using the private IP addresses was important. That’s how I could confirm I was testing private network connectivity rather than accidentally reaching an instance over a public internet path.
A successful ping is basically:
EC2 1:
Anybody there?

EC2 2:
Unfortunately, yes.
Troubleshooting My Ping Issues
Of course, it didn’t work immediately. Where would the learning be in that?

When my ping failed, I started checking:
- VPC Peering connection
- Route tables
- Security Groups
- Network ACLs
- Subnets
- EC2 configuration
At one point, I discovered my ICMP Security Group configuration wasn’t allowing the traffic I expected from the peer VPC.
Instead of broadly opening it to:
0.0.0.0/0I could explicitly permit ICMP from the peer VPC CIDR.
Once the routing and security rules aligned, the instances were finally able to communicate.
Troubleshooting VPC peering ping
My New Networking Troubleshooting Checklist
One thing I really liked about this project was that it gave me a much clearer troubleshooting process.
Instead of treating “AWS networking” as one giant mysterious thing, I can follow the packet.
Where is the packet trying to go?
            │
            ▼
       Route Table
            │
            ▼
      VPC Peering
            │
            ▼
       Network ACL
            │
            ▼
      Security Group
            │
            ▼
          EC2
Each layer answers a different question.
The route table:
Do I know where to send this?
The peering connection:
Is there a network path between these VPCs?
The NACL:
Can this traffic cross this subnet boundary?
The Security Group:
Can this traffic reach this resource?
And the EC2 instance:
Is anything actually listening or responding?
Networking is basically several bouncers standing behind each other asking to see the same ID.
VPC Peering Doesn’t Merge the Networks
Another important thing I learned is that VPC Peering connects two VPCs.
It does not merge them.
Each VPC still maintains its own:
- CIDR range
- Subnets
- Route tables
- Internet Gateway
- Network ACLs
- Security Groups
Peering simply gives you a private path between the networks.
You still decide which subnets use that path and which traffic is permitted across it.
What Happens When You Add More VPCs?
Initially, I thought VPC Peering was only useful for around five VPCs.
That’s not really the rule.
The actual architectural issue is that VPC Peering is non-transitive.
Suppose I have:
VPC A ←→ VPC B ←→ VPC CVPC A does not automatically gain access to VPC C just because they both have a relationship with VPC B.
If A needs to communicate directly with C, I’d need another peering connection:
VPC A ←→ VPC CAs the number of VPCs increases, managing all those individual relationships and route-table entries can start becoming messy.

Enter AWS Transit Gateway
This is where AWS Transit Gateway can become useful.
Instead of individually connecting every VPC to every other VPC, multiple VPCs can attach to a central Transit Gateway.
Conceptually:
           VPC A
             │
             │
VPC B ── Transit Gateway ── VPC C
             │
             │
           VPC D
Transit Gateway also provides centralized route tables that help control which attached networks can communicate.
So VPC Peering isn’t:
Only use this until you have five VPCs.
It’s more:
At what point does managing all these individual relationships stop being fun?
What I’d Do Differently
If I recreated this project specifically to demonstrate VPC Peering, I would probably simplify it.
Instead of giving equal attention to all four EC2 instances, I’d focus on something like:
┌──────────────────────┐
│ VPC 1                │
│ 10.1.0.0/16          │
│                      │
│ Private Subnet       │
│ └── Private EC2      │
└──────────┬───────────┘
           │
           │ VPC Peering
           │
┌──────────▼───────────┐
│ VPC 2                │
│ 10.2.0.0/16          │
│                      │
│ Private Subnet       │
│ └── Private EC2      │
└──────────────────────┘
That makes the core lesson incredibly clear:
Two isolated AWS networks communicating directly through private IP addresses.
The public EC2 instances weren’t pointless, though.
They helped me understand:
- Internet Gateways
- Public routing
- EC2 Instance Connect
- Security Groups
- NACLs
- Public vs private connectivity
So naturally I built twice as much infrastructure to understand one concept.
As one does.
What I Learned
The biggest lesson from this project was that creating the actual VPC peering connection is probably the easiest part.
For traffic to successfully make the journey, several things have to agree:
VPC Peering
     ↓
Route Tables
     ↓
Network ACLs
     ↓
Security Groups
     ↓
EC2
If one of those layers disagrees, your packet is staying home.
This project gave me hands-on experience with:
- Amazon VPC
- CIDR blocks
- Public and private subnets
- Route tables
- Internet Gateways
- VPC Peering
- EC2
- Security Groups
- Network ACLs
- EC2 Instance Connect
- EC2 Instance Connect Endpoint
- ICMP
- SSH
- Stateful vs stateless network filtering
And, perhaps more importantly, I now have a much better idea of where to look when something doesn’t work.
Final Thoughts
This project took me roughly four hours.
Most of those four hours were not spent clicking “Create Peering Connection”.
They were spent figuring out why something that looked perfectly reasonable in one AWS screen was being blocked by something three menus away. Which is probably the more valuable part of learning AWS networking.
There are approximately seventeen other places where I may have personally ruined everything.
And now I know where to look. 🎉
Happy networking. 🫶🏾
Have a project or engineering opportunity in mind? Get in touch with Sonia.