
A majority of the applications on the internet need to pull data from somewhere on the internet. For example, an API, CMS or directly from the database.
This will be a beginner guide walking you through setting up REST APIs. We’ll cover terminologies and dive into setting up an API from scratch. However, we won’t be covering databases in this tutorial, we’ll be using in-memory data instead.
This is a simple guide for all you beginners out there. I’m going to walk you through setting up a REST API. We’ll get the terminologies out of the way and dive into setting up our server from scratch.

A RUNDOWN ON JARGON
API (Application Programming Interface) is a set of features and rules that exist inside a software program enabling interaction between the software and other items, such as other software or hardware.
REST (REpresentational State Transfer) is a group of software architecture design constraints that bring about efficient, reliable, and scalable systems. The client makes a request to the server, which returns a response over the HTTP protocol. Morten Rand-Hendriksen put it this way in his course:
REST isn’t a specific technology, but rather a data architecture and design methodology that produces predictable and consistent outputs and behaviors by receiving a set of standard methods called verbs - like the CRUD operations - and returning standardized structured data, typically JSON, HTML or XML, called the resource.
As you’ll see later on, Express uses the client-server architecture and every function created for making API requests accepts two parameters - req and res . req object contains information about the HTTP request that raised an event. res object is the desired HTTP response that an Express app sends back when it gets an HTTP request. It’s a convention to either name them req and res or request and response for readability.
HTTP is what’s responsible for communication between the web server and client. Anytime you visit a web page or submit a form or click a button that sends a fetch request - you’re using HTTP to send requests and receive responses.
CRUD is an acronym for Create, Read, Update and Delete. These operations are sent to the server for execution.
SETTING-UP SERVER
Let’s get our hands dirty.
Create a folder called Product-Rest-Api. The name for your project is not cast in stone that it should be Product-Rest-Api. You can give your project your favorite name, make it a memorable one! (This is probably the hardest part of being a developer, it’s a fact, ask other software developers too).
mkdir Product-Rest-Api
cd Product-Rest-Api
Initialize your app:
npm init -yThe -y flag that’s been used is a shortcut to skip all questions. However, you can still run npm init and learn the other options that are available. A package.json file and node_modules folder will be created with details of your project either way.
Install Express Framework.
npm install --save expressCreate a new file within Product-Rest-Api folder called server.js. Your server code will live here.
touch server.jsCreate a local server with the following code:
const express = require("express"); //1

const app = express(); //2

app.use(express.json()); //3

app.listen(8080, () => {
  console.log(`Server is running smoothly on port 8080.`);
}); //4- Import Express.
- Initializes the Express server and sets it to a variable
app. Don’t forget that this is how you execute a function, by adding the parenthesisrememberThis(). - Parsing JSON bodies because Express can’t handle data sent via
POSTrequest as JSON. - Setting your server to listen to requests on http://localhost:8080/.
In order to avoid restarting your server every time you make a change in your codebase, install nodemon. This command will globally install it:
npm install -g nodemonAlternatively, you can install it as a development dependency:
npm install --save-dev nodemonNodemon will automatically restart your server when any changes are made.
You’ll be working with a list of dummy data to test our app. Paste the following immediately above app.listen (4).
/*Dummy data for testing*/
let data = [
  {
    id: 1,
    name: "iPhone 12 Pro",
    description:
      "A14 Bionic. All-new design. Ceramic Shield. LiDAR Scanner. A Pro camera system optimized for low light.",
  },
  {
    id: 2,
    name: "Galaxy S21 Ultra 5G",
    description:
      "It reaches faster 5G speeds with our industry-leading chipset, all while creating a revolution in photography.",
  },
  {
    id: 3,
    name: "Nokia 8.3 5G",
    description: "Shoot pro videos, share with 5G.",
  },
  {
    id: 4,
    name: "Tecno Camon16 Premier",
    description:
      "The pioneer camera phone won multiple world-class awards and international media honor.",
  },
];
ACCESSING THE API
You can test your API using one of the following tools:
- REST Client Visual Studio Code extension
- REST Client like: Postman or Insomnia
- Curl from the command line
This tutorial will use Postman for testing.
I. Sending GET request
You’ll be sending a get request for your dummy data. Just copy paste the code below:
/* Get request */
const getProducts = (req, res) => {
  console.log(`GET request made`); //optional
  try {
    res.json({
      message: "OK",
      data,
    });
  } catch {
    res.json({
      message: "Ooops! Something went wrong 😧",
    });
  }
};

app.get("/", getProducts);
getProducts function, as the name suggests, fetches all the products.
- It logs out ‘GET request made’ then sends a JSON response inside a try-catch statement. If the request runs smoothly, it’ll return an ‘OK’ message and your dummy data. Otherwise, an error message is returned.
app.get()also takes in two parameters, a route path and function to call when the client requests a path. This is equivalent to the client saying, “Hey server, listen for requests on the/route and call thegetProductsfunction if a request is made.”
We can now head over to Postman.
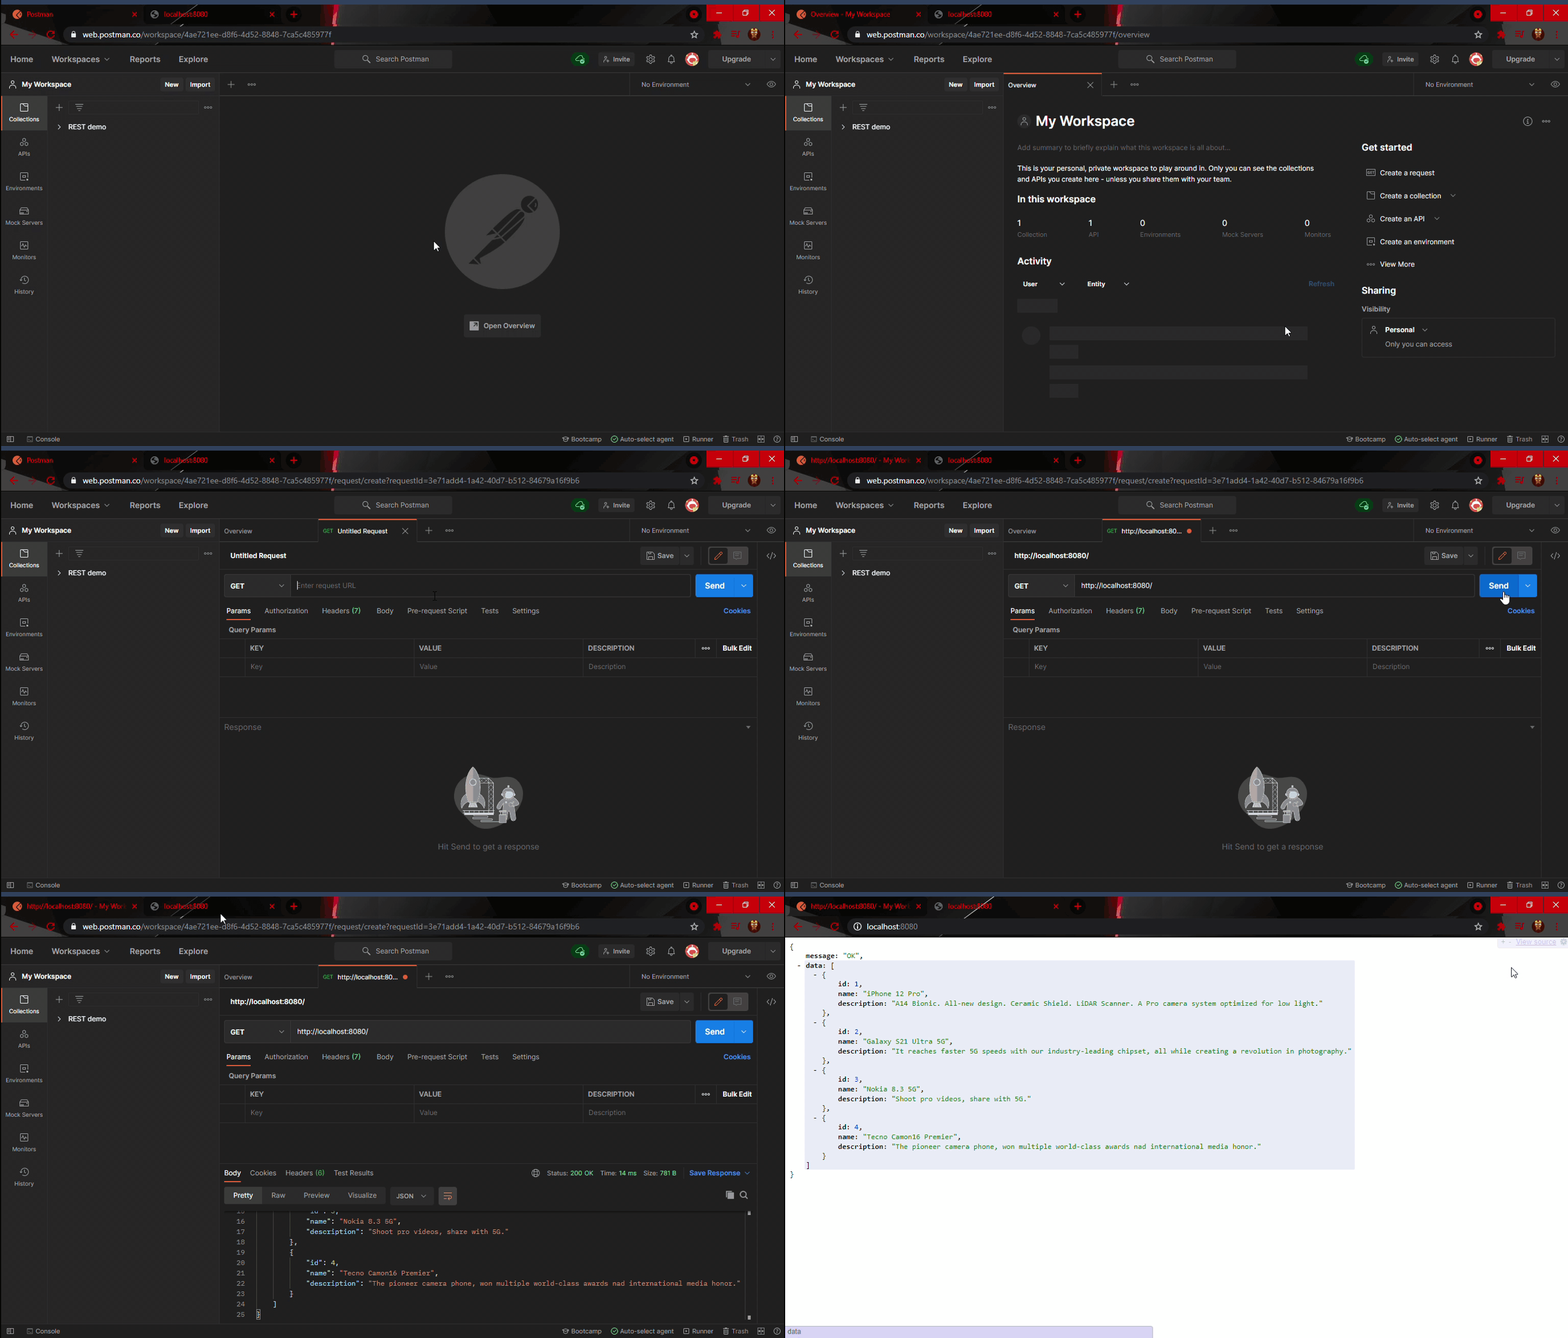
Alternatively, you can just open http://localhost:8080/ on your browser.
II. Making POST request
Let me walk you through the code before you copy-paste it.
/* Post request */
const postProduct = (req, res) => {
  console.log(`POST request made`); //optional

  /* destructuring from the req.body object */
  const { name, description } = req.body;

  const newProduct = {
    id: data.length + 1,
    name,
    description,
  };

  try {
    data.push(newProduct);
    res.json({
      message: `New Product: ${newProduct.name} added!`,
      data: newProduct,
    });
  } catch {
    res.json({
      message: "Oooops! Something wrong happened here",
    });
  }
};

app.post("/product", postProduct);- You’re requesting a new object to be added into our dummy data. Our
postProductfunction accepts two parameters:resandreqthen logs out a statement. - You’ve destructured
req.bodyobject and then creatednewProductobject to carry the new product fromreq.bodywhich contains its id, name and description. - The function pushes our new product into the existing dummy data. It then sends a JSON response with a message and data containing the new product that was added. If it fails, an error message is returned.
Here is some data you can use to test out your new endpoint:
{
  "name": "Google Pixel 5",
  "description": "The Ultimate 5G Google phone."
}
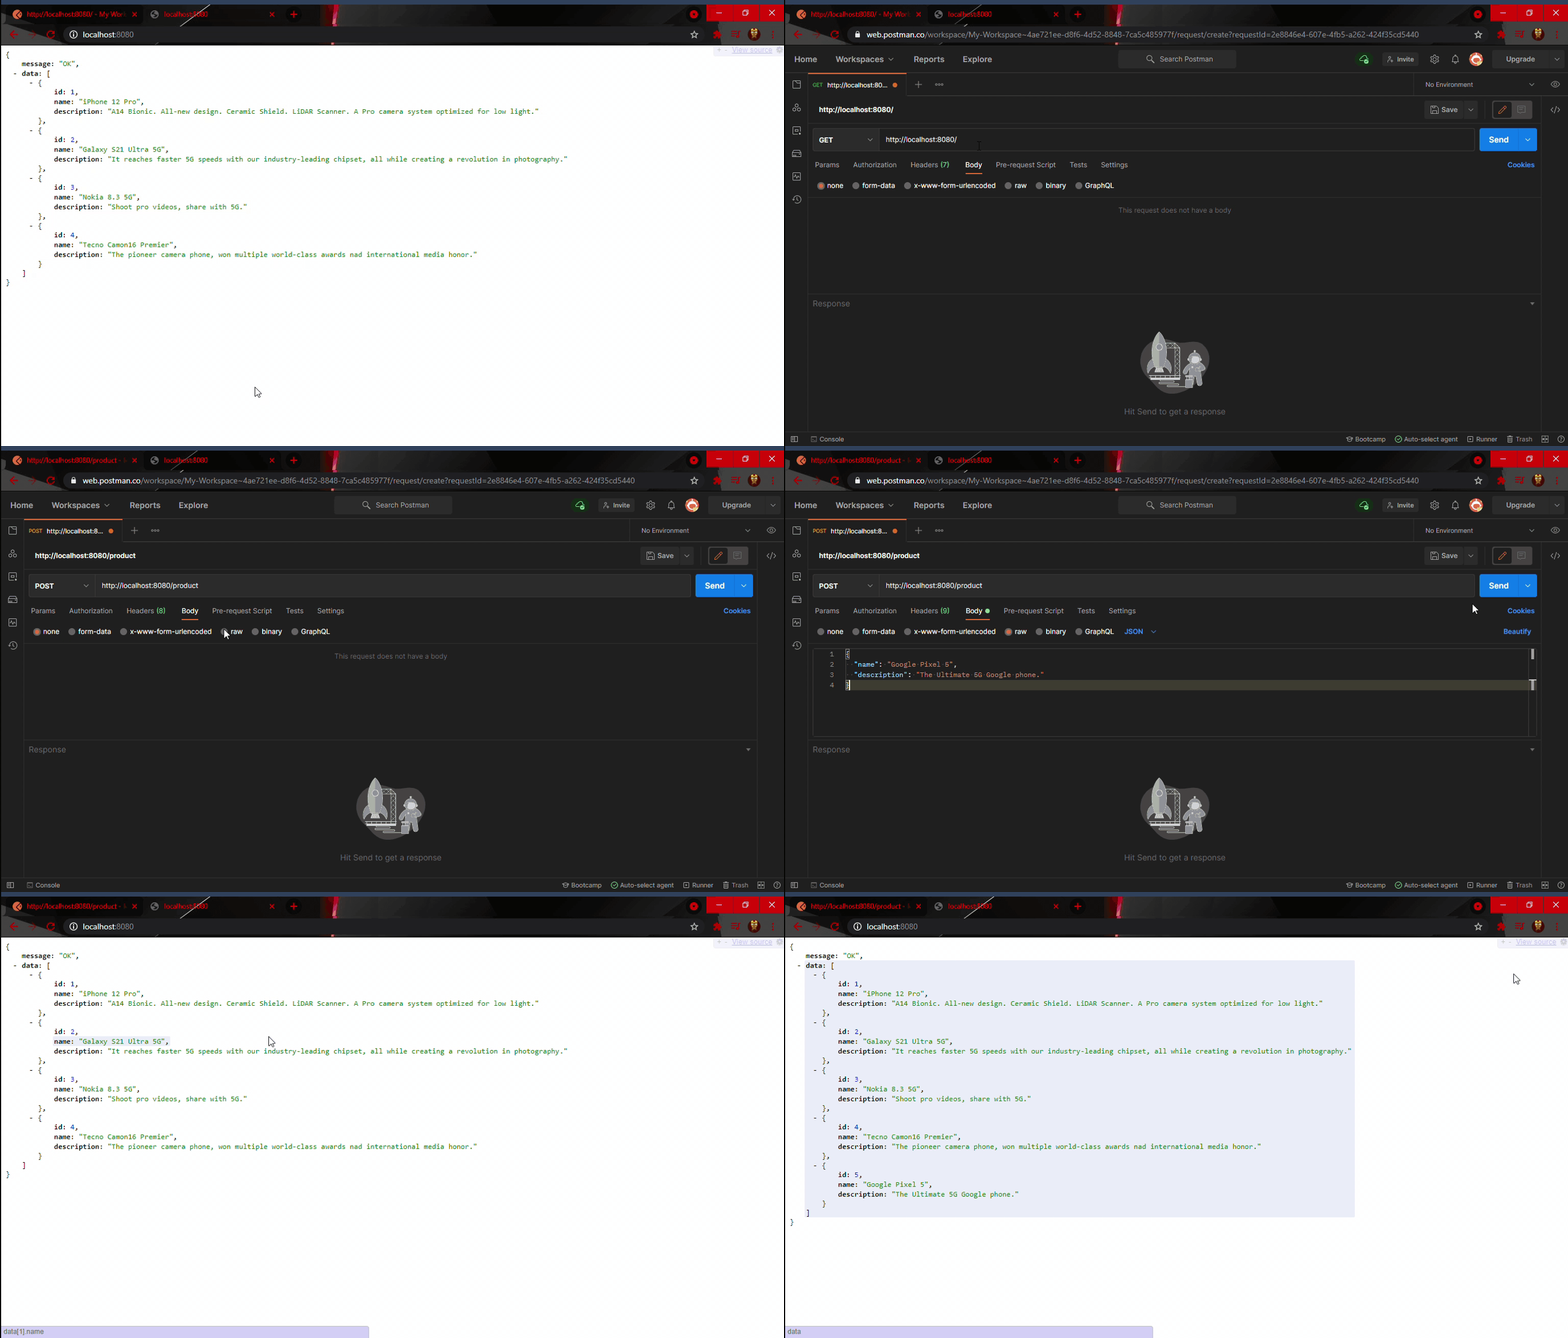
Copy-paste the JSON above to postman. Make sure you’ve added the /product route to the URL and selected the POST option. Click on Body and select JSON on the blue drop-down menu. Paste the JSON you want to add inside the body (making a request in the body). Hit that Send button and watch the magic happen.
III. Update with PUT request
Data is updated using PUT.
/* Update request */
const updateData = (req, res) => {
  console.log("Update successfully made!");
  const { name, description } = req.body;
  const { id } = req.params;

  try {
    let update = data.filter((product) => {
      if (product.id === Number(id)) {
        product.name = name;
        product.description = description;
        return product;
      }
    });
    res.send(update);
  } catch {
    res.json({
      message: "Oops! Something went wrong 🤪",
    });
  }
};
app.put("/product/:id", updateData);updateDatasearches for product by id and updates the existing data.- Data is retrieved from
req.paramsobject and casted to an integer because it’s a string. Product name and description are retrieved fromreq.body.
{
  "id": 1,
  "name": "Motorolla one 5G",
  "description": "Get the features you need for the life you lead."
}
You then get a response with a message and the updated data. For now, you’re going to change the object with id: 1, from “iPhone Pro” to “Motorolla”.
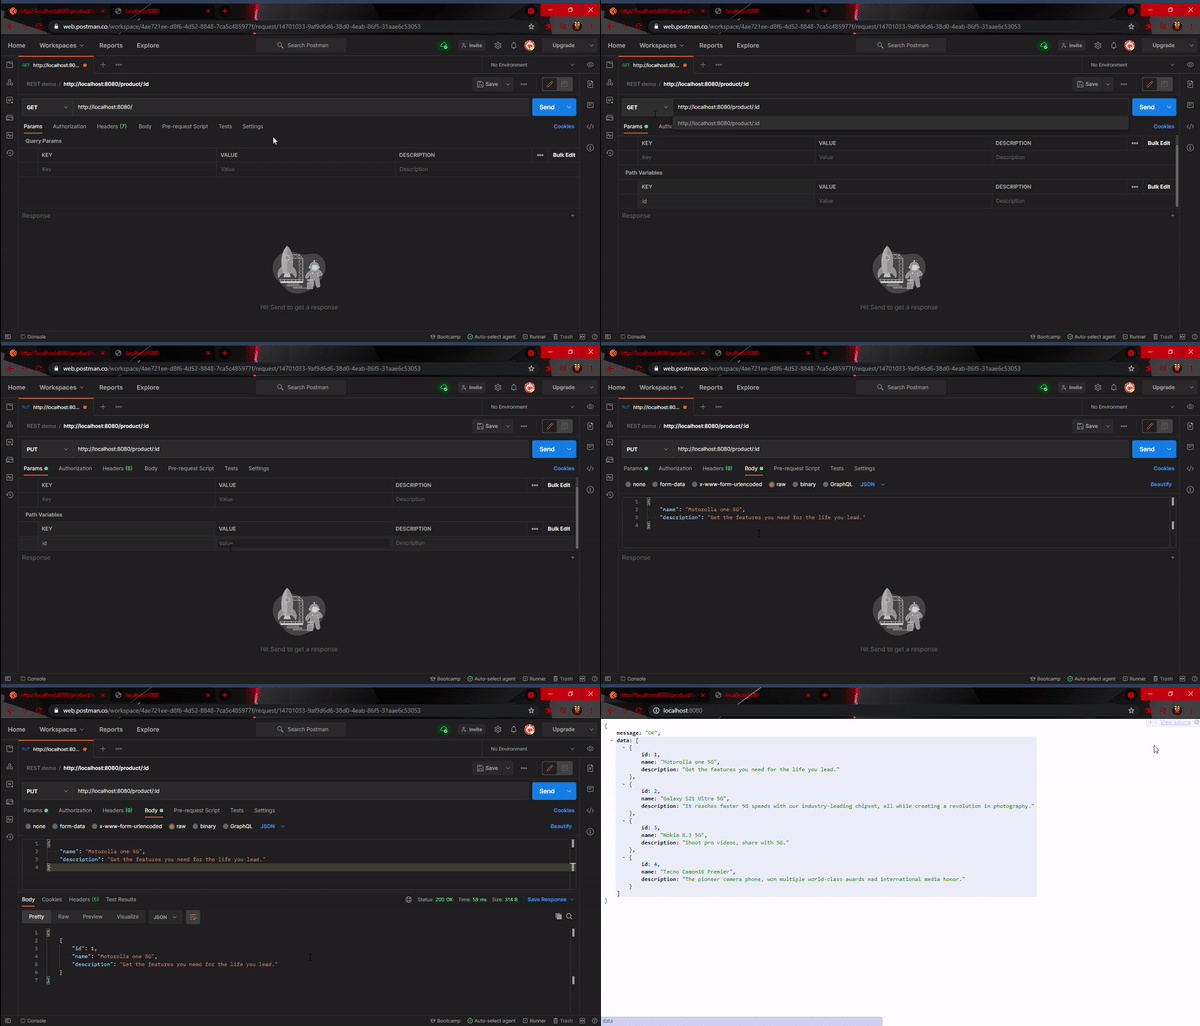
Just a side note - the log statements in our code only help ensure that the function is well, functional…get it? Ok, dry jokes aside, let’s head over to Postman. Don’t forget to select PUT and add /product/:id route to the URL.
IV. Finally, DELETE Request
Delete comes easily once you’ve understood the previous requests.
/* Delete request */
const deleteProduct = (req, res) => {
  console.log("DELETE request successful!");
  const { id } = req.params;

  try {
    const product = data.filter((product) => {
      return product.id === Number(id);
    });

    const index = data.indexOf(product[0]);

    data.splice(index, 1);
    res.json({
      message: `Product: ${id} has been deleted successfully!`,
      data,
    });
  } catch {
    res.json({
      message: "Oops! Something went wrong 😤",
    });
  }
};

app.delete("/product:id", deleteProduct);- The
deleteProductfunction operates the same as the other functions. However, you’ve filtered through your products to find one that matches with the same id as that onreq.params. - The matching object was then spliced from the data list. If all runs well, a message and the new data list will be sent.
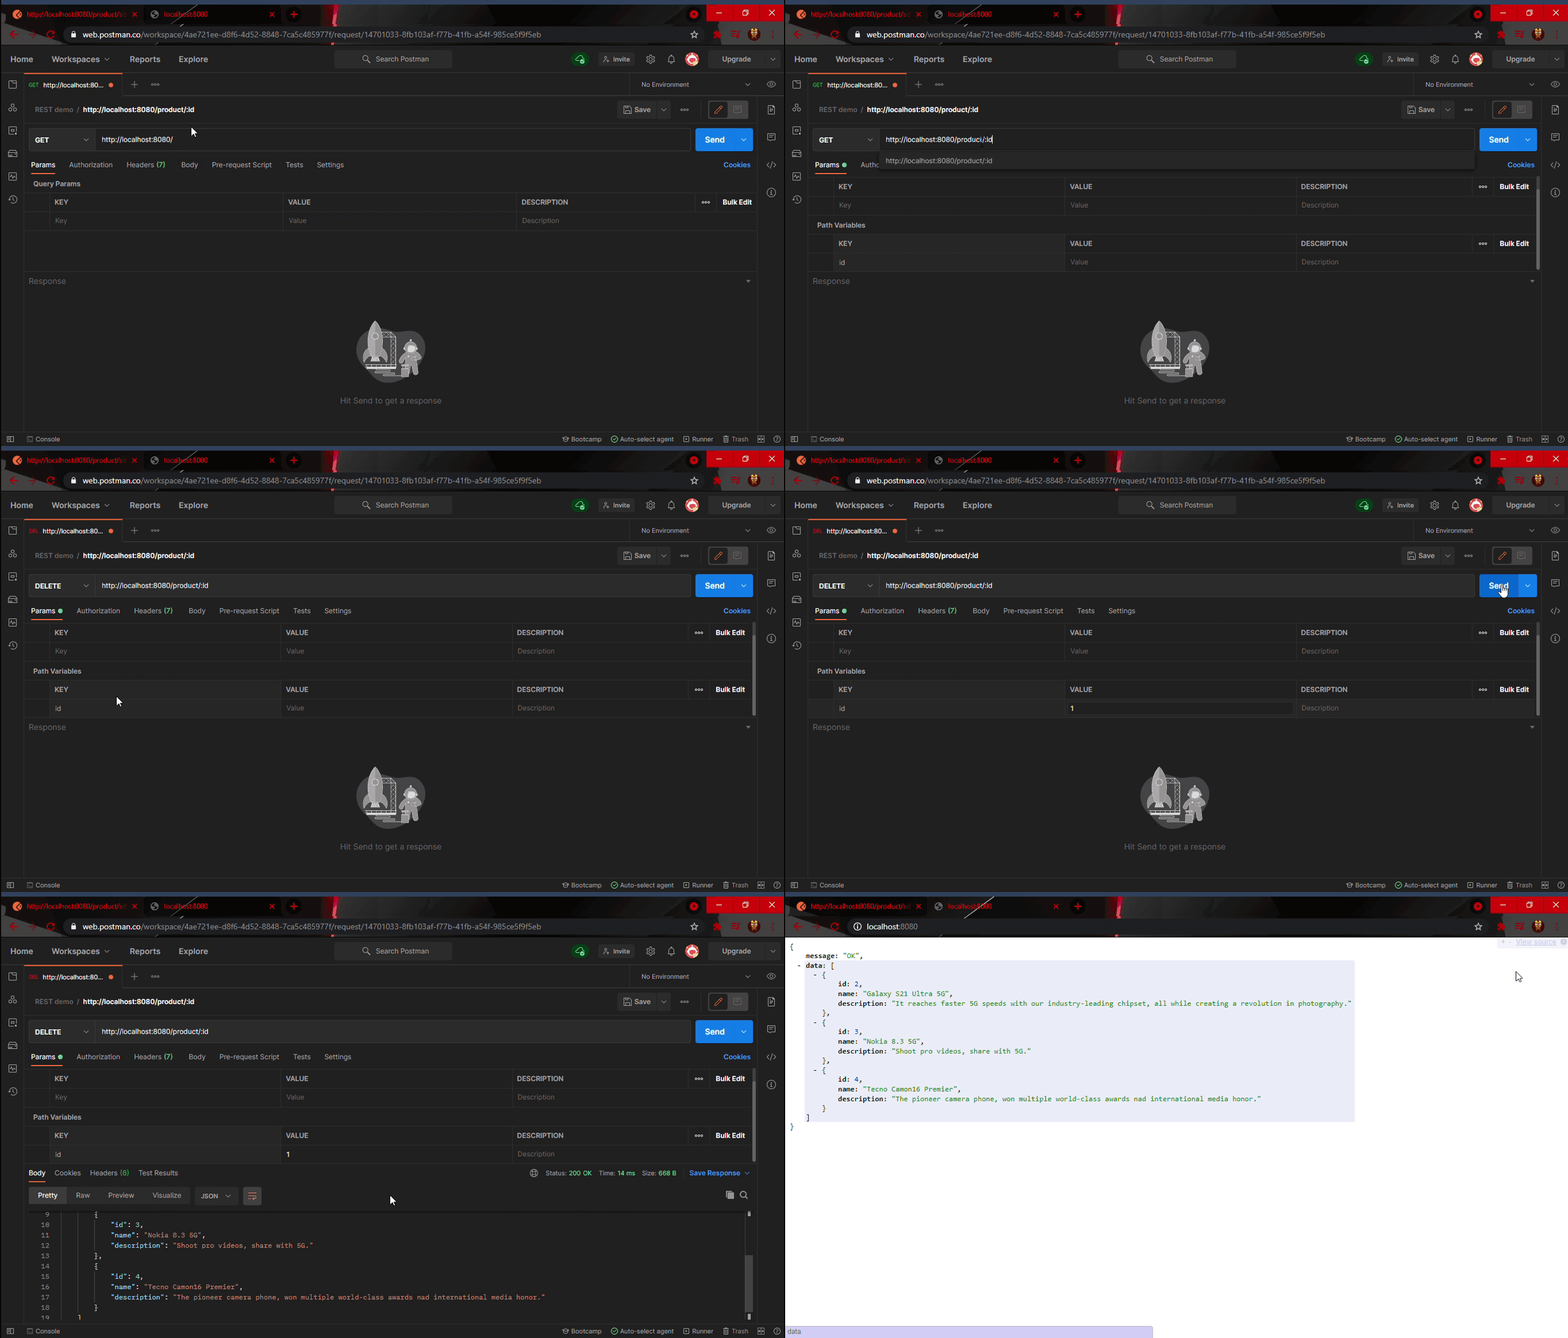
- We’ll be searching for product id: 1 (iPhone 12 Pro), then delete it because it’s about time Android completely takes over.
{
	"id": "1"
  "name": "iPhone 12 Pro",
  "description":"A14 Bionic. All-new design. Ceramic Shield. LiDAR Scanner. A Pro camera system optimized for low light."
}
The code is available on Github.
CONCLUSION
This article does not completely exhausted how REST APIs work, but it’ll help you get up and running. Play around with the data and make your own version. Break stuff, make stuff - that’s how you learn.
Don’t stop here, check out these resources:
Have a project or engineering opportunity in mind? Get in touch with Sonia.